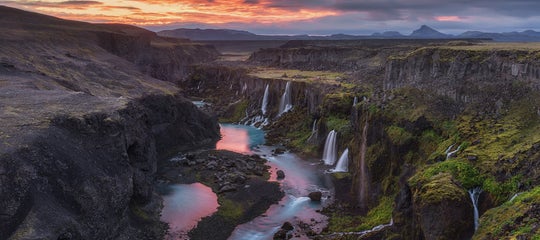
There is not much in the world of photography that can beat a blazing sunset session. That period of time during which the sun moves below the horizon is a pivotal moment of the day, signifying the transition from afternoon to evening and eventually the night.
- Discover this 2-Day Snaefellsnes Peninsula in Summer Photography Tour
- Find out 5 Key Reasons to Use a Wide Angle Lens in Iceland
- Check out this Ultimate Guide to Sunrise Photography
After a brilliant finale, the buzz of life gradually slows down and our surroundings take on a certain calmness and tranquility. This is a mood that a lot of photographers chase and is a familiar feeling that is able to be communicated to the audience when sunset photography is done effectively.
Although capturing the vibrance and beauty of the atmospheric effects of sunset can be difficult, all you need is a little patience and practice to master the technique. In this guide, you’ll learn about the benefits of photography at sunset, the equipment that you’ll need, how to plan your sunset shoot, what settings to use as well as a few tips to get you started photographing sunsets wherever you are in the world so that you can produce a stunning range of images.
Why Photograph Sunset Instead of Sunrise?
Sunrise and sunset photography both have their own sets of advantages and disadvantages, which will no doubt have an impact on how you work. Which you choose to head out for will depend a lot on your schedule and lifestyle, though there are some benefits to shooting sunset rather than sunrise.
 Whether you choose to photograph sunrises or sunsets is up to what you hope to achieve. Photo by: 'Pxhere'.
First of all, not all photographers are morning people. Even when you have set your alarm to wake up early, how often have you slept through it or chosen to ignore the tone and continued on with sleeping?
One of the main advantages of choosing to shoot at sunset is that you won’t have to get up early. You also won’t have to deal with the rush that is involved in getting ready to shoot the sunrise, as you will have had all morning to prepare. By the time that the afternoon rolls around, you’ll hopefully be more motivated to pick up your camera and head out to shoot.
Another advantage of shooting sunset instead of sunrise is being able to relax as you make your way to your destination. Provided that you get there well ahead sunset, you’ll also have more time in which to work which means that you can slow down, be more thoughtful as you analyse the scene and explore the surroundings for compositions without being a hurry.
 Sunsets give you more time to work so you won't have to be in a rush! Photo by: 'Pxhere'.
At the beginning of the day, the air is clearer than it is in the afternoon. Human activity builds as the day progresses, resulting in many more particles circulating through the atmosphere. These pollutants increase the haze in the sky and behave like a giant diffuser, softening the light of the sun.
As a result, photographs taken in the golden hour before sunset and during sunset will often appear to have more harmonious shadows and highlights, while taking on a warmer glow due to the direction of the light as the sun gets lower on the horizon. Meanwhile, the change in colour temperature from warm to cooler during sunset and in the blue hour afterwards as the sun moves below the horizon can provide spectacular opportunities to capture different moods within the scene. This is when the skies are often at their most dramatic and may result in a plethora of absolutely gorgeous images.
 Sunset photography is also about capturing the magical light of the golden and blue hours. Photo by: 'Pxhere'.
Of course, there are other advantages to photographing the sunset instead of sunrise, including having a better idea of how the weather conditions are progressing throughout the day. This way, you can actively monitor what is going on and change your plans accordingly as you chase the sunset light.
Finally, if you’ve been observing the sun during your waking hours, it can often be easier to visualise how it will shift as it sets rather than when it rises first thing in the morning. This is particularly helpful when scouting for compositions.
- See also: Interview with Peter Coskun
How to Capture Stunning Sunset Shots
Sunset photography isn’t always as straightforward as it may seem. Before you head out, make sure that you have a good understanding of what camera gear you’ll need because once you get started, there won’t be any time to rush home to pick up essential items that you may be missing.
 Make sure you have everything that you need before you head out to shoot the sunset. Photo by: 'Pxhere'.
While knowing how to use your camera to its full potential will be helpful every time, it can take a while to master your gear so it’s a good idea to read up on the theory and place it into practice by experimenting with the settings before you head out for your sunset shoot.
Getting to the point where you can capture stunning sunset shots requires careful planning and a basic understanding of techniques and tricks that you can utilise in-field to improve your photography. So without further ado, let’s delve into how you can begin taking better sunset images.
Essential Equipment for Sunset Photography
Mid Range Zoom Lens
A mid range zoom lens is an important tool to have in your arsenal for sunset photography. It offers a lot of versatility in terms of focal length, enabling you to cover a range of genres from portrait photography through to weddings, street, wildlife and cityscapes. This will maximise your ability to capture a wide array of sunset images.
 Mid range zoom lenses are very versatile for sunset photography. Photo by: 'Pixabay'.
Wide Angle Lens
A wide angle lens is perfect for sunset photography, particularly if the aim of your game is to photograph sprawling landscapes. These lenses have a large field of view, meaning that you’ll be able to fit more of the sky into your frame.
 Wide angle lenses allow you to fit more of the landscape into your shots. Photo by: 'Pixabay'.
Wide angle lenses are also affected by barrel distortion, which can be a great means of expanding your creativity in-field. By getting close to your subjects and tilting upwards or downwards, you’ll be able to exaggerate the proportions of things – a technique which may be used to accentuate the amplitude of the sky or to place the emphasis on foreground elements. This can add another level of interest to a sunset image, allowing you to draw the viewer’s eye into the frame and to keep their focus.
Tripod
While there may be a lot of light when you first head out for your sunset shoot, it will eventually fade and become darker as the afternoon wears on into the evening. You’ll likely end up shooting in fairly low-light conditions once the sun begins to dip below the horizon so you can either increase your ISO (which may result in more noise) if shooting handheld or mount your camera to a tripod. The latter will enable you to shoot with lower ISO ranges, meaning sharper and higher quality images while reducing the risk of blur that may result from camera shake.
 A tripod will allow you to shoot with lower ISO ranges. Photo by: 'Pixabay'.
Graduated Neutral Density Filters
Given the wide dynamic range of light when shooting at sunset, it can be difficult to balance the exposure between the foreground and the sky. To make things easier, invest in a good set of graduated neutral density filters (GND) and keep them in your camera bag whenever you head out for a sunset photography session.
 Graduated neutral density filters help you to balance the sky and the foreground exposure. Photo by: 'Pixabay'.
GND filters are designed to help you achieve a well-balanced exposure. Usually, a 3 or 4-stop soft edge GND will serve you well on their own or stacked together to further reduce the light in the scene. As the sunlight gradually fades, you’ll be able to remove the filters one at a time, until it is dark enough to shoot without any filters attached at all.
Flash
An off-camera flash is a great piece of equipment to have in your kit for beautiful sunset portrait or wedding photography. It’s useful for adding a bit of fill light to reduce shadows and contrasts on people’s faces, making them pop out from the environment around them. Adding a reflector can also help you to achieve better illumination of your subjects.
Headlamp
The thing about shooting sunset is that you’ll inevitably end up trying to make your way back from your photography location in the dark, so be sure to pack a headlamp or some other form of light, unless you’re keen on falling over with all of your camera gear.
Warm Clothing
While shooting sunrise may result in the shedding of clothing as the warmth of the air increases, you’ll more than likely end up getting very cold when the sun begins to set, taking its warm rays with it down below the horizon. As such, bring along some extra pieces of warm clothing such as gloves, a jacket, beanie or a scarf so that you won’t end up leaving your shoot early when the temperature drops.
Best Settings for Sunset Photography
Once you have your equipment in order, it’s time to take a look at your camera settings. While you’ll be adjusting the majority of your settings in-field as the light changes, there are a few things that you can dial in ahead of time to make things a bit easier when you’re finally out in-field.
 Your camera settings will change as the light dims through the sunset. Photo by: 'Pixabay'.
RAW vs JPEG
If you’re the type of person who really doesn’t like to edit their photos, then set your camera to record in JPEG format. This means that your camera will apply adjustments such as contrast, saturation and white balance on your behalf, producing an image straight out of camera that is ready to be shared to your social media or with family and friends. The only downside of this is that the image will have some level of compression applied, meaning that it will be of lower quality and not exactly suitable for high-resolution printing.
 Shooting in RAW is better for maintaining quality and so you can make fine edits later on. Photo by: 'Pixabay'.
A better way to go is to set your camera to record in RAW format. This means that your camera will save all of the data within the scene, giving you complete control over any adjustments to be made using post-processing software when you get around to editing your images. The result will be an image of much higher quality that you can use to recreate exactly what you saw in-field or to express your own creative vision.
Balancing the Exposure Triangle
 It can be difficult to balance the exposure triangle correctly during sunset. Photo by: 'Pxhere'.
A large part of capturing a great sunset shot is being able to achieve a well-balanced exposure. If you’re not quite sure how to do so yet, then check out this information about what the exposure triangle is as well as how you can use these elements to produce stunning images. For the purpose of this guide, we’ll presume that you have a basic background knowledge of how the exposure triangle works, so let’s delve into the finer things about ISO, aperture and shutter speed settings which will impact your sunset photography.
ISO
When you first head out to shoot the sunset, there will be a lot of light in the environment, meaning that you’ll be able to get away with shooting handheld at lower ISO ranges. However, as the sun gets lower on the horizon and gradually sets, you’ll end up working with less and less light, meaning that you’ll need to increase the ISO if you want to achieve a brighter exposure.
 Shooting during sunset is very similar to low-light photography. Photo by: 'Pxhere'.
Of course, this becomes less of a problem when you have your camera mounted to a tripod. You’ll be able to continue shooting at your camera’s native ISO capability (usually ISO 100) well and truly after sunset, albeit with longer exposures.
Whether you choose to shoot handheld or on a tripod, the goal is to shoot at the lowest ISO that your camera and the circumstances will allow, so as to minimise the risk of noise appearing in your sunset images.
Shutter Speed
The shutter speed that you choose to use will depend a lot upon the lighting conditions and the effects that you want to achieve. To freeze the range of motion within the scene, try shooting with a faster shutter speed, such as 1/125th of a second. For dreamy, drawn out clouds or silky water, try a slower shutter speed of around 1 second to a few minutes.
 Experiment with shutter speed to freeze the motion in the scene. Photo by: 'Pixabay'.
As the conditions get darker, you’ll find that you’ll need slower shutter speeds to allow for more light to reach your camera’s sensor in order to achieve a well-balanced exposure.
Aperture
The aperture that you use for sunset photography will be determined by your subject matter and what you hope to achieve creatively. For portraits, it’s best to use a wider aperture so that you can blur the background while your subject remains in focus. Similarly, if you’ll be capturing action during the sunset – such as people playing sports on the beach – then a wider aperture such as f/1.4 combined with a faster shutter speed will help to freeze the motion while isolating your subject from the surrounding environment, making for more compelling images.
 A wide aperture will blur the background nicely for portraits during sunset. Photo by: 'Pxhere'.
On the other hand, if you’ll be shooting landscapes or seascapes, it is recommended that you use a more narrow aperture of around f/11 to f/16 to ensure better sharpness all the way from the foreground into the background. As the light gets darker, you’ll need to gradually open up the aperture to let more light in to achieve a balanced exposure.
Aperture Priority Mode
The Aperture Priority function of your camera allows you to set your desired aperture value while your camera will automatically select a shutter speed to match. This is particularly useful for shooting as lighting conditions change rapidly while the sun is setting, so you can concentrate on getting the shot right rather than spending all of your time trying to achieve the correct shutter speed for a well-balanced exposure.
 Use Aperture Priority for ease of shooting during sunset. Photo by: 'Pxhere'.
Manual Mode
Once the sun has descended below the horizon line, it’s time to switch your camera from Aperture Priority into Manual Mode. This will enable you to have full control over the settings in low-light conditions, when your camera’s automatic light metering can often fail.
 Manual mode will give you more control over the exposure. Photo by: 'Pixabay'.
Check the Histogram
As you’re taking photos while the sun sets, you may find yourself looking at the previews on the back of the screen and wondering why they appear either too bright or too dark. The reason for this is that your eyes will be constantly adjusting for the changing light in the environment around you, so you may not perceive your LCD correctly.
 Check the histogram to ensure a well-balanced exposure. Photo by: 'Pixabay'.
Rather than deleting images that don’t appear to be well-exposed, check your histogram instead. This is a tool which will give you a visual representation of where the tones are within your image, so you can figure out if there are any parts which may be overexposed (indicated by clipping of the highlights) or underexposed (when there is clipping of the shadows).
Planning for Sunset Photography
A lot can go into planning for a great sunset photograph, from predicting when there will be nice conditions to knowing where to go to make the most of the light when it happens. There are a number of smartphone apps and websites available that will make your life a lot easier when it comes to planning ahead of time, so be sure to utilise them to make the best of each sunset session!
Location
Unless you know where you want to go to shoot the sunset, it can be a good idea to start doing a bit of research online. Photography sharing websites such as 500px, Flickr and Instagram can provide a lot of inspiration in terms of possible destinations for sunset photography all around the world.
 Check social media if you need some inspiration for your next sunset shoot. Photo by: 'Pixabay'.
If you’d like to head to a destination that is a little more unique, then try using Google Maps and Google Earth to scan the topography of the land. These tools are great for locating small waterfalls, lesser known mountain peaks and even hidden valleys where you’ll be able to capture a stunning sunset without anyone around. You can even view photographs that others may have taken in certain locations on Google Earth, so that you can get a feel for how things may look when you go out there for yourself.
After you’ve identified a location, the next step is to scout the area for your photo shoot. This involves making a visit ahead of time, so that you can explore for the best angles, possible compositions and even get an idea for foreground elements or interesting backdrops. Once the sunset begins, the light will change rapidly and you’ll have very little time to come up with the perfect frame. Familiarising yourself with the area will also give you the added benefit of knowing how long it will take you to get there, keeping in mind that sunset occurs at the end of the day when most people are trying to get home from work!
Weather
As soon as you have a location in mind, it’s time to start monitoring the conditions so that you can figure out when the best time will be to head out for your sunset shoot. For the most accurate forecasts, download a weather app that is local to your destination and observe how the conditions change throughout the day.
 You'll need clouds at sunset to catch the light. Photo by: 'Pixabay'.
For beautiful sunset photos, it’s best to have a little bit of cloud in the sky to catch the light. In fact, clouds are one of the best indicators that you can use to predict a dramatic sunset. Keep an eye out for medium to high level clouds, which are perfect for sunset photography. If there are any large, low level clouds near or on the horizon, then you may be better off staying at home as they’ll obscure the sun and prevent the light from spreading across the sky.
Another thing to look at in terms of the weather is the amount of humidity in the air. This can have a large effect on the vibrancy of sunset colours in the sky. Lower humidity will result in more vivid and colourful sunsets, while higher humidity may lead to the colours appearing to be washed out.
Direction of the Sun
We all know that the sun rises in the east and sets in the west. While this is already helpful information, it can be even more useful to know exactly where the sun will be at certain times of the day in relation to the location where you’ll be shooting.
 The direction of the sun can have a large impact on your sunset shoot. Photo by: 'Pxhere'.
This is where the website SunCalc comes in handy. SunCalc shows you the movement of the sun as well as the sunlight phase for wherever you want to shoot on any particular day of your choosing. This means that you can plan sunset sessions well ahead of time, simply by setting a date and time for the future. SunCalc is also available as an app for smartphones, so you can take it with you wherever you go.
An even more powerful app to use is PhotoPills, which comes jam-packed with features not just for sunset photography but also for moon and Milky Way photography. It comes with a brilliant augmented reality feature, which allows you to view where the sun is and the trajectory that it will take throughout the rest of the day. You’ll be able to see exactly when and where the sun will set, as well as when the magical golden and blue hours will take effect. In addition to helping you to plan your sunset shoots, you’ll be able to save the information so that you can look back on it later and even share it with your friends.
The Photographer’s Ephemeris is another great app for planning your sunset shoots. While it is very similar to PhotoPills, it does have a nifty 3D feature which will enable you to see how the light falls upon the environment where you will be shooting, including mountains, valleys and even city structures. This makes it very valuable for planning and capturing sunset images, particularly if you don’t have enough time to scout the location physically beforehand. While it won’t help you entirely in terms of finding interesting foreground elements, it is a wonderful tool to assist with pre-visualisation.
- See also: How to Take Great Photos in Bad Weather
Sunset Photography Tips
Now that we’ve gone over all of the nitty gritty about sunset photography, it’s time to take a look at our top tips to help you achieve successful sunset images.
Tip #1. Clean the Lens and Filters
 Clean your filters and lenses to reduce lens flare. Photo by: 'Pixabay'.
One of the most important things to remember when practicing sunset photography is to do it with a clean lens and filters, so make sure to keep a microfibre cloth or lens wipes in your bag specifically for this purpose. Dust spots and smudges tend to stand out against a bright sunset. In addition, they can catch the light of the sun, causing ugly lens flares which may be impossible to fix later on in post-processing.
Tip #2. Shoot in HDR or Bracket
We’ve touched a bit already on the wide dynamic range associated with sunsets, which can make it difficult to obtain a well-balanced exposure. If you’re not using filters, then it’s worthwhile to switch on the high dynamic range (HDR) function or auto-bracketing feature on your camera.
 Bracketing for HDR images can be useful to manage the wide dynamic range at sunset. Photo by: 'Pixabay'.
This means that your camera will take at least 3 images – one that is automatically light metered, one that is underexposed for the highlights and one that is overexposed for the shadows. You’ll be able to combine these images using layer masks with your post-processing software in order to produce a single balanced exposure that contains all of the details within the scene.
Tip #3. Use Live View to Focus and Compose
The last thing that you want to do when your photographing the sunset is to look directly into the sun. Doing so can damage your eyes, even when you’re looking at it through your camera’s viewfinder.
 Live View is a better way to compose than looking through the viewfinder at sunset. Photo by: 'Pixabay'.
A better option is to turn on the Live View function on your camera’s LCD screen. This way, you’ll be able to compose better due to having a larger representation of what’s in your frame, while gaining the ability to focus precisely.
Tip #4. Find an Interesting Subject
 Interesting subjects can be found beneath your feet. Photo by: 'Pixabay'.
Photographing the sunset is not just about pointing your camera at the sun and the sky. Most of the time, these images will fail to captivate your audience and will not lend any context as to where or when they were taken. So when you’re out on-location, look for an interesting subject or fascinating foreground elements such as leading lines that can draw your viewer’s eye into the frame, utilising the sunset as a backdrop instead.
Tip #5. Capture Silhouettes
 Create a silhouette by placing the subject in front of the sun. Photo by: 'Pxhere'.
Silhouettes are an effective way to add a dynamic layer of interest, scale or context to a sunset scene. You’ll need the sun to be behind your subject and to shoot with an aperture between f/8 to f/16, metering for the sky. If you happen to capture part of the sun being obscured by your subjects, then you’ll also end up with an excellent starburst effect.
Tip #6. Make Sure the Horizon is Straight
 Making sure your horizon is straight is pertinent for seascape photography. Photo by: 'Pixabay'.
There’s nothing worse than being thrown off-balance by an image with an off-kilter horizon line. This is especially the case when the horizon is clear, such as when shooting a sunset directly out to sea. Most digital cameras these days have an in-built levelling mechanism, so before you press the shutter release button, check to see that your horizon is straight.
Tip #7. Look Around You
 The best light during sunset isn't always in the direction of the sun. Photo by: 'Pixabay'.
When you’re photographing the sunset, it can be very easy to get caught up in the moment and shoot directly into it. However, the colours can often happen in the sky behind you, so it pays to look around. Shooting with your back to the sun also means that it will light up your foreground, which can make for some extremely beautiful shots if you’re photographing landscapes and cityscapes.
Tip #8. Get There Early
We’ve already mentioned that the sunset includes that magical time beforehand, known as the golden hour. To ensure that you’ll be there to capture all of the glorious changes in light, it’s worthwhile to get to your location early.
Some popular places for photography can also get very busy at the end of the day, not just with visitors but with other keen photographers just like yourself. Getting there early will prevent having to jostle for a spot so you can be in the perfect position when the light show begins.
Tip #9. Stay Late
 Stay as late as you can during sunset photography so that you can take advantage of all of the changing light. Photo by: 'Pixabay'.
Last but not least, it’s important that you don’t make the mistake of packing up and leaving your sunset shoot too early. Sometimes, sunset colours can appear well after the sun has dipped below the horizon. To maximise your chances of capturing spectacular sunset images, be sure to stay out later than the sunset to the point where the blue hour begins. You can then make a decision whether you’ll stay to photograph the blue hour or not. It’s a win-win situation!
About the author: Serena Dzenis is a landscape photographer based in Iceland. You can find more of her work on her website or by following her on Facebook and Instagram.
Have you got any other tips for sunset photography? What kind of planning went into your most recent sunset shoot? Leave a comment below!

Serena Dzenis is an award-winning photographer, author and journalist who is based in Iceland. She has written numerous articles for the Iceland Photo Tours website, both about photography in Iceland as well as the more general aspects of using a camera.
Well-known for her uniquely romantic photographic style and love for the winter season, Serena is not afraid of harsh conditions and in making the most of what this planet has to offer. Her open and friendly nature has seen her embracing challenges each and every day, teaching others to make their own future and to turn their dreams into reality.