You may have seen a lot of stunning photography of landscapes in Iceland but the truth of the matter is that not all of the magic occurs in-camera. Post-processing is widely misunderstood within the genre of landscape photography, with some people claiming that it detracts from what the scene may have “actually looked like in-field”.
- Discover How to Choose Which Version of Lightroom to Buy
- See these article on Understanding the HSL Sliders in Lightroom
- Learn all about Chromatic Aberration – What it is and How to Avoid it
In reality, post-processing is the equivalent of what used to happen in the darkroom back in the days when photography was shot on film. The art of post-processing is an excellent way for you to express your creativity and vision, as what you choose to do during the post-processing phase is entirely up to you. Your adjustments may be slight or even more complex, depending upon the final result you are hoping to achieve.
In this article, we’ll discuss a few simple things that you can do to make post-processing in Lightroom that will help you to get your images ready for sharing or printing.
- See also: How to Photograph Rainbows in Iceland
Before You Start... Shoot in RAW!
We’re often asked what the difference is between RAW and JPEG.
The easiest analogy to make is for you to think of it like this: Recording an image in RAW can be compared to taking photos on a roll of film, then developing the film yourself. All of the data will be recorded and you’ll have full control of the editing process thereafter, before you produce the final product.
On the other hand, recording an image in JPEG is somewhat like using a Polaroid camera, whereby the final result is produced by your camera instantly. All of the adjustments will have already been applied and the photo will have been compressed. As such, any changes that you hope to make to the image will have to be applied onto the finished photo itself.
So just to make things clear: Recording in RAW will give you the opportunity to edit the data before it is compressed, whereas recording in JPEG means that you will have to apply all of your changes after the image has already been altered and compressed for you.
The latter option will lead to a much larger reduction in image quality than the former. So before you even get around to processing your landscape photos of Iceland, it is important that you set your camera to record your image files in the RAW format, to allow you more room to exercise your creativity thereafter whilst preserving the quality of your finished product.
Now that we've gotten that out of the way, let's move onto our 5 simple tips for post-processing with Lightroom!
Tip #1. Straighten and Crop
 Straightening a horizon line strengthens the composition. Photo by: 'Kaspars Dzenis'.
When you open up your RAW image in Lightroom, the first step is to make sure that your horizon is straight and to crop your photo if necessary. This will help you to balance out your photo and to strengthen the composition.
If you’ve managed to take the perfect photo, then there will be no need to crop. However, cropping can be a valuable tool during the post-processing phase to help you cut out dull parts of your photo or to accentuate certain elements within the frame. You might even want to change the dimensions of your image to make it suitable for printing, or in accordance with aspect ratios specified for use on social media.
Cropping also allows you to explore different ways of looking at the same scene or to eliminate potential elements that may distract the eye from the subject of the final image. It can result in better reach when you are unable to move closer to your subject, such as when you are shooting puffins from far away, or even when you are missing the length required by your lens to be able to fill the frame.
Therefore, if you feel that there is some part of the image that is not doing anything to help convey your vision or to strengthen the composition, or if you were unable to fill the frame with your subject because your lens just didn’t have enough reach, it is best to crop those erroneous parts of the image away.
 Cropping can allow you to cut out distractions in an image. Photo by: 'Edwin Martinez'.
To easily reach the crop and straighten tools in Lightroom, just hit the ‘R’ key. This will take you directly to the Develop Module and into the tools. There are two ways that you can straighten out the horizon – the first is to rotate the image visually. To do so, hover your cursor outside a corner of the image until the double arrow appears. Next, click and drag the cursor up or down to align the grid with your horizon. When you are happy with the result, hit Enter or Return to register your changes and to exit the straighten mode.
The other method to straighten the horizon is to select the ruler in the crop options box and then click and drag it along part of the crooked horizon. Lightroom will then automatically calculate how far off from level the horizon is and rotate the image to fix it.
When you’re ready to crop, hit ‘R’ and place your cursor over a corner of your photo, then drag it into whatever position you like. You can adjust each side of the selection until you are happy with how balanced the resulting composition looks. To register your changes, hit Enter or Return to exit the crop mode.
- See also: Understanding the HSL Panel in Lightroom
Tip #2. The Graduated Filter Tool
 You can use the graduated filter tool to draw the eye into the image. Photo by: 'Kaspars Dzenis'.
Once you have straightened out your image and made any necessary crops, you can start applying local adjustments to enhance your landscape photography of Iceland. The easiest tool in Lightroom to get started with is the Graduated Filter.
The Graduated Filter in Lightroom is a valuable tool that is commonly used to darken the sky. It can also be used to darken or lighten the edges of a photo. This helps to remove distractions and to draw the viewer’s eye inwards towards the subject of your shot. It will also allow you to add a bit of colour and saturation if the sky is otherwise dull, particularly if you weren’t able to use a graduated filter while you were out shooting in-field.
To get to the tool itself, hit ‘M’ on your keyboard, which will open up the Graduated Filter dialog box. Then the tool is actually really easy to use. It’s pretty much a process of clicking and dragging. Click where you would like the graduated effect to begin, then drag until it is at a point where you would like it to stop. If you would like to apply the Graduated Filter effect in a perfectly straight line, then hold down the ‘shift’ key while dragging.
To rotate the adjustment, place your cursor over the centre line of the Graduated Filter that you’ve just applied. A little rotating arrow will appear which will allow you to rotate the adjustment itself.
To make adjustments within the Graduated Filter, play with the sliders within the tool, such as the exposure, highlights, shadows and temperature. You can click and drag them to either side to see the effect that they make to the area where you have applied the tool.
Tip #3. Making Local Edits with the Radial Filter
 The radial filter is great for making local edits. Photo by: 'Kaspars Dzenis'.
If there are particular areas of your landscape photo of Iceland that you think need a bit of work, then the best way to make those edits is by using the Radial Filter in Lightroom.
The Radial Filter gives you the ability to target your adjustments to a specific area. This is helpful during post-processing, as there are more than likely parts of your image that you will not want to apply any adjustments to. For example, in this picture of an ice cave below, you can use the Radial Filter to increase the warmth of the light hitting the icy walls, by making a local edit to only that part of the picture.
 Use the radial filter to highlight the parts of a photo that you want to stand out. Photo by: 'Iurie Belegurschi'.
To quickly access the Radial Filter, hold down the ‘shift’ key and hit ‘M’. Next, click and drag a circle over an area of your photo. If you need to, you can adjust the shape and size of your Radial Filter by using the small pins on the outside of the circle. To reposition your Radial Filter, just drag the entire filter to a new location on your image.
As before, to make adjustments within your Radial Filter, you can play with the different sliders within the tool, such as the exposure, highlights, shadows and temperature. You can click and drag them to either side to see the effect that they make to the area where you have applied the tool.
By default in Lightroom, the adjustments that you make to your Radial Filter will be applied outside the circle that you create. To apply the adjustments within the circle instead, just click the ‘Invert Mask’ checkbox below the sliders.
Tip #4. Global Adjustments in Lightroom
 Global adjustments are useful for making changes to the whole image. Photo by: 'Kaspars Dzenis'.
Now that you’ve made some local edits using the Graduated Filter and Radial Filter tools, you’ll be ready to consider making some final Global Adjustments.
In Lightroom, Global Adjustments refer to the sliders that apply adjustments to the overall image, such as the temperature, exposure, contrast, highlights, shadows, vibrance, clarity, saturation, sharpening and colours. To access these, click on the ‘Basic’ tab within the ‘Develop’ module. You can then make these adjustments easily by dragging the sliders left or right to change the settings.
There might not be much that you’ll need to do with Global Adjustments, other than to ensure that the histogram is properly balanced and that you have a well-exposed, sharp and vibrant image. Just remember that any changes that you make will be applied to the entire image, rather than just a small and specific area.
Tip #5. Last But Not Least… Vignette!
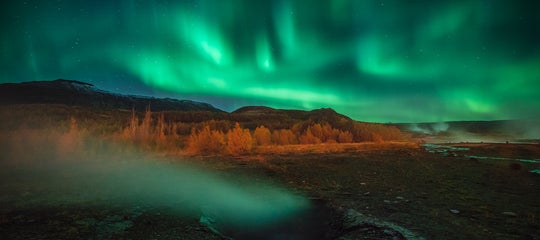
 A vignette can draw the eye in, even for night photography. Photo by: 'Kaspars Dzenis'.
The final step to improving your landscape photography of Iceland with Lightroom is to apply a vignette. The vignette is one of the most powerful ways that you can enhance your photos, as it reduces the brightness at the corners to draw the viewer’s eye into the centre of the image. This allows you to highlight your subject and to cover any distractions on the edges of the frame.
The best way to create a vignette in Lightroom is by using the Post-Crop Vignetting Tool, which is located inside the Effects tab. In this tab, you’ll see the ‘Amount’ slider, which denotes how much of the effect will be applied. The slider goes from -100 (whereby the vignette is 100% black) to +100 (the vignette is 100% white). To darken the edges of your photo, you’ll want to apply a black vignette, by pulling the slider towards the left.
Next, you can adjust the size of your vignette by using the ‘Midpoint’ slider. By sliding it towards the left, the midpoint becomes smaller, meaning that your vignette will be larger. Sliding towards the right will result in a larger midpoint and therefore a smaller vignette.
The trick in applying a vignette is to make it subtle, such that the viewer will barely even notice that it is there. To do so, you’ll need to make a gentle transition from dark to bright, which is best achieved by using the ‘Feather’ slider. If you pull the Feather slider all the way to the left, the vignette will have a hard transition, whereas pulling the slider towards the right will result in a softer and less visible transition.
So there you have it – our simple Lightroom post-processing tips to help you improve your landscape photography of Iceland. Of course, post-processing can get much more complex, but these are just a few of our tried and tested techniques that will have you on your way to getting your images of Iceland ready for printing and sharing in no time.
About the author: Serena Dzenis is a landscape photographer based in Iceland. You can find more of her work on her website or by following her on Facebook and Instagram.
Have you tried to use any of these tools in Lightroom? Or maybe you have some of your own tips to share with us? Leave a comment below!

Serena Dzenis is an award-winning photographer, author and journalist who is based in Iceland. She has written numerous articles for the Iceland Photo Tours website, both about photography in Iceland as well as the more general aspects of using a camera.
Well-known for her uniquely romantic photographic style and love for the winter season, Serena is not afraid of harsh conditions and in making the most of what this planet has to offer. Her open and friendly nature has seen her embracing challenges each and every day, teaching others to make their own future and to turn their dreams into reality.