Hello everyone, my name is Alex Wides. I have been a photographer since 2008, though a few years ago, I chose to deal only with landscape photography. At that time, I decided to experiment with many different kinds of styles. For a while now, I have been in love with panorama photography.
- See these 25 Useful Tips to Quickly Improve Your Landscape Photography
- Find a wide range of articles to improve your photography
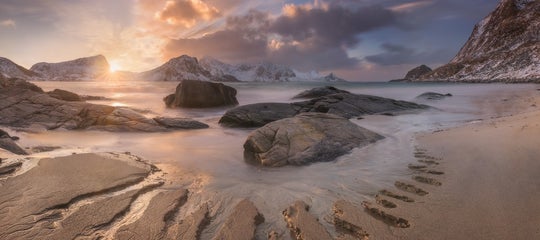
Panoramic photos are very beautiful. I find that by framing different points in a certain way, you can show all the beauty of what surrounds you. Compared to normal landscape photography, panoramic photos give you the opportunity to showcase the vast and immense beauty of nature, such as large mountains, cliffs, glaciers or deserts.
At the same time, panoramic photos can be a big challenge: you need to have specific panoramic photo equipment and find suitable places in which to photograph (often at the top of the most difficult peaks to reach!). Aside from that, making a great panoramic photo includes a lot of planning.
I often see many photographers who make panoramas around 180° or a little more. I hardly ever see extreme panoramas like mine, which makes me a bit sad because with a 360° view, you can appreciate the beauty of a place in its entirety.
In this article, I'll explain everything that you need to know about panorama photography, from what a panorama is to how you can successfully make amazing panorama photos of the landscape on your own. I'll also talk a bit about my style and my vision of representing the world through panoramic photography.
What is a Panorama?
The literal meaning of a panorama is a "wide general view from an elevated point, particularly appreciable from an aesthetic and tourist point of view".
The panoramic format is evolving more and more in the world of photography, having become popular largely in the realm of real estate photography. Given that there was a need to show as much of a house as possible in narrow spaces such as small rooms or kitchens, many real estate photographers found it necessary to find a way to make these areas within a house look bigger. In doing so, they were able to focus on certain characteristics of each space, not by taking many photos to demonstrate different angles, but by having a single image that conveyed every element within it.
The panoramic format was developed to allow the photographer to capture everything around them with a single photo.
Initially, this process was done through the use of cameras that moved. However, making a single panoramic photo with the use of film was very difficult, as it involved thinking larger than the framing of the lens.
Over time, panoramic photography has evolved and with the advent of digital cameras, it has become even easier with the use of specific tools to allow for rotation.
Panoramic photos are really interesting images. By shooting with a very wide angle for a large field of view, these photos become different from the usual. They are original and they captivate the minds of many people.
You can make a panorama simply by using an extremely wide angle lens, taking a single shot and then using a panoramic crop to make one side (either the horizontal or vertical edge) considerably longer than the other. You can also make a panorama by stitching together several shots to enlarge the angle of view and include more elements in the frame.
When photographers first began experimenting with panoramic photos, they shot with angles of view of 150°. Digital cameras allowed them to go even higher with angles of view in-field. These days, you can make extreme panoramas up to 360 by 180°!
Panoramic photography has evolved to enable large skyscrapers to be captured in a single shot, as well as to allow virtual tours of the interiors of buildings with panoramas that allow the user to move within the framing. To give you a bit of an idea of how much thought has gone into creating panoramas – Google was one of the first investors in panoramic photography, developing the "Street View" platform and allowing users to upload their shots at 360° by providing a special camera during their trekking!
The development of tools dedicated to panoramic photography has been just as rapid. On the market today, there are several brands that offer 360° cameras (they are generally two cameras with 180 mirrors), which give the possibility to shoot a 360° video. Ten years ago, this was seemingly an impossible feat.
 360° panorama at Tre Cime di Lavaredo (Dolomites, Italy). Photo by: 'Alex Wides'.
The Relationship Between Panoramic Pictures and Landscape Photography
Over the years, landscape photography has evolved a lot, alternating in different ways to allow photographers to represent a scene in nature. There was a phase during which the telephoto lens was used a lot to show the details of nature, before landscape photographers largely went back to the wide-angle lens for a larger field of view over the scene. These days, you can even make intimate compositions with a medium focal length lens.
It's undeniable, however, that in front of a breathtaking landscape, the first thing that comes to mind is to include as many parts as possible in the frame and to showcase the great beauty of nature in all of its vastness.
Whether it's vertical or horizontal, some of us always want to increase the angle of view to allow the viewer to see more parts of the landscape.
Hence the need to move towards ever more extreme wide angles; an example is the large number of photographers who today use very wide angle lenses such as 10mm or 12mm.
A problem that is created with the use of these lenses is the distortion. Unfortunately, the construction characteristics of these tools prevent the scene from being displayed correctly. Instead, perspective distortions are introduced, altering the horizontal and vertical lines of the scene. This is a bad thing, especially in architecture photography.
What is the Right Aspect Ratio to Use?
We generally start from a height/width ratio of 1/2. This means that to have a photo that can be defined as panoramic, it must have at least twice the sides of the other. This is true for the vertical side as for the horizontal one.
There are no rules on the angle of field – it is not mandatory in panoramic photography and many photographers take normal photos with a wide angle lens (e.g. with 114° of angle of field, such as a 14mm Sigma Art lens) and then simply crop the frame in 1/2.
However, I don't like this approach. My preferred method is to stitch together more frames until I reach the desired ratio.
The most common format in panoramas is 1/3, especially in the case of 360°, which leads to a considerably longer wide side than the height side. This format has been inherited from movie cameras like the Fuji 617, while many authors have made several panoramas with this format.
Types of Panoramic Photos
There are three different types of panoramic photography, each of which has certain difficulties and parameters to respect both in the shooting and editing phases:
Virtual Tour
These are almost considered as video. They are the types of images which allow you to explore the interiors of homes or offices. Virtual tour panoramic photos are widely used in advertising to enable the viewer to get inside the scene and explore it with a simple click of the mouse or by rotating their smartphone.
Vertical Panorama
If we imagine a panorama, the first thing that comes to mind is a horizontal panorama, like a horizon. As I always say during my workshops: "if we have a subject with horizontal extension like the sea or some hills or the skyline of cities, it can be a horizontal pano. If instead, we are in front of a vertical element, such as a tall mountain, it would be better to have a vertical pano".
Horizontal Panorama
This type of panorama is the classic photo with the horizontal side that is at least twice as large as the vertical side. These days, some photographers combine hundreds of high-resolution images to create gigantic panoramas, called "gigapixels". Obviously, these advanced techniques require many expensive tools. For our kind of panorama photos, the equipment is quite simple.
 360° panorama in the Ice Caves (Iceland). Photo by: 'Alex Wides'.
Best Panoramic Photography Equipment
To set up a 360° panorama, you need to use dedicated equipment for shooting as well as a panoramic photo app to help you plan and edit the shots.
Camera
Basically, there is no real ideal camera for panoramic photography, but you have to keep in mind several aspects. Generally speaking, panoramic photography is for showcasing a significantly larger portion of the scene than a classic photograph. If we use a wide-angle lens, then we will have more possibilities to widen our field of view, even more so than if we use a camera that allows us to take advantage of wider angles without penalising us with the crop factor. As such, a full-frame camera is certainly better suited to panoramic photography than a crop sensor.
If you do not have a full-frame camera, then you can still use an APSC with some shrewdness: first of all, you will need a very wide lens, such as the 10-16mm Tokina. With the crop factor, it will reach 15-16mm, reducing the angle of view. You will then have to do one or two more frames to have a sufficient field width.
Lenses
The best lens for panoramic photographs does not exist. However, we can look for a lens that fits our needs, depending on what we have to photograph.
For example, if you want to photograph mountains in the distance to capture a lot of detail, the ideal lens will probably be a telephoto zoom. This is because it will allow you to get closer (virtually, of course) to your subject.
The case is completely different if you want to photograph an expansive landscape and to include many parts within the frame, starting perhaps from the front of our feet. For this type of panoramic photography, the ideal lens is a very wide-angle, something like a 14mm on full-frame can be ideal.
Let's not forget that the longer the lens will be (35, 50, 85mm ...), the narrower and longer the photo will be. Conversely, if we use a very wide-angle lens, we will have a more balanced view between the long and short side.
Tripod
The tripod is generally a very important tool in photography. I would even say that it is indispensable in landscape photography, especially if you shoot with little light or filters. Having said that, the ideal tripod for panoramic photography depends on what kind of photographer you are. If you like to go to the mountains, then the weight will likely be a problem. However, if you are a photographer of seascapes, then you will have fewer weight problems, as your tripod must be stable and solid to withstand the breeze.
In panoramic photography, taking multiple frames to stitch together later on can be affected by the movements of the camera. Even a few millimetres can make a difference. As such, it is a good idea to have a solid tripod with a large rotation base. I use a Feisol CT-3442 Tournament, though you should do your own research to see what suits you best.
Pano Head
Several very important tools need to be mounted above the tripod. These include:
1) a levelling base (which may very well be a ball head)
2) a rotator (better if it has "clicks" that alternate the rotation)
3) a nodal plate (which can be flat or "L" shaped)
These accessories can be very expensive – in effect, we are talking about a type of photography that requires the purchase of dedicated tools to be able to do it better.
- See also: Camera & Gear Reviews
How Are Panoramic Photos Taken?
First of all, the tripod must be stable, so it is ideal to find a good support surface to have the legs well anchored to the ground. This is really important and the success of a good panoramic photograph depends very much on this.
With the camera in vertical mode and pano head perfectly aligned with the ground (centre the air bubble), we must then think about the distance from the subject and the error of parallax. The closer we are to the subject, the worse it will be. If we are using a nodal plate or a pano head, then we will have to calculate the nodal point.
What is the Nodal Point and the Error of Parallax?
The easiest way to explain to you the nodal point is with a little experiment.
Switch on your camera and the Live View. Now put one of your hands in front of the lens and spread your fingers. You will see some parts of the background between your fingers, right?
Let's move the camera left and right as if it were on the tripod. You will see your fingers begin to hide the different parts of the background. This is known as the 'parallax error'.
We can solve this problem with a specific tripod head and an accessory called the nodal head (or panoramic head/plate), which allows the rotation of the camera around the nodal point. Two popular brands that produce these accessories are Novoflex and Nodal Ninja. Each camera-lens combination has a different nodal point – a point that virtually eliminates this effect.
The parallax error can be very intrusive in panoramas made with a very close foreground, so you should consider buying a pano head in order to improve your panorama photography. Think about how many times you would like to take perfect and extreme (over 200°) panoramic photos, as well as how many times you will need to align the shots with an error of less than 3%. Objectively, it is not necessary to have a pano head, so think about whether it is worth buying before you make the investment.
If you can't set the nodal point, you will just need to shoot by keeping at least 30% of the previous frame in the shot whenever you move the camera to take a new shot. You will also need to take three shots (bracketing) for each frame.
Camera Settings for Panoramic Photography
Before describing the correct settings, it is important to clarify something about longer exposures. In panoramic photography, there may be several elements within the scene that are often difficult for the stitching software to read correctly, generating complications upon the assembly of the entire panorama. My advice is to avoid long exposures with clouds, water or plants that move. During the long exposure, you will risk misalignment of these elements, with the possibility that the software cannot mount the panorama.
Exposure
When you take a panorama, it is very important to read the light on the brightest point of the scene. This is because if you do not read the exposure on the brightest point, but for example on a darker part of the scene, you will risk arriving at the backlighting point with the setting too overexposed and this will cause the backlit area to appear too bright, burning the highlights and making them unrecoverable.
As for the shadows, you will have no problem if you set your camera to bracket (manual multi-exposure, which generates three RAW files at different exposures) with 2 stops of difference, which will allow you to recover the shadows using the overexposed photo.
- See also: Ultimate Guide to Long Exposure
Aperture
Usually, the ideal aperture for panoramic photography coincides with photographing normal landscapes. In fact, the aperture that you choose will depend largely upon the lens that you use. You'll need a lot of depth of field to allow the viewer to see the details of the landscape across the whole frame. As such, it's a good idea to close the f-stop, making sure that you'll have a constant exposure as you rotate the camera.
Focus
The focus is quite simple. When making a panoramic photo, you will rarely have the tripod set too low, so just focus to infinity with a closed aperture.
During night sessions, setting the focus is a little bit more complicated, due to the low level of light. In these situations, you'll need to set a larger aperture and lose depth of field, meaning that you might need to take at least two shots with a different focus for each frame.
White Balance
I usually leave the white balance set to automatic. If you are shooting in RAW, you will be able to fix it later during post processing.
Remote Shutter Release
It is not essential to use a remote shutter control for panoramic photography, as you'll rarely need to do a long exposure. Most of the time, you can set your camera to delay at least two seconds to allow it to stabilise after you press the shutter button.
ISO
ISO sensitivity must be constant, as well as the rest of the exposure parameters (shutter speed and aperture).
Panoramic Photography Composition
In spite of standard photography (where we can immediately see the result of the shot on the camera display), in panoramic photography, you will first have to visualise your photo project. One important thing I've learned over the years is that a panorama must always be balanced. You can have a good balance of the image by positioning the elements and the light well. Here are a couple of different examples:
 360° panorama at the Sahara Desert. Photo by: 'Alex Wides'.
The focus on the image above is on the centre. The lighting and the composition invite the viewer's eye to look at the centre of the image.
 360° panorama at Vestrahorn (Iceland). Photo by: 'Alex Wides'.
In this photo, the focus is on sides (left side with elements balanced by right side with a light source).
How To Shoot a Vertical Panorama
We've talked a bit about vertical panoramic photography, which can give you great satisfaction if you are able to do it well. It is also considered as a separate category in international contests, such as the Epson Pano Awards, which is the most important competition that recognises panoramic landscape photography today.
To capture excellent vertical panoramic photographs, you can use the same system as the one employed for horizontal panoramic photography. The technique is the same, but you'll need to mount the camera horizontally, which you can do either directly on the ball head or on the nodal plate. Using a nodal plate will result in less parallax error, so your software will be able to align the panoramic images more easily.
You'll then simply have to take several photographs with the camera in horizontal format, raising the frame for each shot and keeping 30% of the previous shot in the next frame.
Once you have visualised and placed all the elements within your mind, you will be ready to shoot with this technique.

 360° panorama at Segla, Senja Island (Norway). Photo by: 'Alex Wides'.
Night Panoramas
For night panoramic photography, you'll need to pay a lot of attention to how much light the camera reads. There must be enough light to show sharp and well-defined shapes, in order to allow the software the ability to mount the panorama correctly. This is because the software uses contours and shapes to make the interpolation of the different frames.
If there is not enough light, or if the horizon is not well-defined, then it is a good idea to take more shots than what you need to make sure that you'll have enough photos to form the panorama later on during post-processing.
 300° winter Milky Way panorama in Corse (France). Photo by: 'Alex Wides'.
It's also a good idea to form a routine to allow you to differentiate between each series of panoramic photos, for example, taking a selfie after the last frame in a sequence.
How to Stitch Panoramas in Software
To stitch the panoramas, I use two different types of software: Photoshop and PTGui.
Stitching a panorama in Photoshop gives you the advantage of using the "HDR panorama" function, where you'll have the possibility of selecting all of the images and stitching them into a pano quickly. You'll then be able to see a full view in DNG with the three exposures, so that you can see the dynamic range of highlights and dark shadows.
With PTGui, you can stitch the images together using the following method:
-
First, stitch the individual HDR images.
-
Edit the final 6-8 images or 10 DNG with Camera RAW.
-
Save the files to TIFF and mount the TIFFs in panorama with PTGui.
In this case, you can also choose the centre of the pano, rotating the entire image.
 360° panorama in Sardinia (Italy). Photo by: 'Alex Wides'.
Shooting panoramic landscape photos can be complicated. I've worked with panoramic photography for a long time and only have a few photos to show for it. It's tremendously hard to find places that have a good 360° view, where all of the elements balance perfectly. It is also difficult to imagine having a portfolio that includes only brilliant panoramas, but it is possible to integrate a good gallery of landscapes photos with some extreme panos to help you tell your story. I hope this guide has given you enough information to get out there and start taking your own panorama photos!
About the author: Alessandro Cantarelli, aka "Alex Wides", is a landscape photographer based in Italy. You can find more of his work on his website or by following him on Facebook and Instagram.
Practice your panorama photography skills in the expansive landscapes of Iceland. Join us on a winter photography tour in the Land of Fire and Ice!