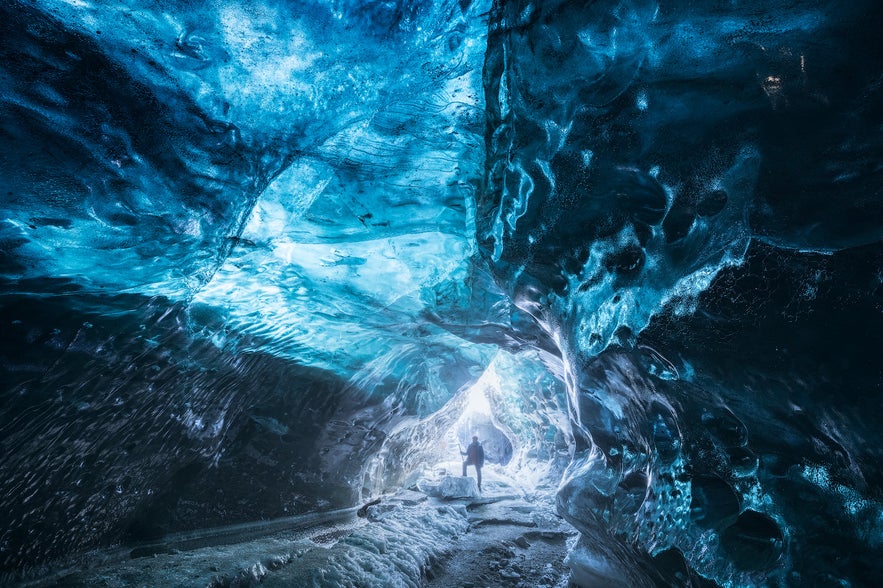
For most photographers who travel to Iceland, capturing the immense extraordinariness of the country’s ice caves is a once-in-a-lifetime experience that can be made disappointing without the right approach. Ice caves are dark inside, cold and such awe-inspiring, unfamiliar places that the simple act of taking a photo inside one may seem ten thousand times more difficult than shooting anywhere else on the planet.
- Find out all about The Most Popular Destinations for Photography Around the World
- Discover the key to Understanding Lens Flare in Landscape Photography
To make things a little easier for you, we've put together this complete guide to photographing the beauty of Iceland’s ice caves, so that you can prepare yourself to capture the shots you want well ahead of time. Read ahead to learn all about how ice caves are formed and change over time, the best time to visit Iceland’s most famous ice caves, the importance of having a reputable tour guide, as well as everything you’ll need to know about what to wear, photographic equipment to bring and how to produce your own stunning ice cave photographs from Iceland.
The Dynamic Nature of Iceland’s Ice Caves
Iceland’s impressive glacier ice caves form naturally when water melts during the summer, carving out long tunnels and caves beneath thick sheets of glacial ice. As glaciers are always on the move and the ice continues to melt and freeze over time, each ice cave is constantly varying in structure, changing and evolving into different shapes and sizes.
 Ice Caves are Dynamic. Photo by: 'Iurie Belegurschi'.
The dynamic nature of an ice cave means that it may be accessible during some years, whereas other years it may be inaccessible or might not even exist at all. As such, each and every visit to one of Iceland’s ice caves becomes a completely unique experience, offering different photographic opportunities from unusual formations in the ice to peculiar patterns and even striating colours in the frozen cave walls.
You may even be one of the few to visit a particular ice cave before it disappears, never to form again.
When is the Best Time to Visit an Ice Cave?
Ice caves are only accessible from a few places in the world and even then, only at certain times during the year under specific conditions. Subsequently, if you have the chance to explore an ice cave, then that becomes an incredibly rare opportunity in itself.
To maximise your odds of photographing one of the beautiful ice caves of Iceland, head there from the beginning of November until the end of March, when ice caves are at their most stable and hence most accessible. Some ice caves are only able to be visited during the winter, whereas others may be accessed year-round, depending on their structural integrity.
 Exploring an Ice Cave. Photo by: 'Iurie Belegurschi'.
Inside Iceland's Famous Ice Caves
Since the ice caves in Iceland’s glaciers are only temporary structures, many do not have formal names. However, if a cave is discovered in a similar location to where it was the next year, then it is often given a name so that it may be easily distinguished by visitors and tour guides alike.
The Crystal Cave
Vatnajökull, the largest glacier in Europe, is home to an extravagant ice cave known as “The Crystal Cave”. Situated just a little west of the glacier lagoon, Jökulsárlón, the Crystal Cave has appeared more or less in the same location since the winter of 2011-2012.
This is the glacier ice cave that most people visit, with multiple guided tours taking travellers there due to its size and ease of access. The Crystal Cave is large enough to fit 70-100 people at a time, though it is the physical appearance of this Vatnajökull ice cave that attracts most photographers, with the arched walls resembling a stunning crystal blue dome.
 The Crystal Cave. Photo by: 'Iurie Belegurschi'.
The Waterfall Cave
The Waterfall Cave is a large ice cave situated east of Jökulsárlón glacier lagoon by the Veðurárdalur valley. It has appeared since the winter of 2015-2016 and is quite unique, in that it has a small river flowing into it, as opposed to out. By following the river, you will wind up at a small but beautiful waterfall that may or may not be frozen, depending on when you decide to visit.
Katla Glacier Cave
Deep within the Katla glacier, one of the most dangerous volcanoes in Iceland, is a glacier cave that is darker than those in Vatnajökull. Discovered in the winter of 2016-2017, the shadowy Katla ice cave does not contain any blue ice; instead, you will see walls of black ice interlaced with ripples of pale blue, all swathed in a dusting of white snow as you peer out of the cave from within.
The Katla glacier has been a key filming location for TV series ‘Game of Thrones’ since its inception. So if you’re planning to visit for the nostalgia, then you’ll be happy to know that the Katla glacier cave is closer to Reykjavík than the ice caves of Vatnajökull and is stable enough to be visited during summer.
How to Get to Iceland's Ice Caves
Iceland’s weather is notorious for its changeability and unpredictability, therefore accessing a natural glacier ice cave can be a very dangerous endeavour.
The roads leading towards the ice caves may be quite treacherous and deceptive, having the appearance of solid land despite concealing large bodies of water or even flowing rivers beneath a sheet of ice.
Without adequate care, you may find yourself and your car sinking through to the water below!
 Fascination with Ice Caves. Photo by: 'Iurie Beelgurschi'.
As glaciers are inherently full of cracks, they may harbour deep drops. If you’re not careful, then you may end up falling tens or even hundreds of metres into a glacier crevasse. Furthermore, if the temperature rises within an ice cave itself, then the ceilings may break and collapse, trapping visitors beneath a heavy mass of ice.
To ensure your wellbeing and that of others, it is important that you only attempt to access a natural glacier ice cave with a reputable tour guide who has the appropriate certifications, equipment and above all, your safety in mind.
What to Bring When Photographing Ice Caves
When visiting Iceland’s ice caves, it is absolutely essential that you have the appropriate gear to ensure your safety and that you return home with spectacular photos to reminisce upon for years to come. Below, you will find a recommended packing list from clothing to photography equipment, which will assist you with planning your trip to Iceland.
Recommended Clothing
-
A thick thermal base layer.
-
A heavy fleece mid-layer.
-
A down coat top-layer.
-
Good quality warm gloves which will still enable you to operate your camera.
-
Water-resistant trousers (preferably thermal).
-
Thermal socks.
-
A neck-warmer or scarf.
-
An alpine mask to cover your face.
-
A good warm hat which covers your ears.
-
Water-proof, thermal, knee-high rubber boots.
-
Ice spikes or crampons to protect yourself from slipping on icy surfaces.
-
Headlamp, as it can get very dark within an ice cave.
Recommended Camera Gear
-
A digital camera, preferably a D-SLR with good low-light capabilities.
-
A sturdy tripod. It can be slippery inside an ice cave so mounting your camera onto a tripod will ensure sharp and steady shots.
-
An ultra wide-angle lens such as a 16-35mm on a full-frame sensor camera or a 10-24mm on a crop-sensor camera.
-
A wide aperture ultra-wide angle such as a 14mm f/2.8 lens to capture the immensity of a dark ice cave.
-
A remote trigger for your camera, which will be useful for eliminating camera shake.
Camera Settings for Photographing an Ice Cave
Photographing from within an ice cave may be a little tricky at first, due to the low-light nature of the environment. You may even find yourself completely overwhelmed by the structures and have difficulty locating a composition that represents the sheer grandiosity of what you see.
Don’t let this be a deterrent because with the appropriate direction, you will be able to exercise your own creative vision to capture stunning photos from within the crystal blue ice caves during your visit to Iceland. Follow these settings below to ensure sharp, properly exposed photographs and the rest of the creative process will be completely up to you.
Setting Your Focus
Start by setting your camera to Manual mode and your lens to Manual-Focus. You can then select the focus towards an object within the cave by rotating the manual focus ring while you look through the viewfinder or he LCD of your camera in live-view mode. This provides a centre-point upon which the eye will be drawn when viewing the photograph.
A good place to start is on the lower third of your camera grid. Make sure that your focus point is set on the nearest object within the frame, as this is how our eyes will naturally present a view within our field of vision.
 The Cone. Photo by: 'Iurie Belegurschi'.
Aperture Setting
Aperture refers to the amount of light that is let into your camera by the lens. If there is not enough or even too much light, then you will not be able to properly expose your shot.
When shooting within Iceland’s ice caves, it is appropriate to use an aperture between f/8-11 on a crop-sensor camera. For full-frame cameras, it is best to use an aperture between f/11-16. If it is particularly dark within the ice cave, then you may want to select an even wider aperture, such as f/4, to ensure a faster shooting time and less risk of blurring your photo with camera-shake.
Keep in mind though that shooting at such a wide aperture will mean that not everything within your photograph will be in focus.
 Photography in an Ice Cave. Photo by: 'Iurie Belegurschi'.
ISO Setting
Every camera has a different capabilities in low-light. Selecting a low ISO will reduce the risk of noise and ensure a crisp, smooth image. Anywhere between ISO100-400 is appropriate. Using a tripod will allow you to use a lower ISO and hence reduce the risk of noise ruining your shot.
White Balance
It is best to keep this in auto mode, as the white balance may be altered in post-processing if required.
Shutter Speed
To ensure the correct exposure, select a shutter speed below 30 seconds and use your histogram as a reference, making sure that none of the shadows or highlights are clipped. As long as there is no clipping, then you will have captured enough data within your photo to ensure an adequately exposed shot later on during post-processing.
 Exploring Glacial Ice Caves. Photo by: 'Iurie Belegurschi'.
If you have a moving foreground within the ice cave, such as a waterfall or a river, then you might want to try experimenting with the shutter speed to capture different movements. Doing so can add an interesting dimension to an otherwise static shot. A fast shutter-speed such as 1/125 of a second will freeze and capture every detail of the water in motion, whereas a slower shutter speed such as 5 seconds will create a flowing, dreamy effect.
Bracketing
When shooting towards a source of light, such as the opening of an ice cave, it is important to go into bracket mode by either using the in-camera HDR function or manually shooting a number of different exposures. Usually, a total of 5 shots will ensure that you will have all the data you need to control the highlights and to push detail into the shadows for post-processing.
 Bracketing is sometimes essential in an ice cave. Photo by: 'Iceland Photo Tours'.
A good rule to follow is to begin the first image by exposing at 0EV, then taking a photo of the same composition at -2EV, -1EV, +1EV, +2EV. You will then be able to blend the images together manually in post-processing to produce a correctly exposed photograph.
Creative Tips for Ice Cave Photography
Now that you’ve learnt the basics, dare yourself to push the boundaries and get creative to ensure that you capture your own, unique experience when photographing Iceland’s ice caves.
Focus Stacking
As you may be photographing in low-light with a wide aperture, it may be difficult to capture certain parts of the ice cave within adequate focus. If this becomes an issue, or if you would like every part of the photograph to be in focus, then all you have to do is to take a number of images across different focal planes and blend these later in post-processing.
This technique is called 'focus stacking'. You can learn more about it here.
When focus stacking inside an ice cave, start by focusing on the nearest object within the lower third of your camera grid, then slowly move your focus point to something further away until you have the entire frame in focus. Don’t forget to make sure that all four corners of your photograph are in focus.
Shooting with a Person
Placing a person within your frame will give the viewer a sense of scale and highlight the sheer immensity of the ice cave. You can also create certain stories, depending on what your person is doing within the shot. Here are 5 good reasons to add people into your landscape photography.
To make the most of this technique, be aware that where you place the person within the frame will have an overall effect on the atmosphere that you project within the ice cave. Your subject might have their back to the camera, gazing out of the mouth of the ice cave into the big, wide world. On the other hand, they might be in action, scaling an icy wall in bright safety gear.
There is no end to your creative vision, so make your composition as unique and exciting as you want it to be.
 Person for Scale. Photo by: 'Iceland Photo Tours'.
Lighting
How you choose to photograph an ice cave will influence the mood of your shot and how you will feel when you look back on the photograph later on. You can rely on natural lighting for a dark, shadowy look, or you can even shine a soft light from your headlamp over the walls of the cave to highlight the brilliance of the colours within the ice.
Try experimenting with photographic accessories such as the LumeCube, which can really expand your creative options inside an ice cave!
Joining an Ice Cave Photography Tour
While this guide has likely equipped you with a lot of useful information on photographing ice caves, nothing beats in-field tuition from the experts. To maximise your chances of success with ice cave photography in Iceland, it can be a good idea to join a photo workshop or tour.
As we mentioned earlier, ice caves are mostly accessible during the winter months, which also happens to coincide with the Northern Lights season. Check out our 5 Day Winter Photo Workshop in Iceland for a great chance of capturing both on the same trip! You'll be in good hands as our guides will keep an eye on the conditions and provide you with all the safety gear you'll need to enter an ice cave and come out with stunning results.
About the author: Serena Dzenis is a landscape photographer based in Iceland. You can find more of her work on her website or by following her on Facebook and Instagram.
Now that you've got the lowdown on how to photograph an ice cave, you're more than ready to come along on one of our photo tours! Get ready for the adventure of a lifetime in the snowy surrounds of the Vatnajökull National Park in Iceland during winter. Join our Northern Lights and Ice Caves Photo Workshop in Iceland!


