Are you thinking about leaving your tripod at home during your photography tour in Iceland? Although there are many advantages to using a tripod for landscape photography, sometimes it can be just too inconvenient to pack a tripod into your luggage.
- Learn How to Get Creative with a Fisheye Lens
- Check out this article on Understanding Lens Flare in Landscape Photography
- Discover the Ultimate Guide to Understanding Focus in Photography
There are many other situations when landscape photographers might choose to shoot without a tripod or when it may simply be unsuitable to use one. Sometimes, the shooting conditions may be too windy or you may even be faced with dynamic circumstances, such as in wildlife photography. As expensive and well-built as your tripod may be, it might even be too large and heavy for you to carry around. Furthermore, there are some photographers who just prefer to shoot handheld, while others feel that shooting with a tripod allows them to achieve more interesting angles and compositions.
Whatever your reason may be for shooting handheld in Iceland, you’ll inevitably face the possibility of ending up with blurry images and having to deal with camera shake.
In this step-by-step guide, we’ll go over a few fundamental techniques for shooting without a tripod, in order to help you capture the best possible handheld images during your photography trip in Iceland.
Best Camera Settings for Shooting Landscapes Without a Tripod
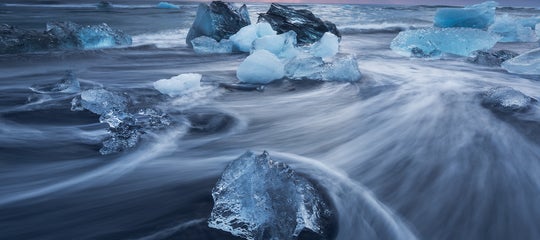
 It's possible to shoot a wide range of landscapes in Iceland without a tripod. Photo by: 'Iurie Belegurschi'.
First and foremost, let’s look at how you can achieve sharp and noise-free images when shooting handheld simply by adjusting your camera settings.
Turn on Image Stabilisation
Most cameras and lenses these days offer an image stabilisation or vibration reduction mode, which works to reduce camera shake. This in-built technology can allow you to capture sharp images at a speed of up to 5 times slower than you would be able to if you were to handhold your gear without it.
The ability to let in more light whilst minimising shake results in less blurry and higher quality images. So if you have the option of using an image stabilisation mode on your camera and lens, then it’s best to turn it on whenever you decide to shoot handheld.
Fast Shutter Speed
When photographing handheld in Iceland, it’s best to use a faster shutter speed in order to reduce camera shake. However, we just talked about how letting in more light can result in higher quality images, so how slow can your shutter speed be when going handheld?
The rule of thumb to follow is to avoid using a shutter speed that is lower than the equivalent focal length of your lens.
For example, if you are using a 400mm lens, then your shutter speed should not go below 1/400th of a second. Similarly, with a 200mm lens, you shouldn’t allow your shutter speed to fall below 1/200th of a second. Therefore, if you are using a 50mm lens, you can lower your shutter speed to 1/50th of a second, in order to capture a sharp handheld image.
As you can see, the wider the lens, the faster the shutter speed that you’ll be able to achieve when shooting without a tripod.
Of course, ending up with a well-balanced exposure isn’t just dependent upon shutter speed and focal length. There are other factors to take into account and the shutter speed that you choose to use will be dependent upon the conditions and circumstances that you’re faced with when shooting handheld.
Wide Aperture
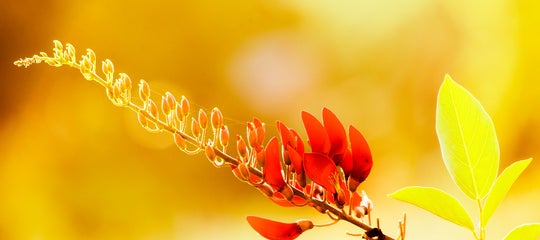
 A wider aperture is great for shooting handheld in low light. Photo by: 'Iurie Belegurschi'.
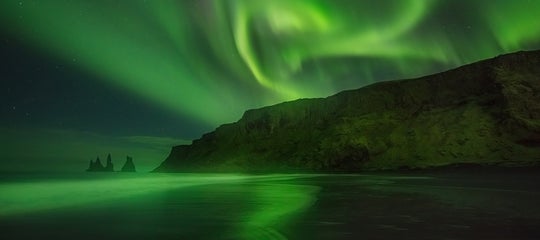
When shooting handheld for landscape photography in Iceland, particularly in low-light situations such as during winter or during the blue hour, the key to ensuring sharp images is to work with a wider aperture.
Very often, photographers will inherently decide to shoot at smaller apertures, such as f/18 or f/22 with the notion that they’ll be able to achieve maximum depth of field. However, this isn’t always practical and depending upon your lens, may even result in unsharp and blurry images. The reason for this is known as diffraction. Basically, when shooting at a smaller aperture, the sharpness of your images are limited by aberrations around the edges of the optical elements of your lens. This is an issue for all lenses, no matter how cheap or expensive they may be.
So to ensure the sharpest images when shooting handheld in Iceland, try shooting somewhere between f/8 and f/16, whilst working with a fast shutter speed and appropriate ISO.
Increase ISO
 You can even shoot handheld in an ice cave with a higher ISO. Photo by: 'Iurie Belegurschi'.
A lot of cameras these days have extended ISO capabilities, making it possible for landscape photographers to capture sharp, handheld images in Iceland even in the darkest and moodiest of lighting conditions – and that includes ice caves! However, choosing the ideal ISO to use is crucial for ensuring image quality, as it has a direct impact on the level of noise that you’ll be able to see in your shots.
While increasing your ISO will help you to achieve a faster shutter speed when shooting handheld, it will also introduce a significant amount of grain. As such, you should aim to use the lowest possible ISO for landscape photography, even while shooting handheld.
Having said that, there will be times when you might want to sacrifice image quality for speed by increasing the ISO, depending on the brightness of the scene, as well as your combined aperture and shutter speed.
Shoot in Continuous Burst Mode
Although most photographers associate shooting in burst mode with action or wildlife photography, it’s also incredibly useful for when you want to shoot with wider apertures or slower shutter speeds, such as when you’re going handheld.
Whenever you press the shutter for a single photo, whether shooting handheld or on a tripod, you will inadvertently introduce camera shake. By using the burst mode, you will only press the shutter when you start and stop taking photos, meaning that you’ll have less risk of camera shake with the images between. As such, you’ll be able to take a quick series of shots which you can review later on to pick out the best and sharpest images.
Shooting in burst mode is particularly useful when photographing wildlife in movement, such as puffins as they soar around the cliffs of Dyrhólaey on Iceland’s south coast, or for photographing Icelandic horses frolicking around in their fields. It’s also good for shooting in windy situations along the coastline of the Snæfellsnes Peninsula in Iceland’s northwest.
 Shooting in continuous burst mode while handheld is great for wildlife photography. Photo by: 'Iurie Belegurschi'.
Use Self-Timer or Remote Shutter Cable
Using the self timer is a great way to reduce camera shake when you are shooting without a tripod and if you’re able to set your camera on a hard or steady surface. It avoids the introduction of movement when you press the shutter button, meaning that you’ll end up with sharper and better shots.
To make use of your camera’s self-timer, simply place your camera on a rock or other flat object, set the timer, press the shutter button and take your hands off your camera. The image will be taken in a few seconds and you’ll be able to pick it up again once it’s done in order to review the shot.
 Take advantage of your camera's self-timer or use a remote shutter release cable for sharper handheld photos. Photo by: 'Gophi, Wikimedia Commons'.
If your camera has a remote function then you can simply attach your remote shutter release cable, which will allow you to take a photo without having to touch your camera, thereby reducing camera shake.
Useful Techniques for Shooting Landscapes Handheld
Now that we’ve gone over camera settings for shooting handheld, let’s take a look at some other fundamental techniques for ensuring that you’ll return home with sharp and beautiful photographs from Iceland.
Put Your Backpack Down
Capturing sharp handheld photos in Iceland is as much about how you stand and hold your camera, as well as about what else you may be carrying. Whenever you decide to shoot handheld, make sure that you’re as light and carrying as little as you can possibly be.
 Put your camera bag down when shooting for sharper handheld photos. Photo by: 'Iurie Belegurschi'.
Try to put your camera bag or backpack down whenever you can, as this will help you to balance your body. This is especially important in windy conditions, as any amount of extra weight can result in unsteadiness, leading to camera shake and blurry images.
Posture and Stance
Whenever you shoot handheld, it pays to think of your body as your camera’s tripod. So treat your body as you would when thinking about tripod placement when you’re in-field.
In order to reduce camera shake and to capture sharp images when shooting handheld, ensure that you have a strong and sturdy stance. This might mean standing with your legs apart at shoulder’s width or even having one foot in front of the other. You can also try bracing yourself against an object in nature, such as a rock or a cliff wall.
Lower Centre of Gravity
Similar to when you’re shooting with your camera on a tripod, you’ll want to lower your centre of gravity in order to reduce movement and shake. You can do this by slightly bending your knees, or even sitting or kneeling on the ground.
 Keep a low centre of gravity for sharper handheld landscape photography. Photo by: 'Iurie Belegurschi'.
Firm Grip
One of the most fundamental techniques of capturing sharp handheld images is in the way that you hold your camera. This applies to every single shot that you take, as you may be adopting different stances from standing to kneeling and even laying down on the ground. It's particularly important when you are shooting at the Diamond Ice Beach!
 Keep a firm grip on your camera when shooting handheld at the ice beach. Photo by: 'Iurie Belegurschi'.
Make sure that you have a good grip on your camera and lens with both hands, while keeping your arms tight to your body and your elbows tucked in at your sides. The closer your elbows are to your body, the more sturdy that you will be.
For maximum stability, it’s best to cradle the lens from beneath with the palm of one hand while you rest your finger on the other upon the shutter release. This will help you to steady the camera further and to share the weight of the rig between both of your hands.
Next, bring the viewfinder up to your eye and press it firmly against the top of your eye socket where your eyebrow lies.
If you prefer to use the LCD rather than the viewfinder, then just make sure to keep your elbows tucked in to your body as closely as possible.
Controlled Breathing
Whether you can help it or not, your body will move with each breath that you take. Unfortunately, this will be a problem whenever you are shooting handheld, as you’ll have an increased risk of introducing movement and camera shake, which will result in blurry shots.
An easy workaround is to be mindful of your breathing and to employ controlled breathing techniques. Simply take a deep breath, pause for one or two seconds, and then exhale. Make sure to press the shutter button halfway down as you pause, then gently continue pressing straight down on the shutter button without jerking your finger as you exhale your breath. Count for a few more seconds before removing your finger from the shutter.
Make sure that your shutter finger is not mid-air before you press the shutter release button. Stabbing or tapping the shutter release introduces camera shake and can result in blurry images. You might even find it useful to slide your finger off the shutter button, rather than to push the shutter directly.
However you choose to release the shutter, controlled breathing can help you to capture sharper images, as your body will be most relaxed while you’re slowly breathing out. It’s best not to release the shutter as you’re holding your breath, as that is when your body will be at its most tense.
 Control your breathing whenever you press the shutter release on your camera, whether you are shooting handheld or on a tripod. Photo by: 'Iurie Belegurschi'.
As you can see, shooting technique and appropriate settings are crucial to ensuring sharp and steady images when practicing landscape photography in Iceland. Although the techniques mentioned above may not be comfortable for everyone, they’re a good start for moving towards better handheld photography. The key to capturing sharp handheld photos is to be aware not only of how you position your body, but the settings that you’re using and to make adjustments to suit each particular scene and circumstance. So good luck with your handheld photography in Iceland and don’t forget to take another breath once you’re done exhaling!
About the author: Serena Dzenis is a landscape photographer based in Iceland. You can find more of her work on her website or by following her on Facebook and Instagram.
Test your handheld photography skills in the landscapes of Iceland! Check out our 11 day photography workshop beneath the Midnight Sun in the magical Westfjords.

Serena Dzenis is an award-winning photographer, author and journalist who is based in Iceland. She has written numerous articles for the Iceland Photo Tours website, both about photography in Iceland as well as the more general aspects of using a camera.
Well-known for her uniquely romantic photographic style and love for the winter season, Serena is not afraid of harsh conditions and in making the most of what this planet has to offer. Her open and friendly nature has seen her embracing challenges each and every day, teaching others to make their own future and to turn their dreams into reality.