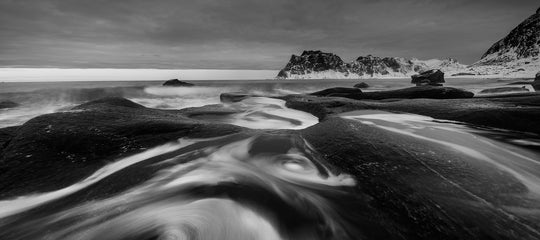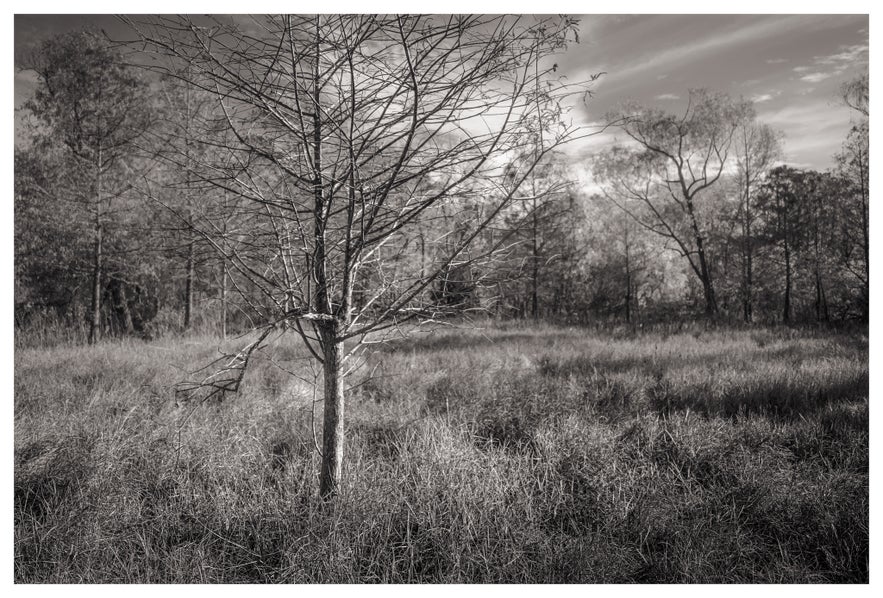
In just a few short years, the fantastic medium of artistic self expression we know as photography will celebrate its 200th birthday. Two hundred amazing years worth of trial and error, two centuries spent by countless photographers with their cameras of all shapes and sizes tirelessly attempting to capture that decisive moment. Throughout its long evolution, photography has changed as much as those who practice it and yet a basilar remnant of the earliest days of our art still lingers as the most idealised and at times argumentative. I’m talking about black and white photo work.
- Check out this 5-Day Summer Photo Tour | Black Sand Beaches, Waterfalls & Glacier Lagoons
- Explore these Photography Tutorials
- Discover How to Create Portraits with a Black Background
At its heart, black and white photography is simple. Not in the way 2+2 is simple, but rather a kind of enigmatic truthfulness – one whose nature is as straightforward as it is complex. The story of a black and white photograph is told through complex shades of grey. Yet for all its seemingly unassuming principles, there is a reason why this most primal iteration of photography stoically remains a divisive hallmark of the “fine art world”. Is there a reason why black and white photographs can still compete and at times exceed the expectations fostered even within the world of modern digital photography?
- See also: 15 Tips for Monochrome Photography
Photography in Black and White: What Does it Mean?
If there’s one misconception when it comes to black and white photography, it is exactly what it means to create a black and white photograph. Searching for the black and white photography definition doesn’t give us much help as it will result in ambiguous answers such as “a photo without colour” or “a picture from which all colour has been removed”.
As you know, this couldn’t be further from the truth as the majority of “black and white” photographs, though consisting of shades of grey, are generally not limited to those tones.
 Black and white photographs are not just images where colour has been removed. Photo by: 'Adam Welch'.
Monochrome or Black and White?
Before we get ahead of ourselves, let’s decipher the difference between a black and white photo and one that is considered “monochromatic”. For whatever reason, the term monochromatic tends to walk hand in hand when we talk about black and white photography. While it’s true, some monochromatic photographs can be considered black and white, not all black and white photographs are monochromatic.
Let’s break down the term; monochromatic. Mono means one, or singular. Chromatic means pertaining to or consisting of colour. Simply put, a monochromatic photograph is one that is made of varying shades of a single colour. You can have a monochromatic photo based on red…
 A monochromatic photo based on shades of red. Photo by: 'Adam Welch'.
...a monochrome photo based on shades of blue…
 A monochromatic photo based on shades of blue. Photo by: 'Adam Welch'.
...or even one rooted in yellows.
 A monochromatic image based on shades of yellow. Photo by: 'Adam Welch'.
In reality, any photograph that is made up of shades of a single colour is technically monochromatic. The confusion with black and white photography could possibly be caused by the common practice of “toning” of black and white photos, to where the image possesses coloration in the highlights or shadows or both. This leads to an effect similar to that of monochrome but is wholly different from a black and white photo, which is generally considered to possess no colour whatsoever, unless toned.
For more info on monochrome photography check out this great article from Leonardo Papèra (with some absolutely gorgeous monochrome photos) which explores some tips for creating your own monochromatic images.
Oh, and if you want to delve a bit deeper into the world of black and white image toning and the history of black and white photography in general, stick around till a bit later in the article. We’ll discuss black and white film photography and how it has and still does impact the way we think about digital black and white photos today.
A Brief History of Black and White Photography
Black and white photo work can often be seen as the “original” type of photography. Many of the classic images we know are indeed black and white, so we usually assume that black and white photography was a distant predecessor of colour photography. This is surprisingly not the case. While it’s true that lack and white photography, or a semblance of it, does predate colour photography, it only does so by about three decades. Yes, believe it or not, our earliest known example of a colour photograph dates to 1861 and was made by Thomas Hutton.
 The earliest known example of a colour photograph by Thomas Hutton. Photo by: 'Adam Welch'.
That means that this colour photograph came about roughly only thirty-five short years after what is considered to be the first EVER known photograph which was made out the window of inventor Joseph Niphore Niepiece around 1826-27. This original work was actually made on a sheet of polished pewter. I’ve had the opportunity to view this incredible photo in person.
 The first ever known photograph made by inventor Joseph Niphore Niepiece. Photo by: 'Adam Welch'.
You might be thinking “Why all this talk about colour photos when we’re supposed to be talking about black and white photography?” The reason is because throughout history black and white photography, for all practical purposes, has walked hand in hand with colour photography. Granted, the process involved for producing colour photographs was and still is more complex than that used for working in black and white. Still, the idea that the long history of black and white photography was one of simply “waiting for colour to come along” is simply a farce.
 Black and white photography is its own genre, not just due to the subtraction of colour. Photo by: 'Adam Welch'.
So, why has black and white photography remained such a powerful force throughout history? No one can definitively say for sure but it is possibly due to the inherent nature of black and white photos themselves. I’ve heard on occasion, and happen to agree, that a black and white photo is a more fluid conduit for individual self-expression. When you dispense with the intrusion of colour, you inherently produce an image that is an abstraction of reality. This means that a black and white photo can be a representation of a person or scene but still be something wholly unique in terms of creative possibility.
Perhaps no one has summed up the idea of the expressionistic nature of a black and white photography better than Ansel Adams at the beginning of this marvellous documentary. Incidentally, Ansel Adams did quite of bit of work with colour photography but stated that he was able to convey his own attitudes more completely through black and white.
If we look at black and white photography through the lens (photo humour) of being able to inject more of ourselves into our work, we begin to understand why the history of photography is filled with so many timeless black and white images. Not because the photographers necessarily had to work in black and white but rather because they often did and still do choose this process due to its inherent qualities of both technical and artistic expression.
- See also: Ultimate Guide to Focus Stacking
Key Elements of a Strong Black and White Photograph
Now that we’ve covered a bit of the history of black and white photography it’s time to talk about a few key points that make for great black and white photos. We’ll discuss some helpful tips for beginners and experienced shooters alike. Many of these suggestions will help you in other areas of photography as well, not just black and white.
Light is King
Any photograph is essentially born from light but when it comes to black and white photography, lighting becomes enormously important for a well-made photo. Since we don’t need or have the availability of visual colour information the quality and directionality of light within a scene becomes what essentially adds interest to the image.
 You still need to think about lighting with black and white photography. Photo by: 'Adam Welch'.
It’s not enough to simply convert a digital colour photo to black and white or to shoot with black and white film (more on all this in a bit). If we want to produce better black and white photographs, we must think in terms of light and shadow. How does the direction of light enhance or subdue the shapes and textures of the things we photograph? It doesn’t matter if we’re using natural or artificial light the truth remains the same that a black and white photo leans heavily on how we use light to create drama and add interest to the subject.
The Subject Matters
A point that can sometimes be overlooked is that some subjects lend themselves to be more favourable for black and white images than do others. It’s not a matter of black and white being better or worse than colour photography but rather because some subjects truly NEED colour in order to be photographed effectively.
 Black and white may not be the best choice for every image you take. Photo by: 'Adam Welch'.
Of course, this is and will likely remain a hotly contested topic but there’s no harm in understanding that black and white might not be the best choice for each and every photograph you make. To that end, it’s up to the photographer to choose what fits their intended end result more fully and then proceed as they see fit.
When in doubt, ask yourself whether the colours found within a scene constitute the bulk of its overall visual impact. If the interest comes more from the shapes, direction or contrast of light and even the textures of the subject, then it’s a good bet it will work well in black and white.
Camera Equipment for Black and White Photography
Currently, the modern photographic world is beginning to display a renewed interest in modes of non-digital photography. In fact, these days I find myself shooting with my film cameras as much as I do with my digitals. Fortunately, no matter if you shoot film or digital cameras, the essence of black and white photography remains the same. However, from a standpoint of equipment needed the differences between using a digital camera to capture your black and white photos is wholly separate from that of using a film camera.
 Digital vs non-digital cameras for black and white photography. Photo by: 'Adam Welch'.
Let’s take a look at some of the basic gear you’ll need to get rolling with both digital and non-digital black and white photography.
Non-Digital
You’ll notice that I’ve chosen the phrase “non-digital photography” in place of “film photography”. Even though most photographers who don’t shoot digital more or less shoot film, there is a growing circle of highly dedicated picture makers who prefer alternative processes such as wet plate collodion for their black and white work. Just in case you were wondering….
In any case, seeing as there has been a resurgence of non-digital photography techniques in recent years, we thought it would be a good idea to include a section which covers the things you will need to get started with non-digital black and white photography. Although this will centre around using black and white film, just know there is an entire world of non-film/non-digital photography out there as well.
Camera
This is a broad area because there is no shortage of film formats and film cameras available. As odd as it sounds some of them don’t even need lenses (pinhole cameras) in order to capture images. However, you will generally need a camera and lens in order to make your black and white photos.
 Digital cameras are more budget-friendly than film cameras. Photo by: 'Adam Welch'.
Compared to digital cameras, film cameras are relatively budget friendly in most cases which make them a great way to get into photography.
Black and White Film
Just as with the case of film cameras, there is actually no shortage of black and white film still available on the market today. The majority of these film stocks are quite inexpensive as well. Be mindful, however, that you’ll likely need to have this sort of film processed through mail order lab services should you choose not to develop it yourself. Many of these labs will even scan your negatives and convert them into fully editable digital files for you.
Should you choose to be bold and try your hand at developing your own black and white film, you will find it’s incredibly easy. You’ll need a few chemicals, or better yet a monobath, to get the job done but the overall process is so fun and simple that you might consider this as an option instead of sending your film off to a lab.
A Way to Scan or Print Your Developed Film
Unless you choose to go all in and print your own photos in a darkroom, you’ll need a way to get your images from the negatives and into your computer for processing. This can be accomplished in a number of ways but the easiest and most cost effective way is to use a scanner and film carriers.
 Using a scanner will allow you to move your negatives to your computer for processing. Photo by: 'Adam Welch'.
This is called “hybrid-processing” and is essentially the best of both worlds when it comes to combining the benefits of both film and digital black and white photography.
Check out this video series which demonstrates just how little you can get by with when it comes to processing your own black and white film practically anywhere.
And it gets even easier when using a monobath solution…
Black and White Lens Filters
Though not required, you’ll find that black and white film benefits greatly from the use of black and white colour filters.
 Black and white colour filters are great for black and white photography. Photo by: 'Adam Welch'.
These filters only allow certain wavelengths of light to pass into the camera, which in turn affects the contrast in the negative image on the film.
Non-Digital black and white photography can still benefit from other basic photo gear such as other filters, a tripod and remote or cable shutter release but to begin, all you truly need is a functional camera and some film. That’s it.
Digital
For all their incredible contributions to the world of photography, digital cameras turned out to lend themselves as perfect tools for avid black and white shooters. The ability to not only capture high resolution images but to also convert those images to highly manipulable black and white photos was a Gift from the Gods.
Unless you happen to be a person who enjoys the entire process which accompanies shooting film and working on your prints in the darkroom (the author slowly raises his hand), there could quite literally not be a better way to capture outstanding black and white photos than with a digital camera setup. What’s more is that the tools required for digital black and white photography are by far considerably less than those needed for its non-digital counterpart.
Camera
Yes as shocking as it might be, you will need a camera and lens combo to begin making black and white photograph.
 Make sure to use a digital camera that can shoot in RAW for black and white photography. Photo by: 'Adam Welch'.
Hypothetically, any digital camera will do (even your smartphone) but you will have great versatility with a DSLR or mirrorless camera capable of shooting in RAW format... more on this in the processing section. Some digital cameras even have built-in black and white colour filter or film simulations.
Post-Processing Software
There is no shortage of apps and software available today that will enable you to convert your colour image files into black and white photos. It’s a good idea to choose one that allows you to work with individual colour channels. Finding the software that’s right for you is like trying on a new pair of jeans; choose the one that feels the best. Many post-processing software companies offer free trial versions of their programs, so try out a few before you commit.
Yes, that’s really about it as far as the absolute bare bones gear required. Of course, just as with non-digital photography, you will often need a few other pieces of kit. These include filters and especially a tripod in order to nab certain shots but overall, digital black and white photography is incredibly accessible to almost any shooter, regardless of budget or skill level.
Best Camera Settings for Black and White Photography
In terms of basic camera settings, such as aperture and shutter speed, black and white photography requires no uniquely specific camera settings... save for one. If you truly want to be able to take control of your black and white photography and get the most from your digital black and white conversions, you need to absolutely... and I repeat... NEED to be shooting in RAW mode.
 RAW files will allow you to create better black and white images. Photo by: 'Adam Welch'.
Simply put, RAW image files contain much more data which can be used for more in-depth post processing. This is especially useful, if not explicitly needed, for processing black and white photos. The reason for this because even though you might intend to end up with a black and white photo, you will need the additional colour information embedded within the file in order to fully manipulate the luminance values, and by default the contrast, of your converted black and white image.
 Make sure to record in RAW format for higher quality images. Photo by: 'Adam Welch'.
This means that even if you choose to shoot in “black and white mode” with your camera, make sure that the images are being recorded to the memory card in RAW format and not JPEG, or at the very least RAW+JPEG.
We’re about to cover the benefits of shooting RAW when it comes to post-processing your black and white photos in the next section.
Secrets of Processing Black and White Photos
It might sound as if I’m oversimplifying things a bit but there are only two secret weapons that you will need in order to produce world class black and white photographs with virtually any post-processing software. I’ll be showing you these tools in Adobe Lightroom Classic CC but you’ll likely be able to find them in many other popular photo processing apps and programs.
First, let’s talk about how to convert a colour image to black and white. There are a few ways to go about it and they are all equally simple.
“One Click” Conversion
By far the easiest method for converting your digital files to black and white, you’ll find this option in most photo editing software.
 One click conversion in Lightroom. Photo by: 'Adam Welch'.
Just click on the convert option and voila, your photo is instantly turned black and white.
Desaturate
You also have the option to simply desaturate the photo using the Saturation slider. This is a good choice for when you want to have complete control over the global (overall) saturation of the photo.
 Desaturation in Lightroom. Photo by: 'Adam Welch'.
Go ahead, ask me if there’s a difference between the black and white conversion option and the saturation slider route. The short answer is... maybe. In my experience, I’ve noticed subtle differences in the initial contrasts but this could very well be a wholly subjective observation. In practical terms both methods should accomplish the same goal.
Convert to Grayscale in Photoshop
This is the most destructive method for converting your photos to black and white and the option I would recommend least. Inside of Adobe Photoshop, there is an option to ‘Convert to Grayscale’.
 Convert to grayscale in Photoshop. Photo by: 'Adam Welch'.
While this will certainly convert your colour photo to black and white, it will also permanently remove all colour information from the image file which was imported into Photoshop. This means that the individual colour channels in your photo will not be eligible for manipulation later down the road. Use this option with caution.
Now that we know a few ways to convert our photos to black and white it’s time to talk about those two wonderfully useful tools we mentioned earlier.
HSL Panel
If there’s one of the most all-time under-appreciated but incredibly powerful post-processing tools, it has to be the Hue, Saturation and Luminance panel, or HSL panel for short.
 HSL panel in Photoshop. Photo by: 'Adam Welch'.
It’s here where can individually adjust the individual colour channels present in our digital photos by changing their brightness, hue and unique saturations. The reason why this is such a potent tool for your processing is precisely because you can adjust individual colours without affecting others. And you guessed it, this is an exceptional tool to have when working with black and white images.
Just as with the black and white colour filters in non-digital photography, the HSL panel works to enhance or reduce the overall luminance of certain colours as they present themselves within a black and white photo. This means that we can specifically control the relative contrast based on the individual colours which are present in a scene.
Have a look at this.
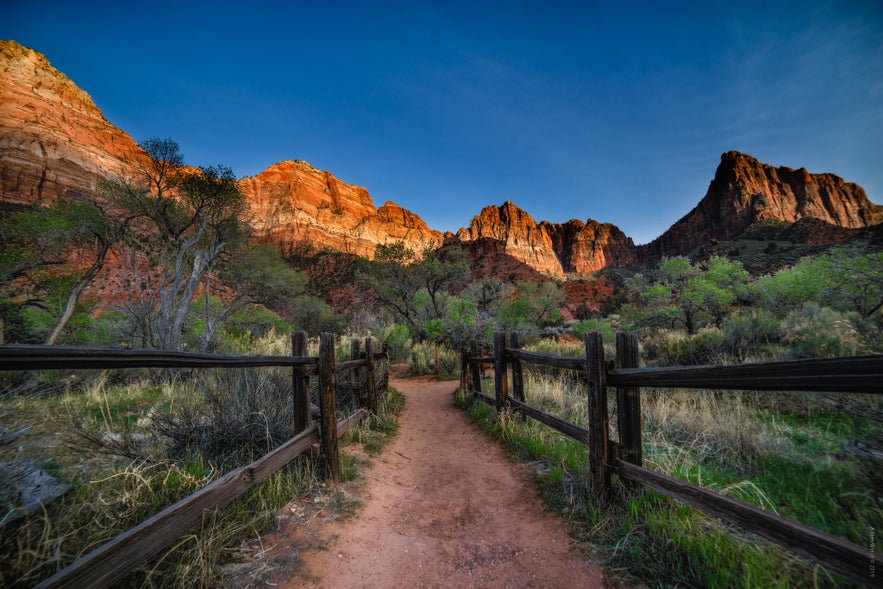
Now converted to black and white…

I’ll darken the luminance of the orange channel.

Fairly drastic difference right? Next I’ll brighten the red and yellow channels.
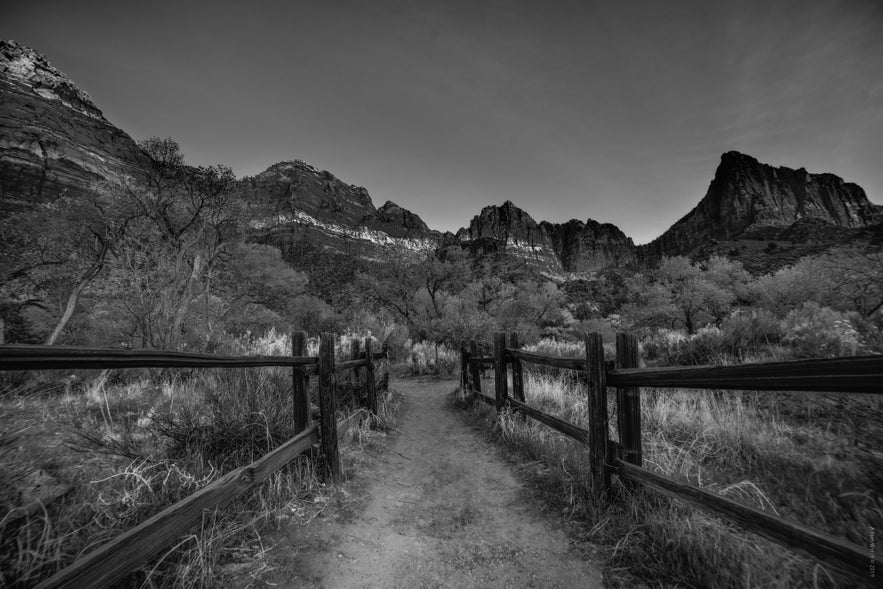
Now that’s quite the transformation with just a few clicks!
The reason we’re able to do these sort of far-reaching edits is because we shot in RAW mode. Granted, you can do the same with images shot in JPEG but the extent to which you can push your work with the HSL will be much more limited.
Tone Curve
The tone curve is King among multi-function post-processing tools. Not only can we use it to adjust the contrast of our black and white photos and play around with luminance values, but we can also use it to digitally “tone” our images.
 Tone Curve tool in Photoshop. Photo by: 'Adam Welch'.
The tone curve allows us to add in toning effects to black and white photos by working with the red, blue or green colour channels. What’s more is that these can be adjusted based on the luminance values similarly to the HSL panel.
Here I’ve added some blue to the shadow areas of this photo.
 Blue has been added to the shadows in this photo. Photo by: 'Adam Welch'.
And here I’ve added in some gold tones to the highlights in the same photo; effectively producing a split toned black and white image simulation.
 Gold tones have been added to the highlights. Photo by: 'Adam Welch'.
As you can already see, there are limitless creative possibilities for processing your black and white photos using only the tone curve and HSL adjustments.
Final Thoughts on Black and White Photography
It’s important to remember that there are no real “rules” for making black and white photographs. The only black and white photography rules you will find are likely located within the confines of your mind and limited by your own creativity. No matter if you’re just getting started or if you’ve worked with black and white photos for years, I hope the things we’ve discussed here today will help to deepen your appreciation for this timeless genre of photography.
You’ll hear a lot of debate on the merits of black and white photography when compared to colour but perhaps these arguments miss the entire point of black and white photography. It’s not a choice to abandon colour in our photographs but rather a preference of translating those colours into a universal language of perspective. Instead of relying on the “true” appearance of the world around us, a black and white photo incorporates the interpretation and feelings of the photographer in order to transmit emotion to the viewer.
About the author: Adam Welch is an adventurer, photographer and author based in the USA. You can find more of his work on his website or by following him on Facebook and YouTube.
Be sure to share your thoughts on black and white photography with us in the comments below and have fun shooting black and white photos of your own!

