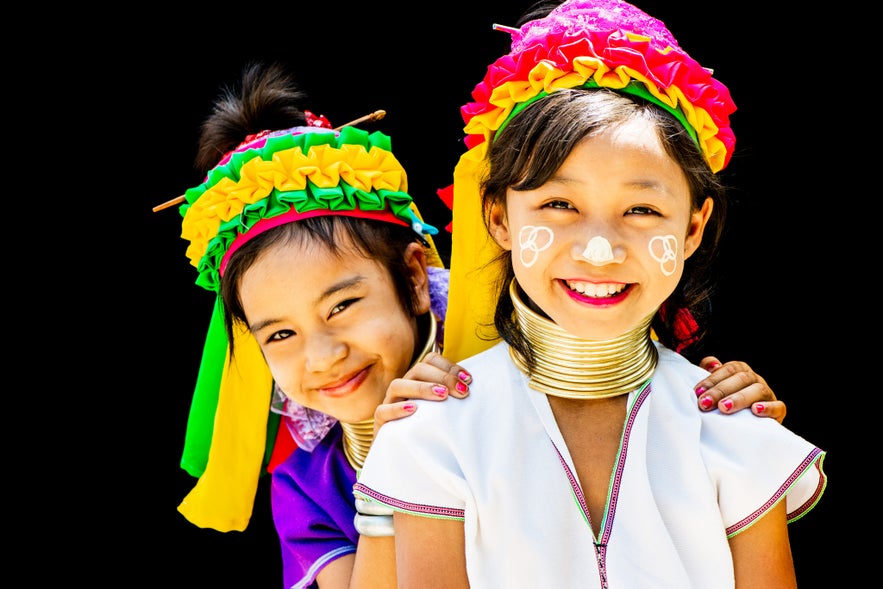
Isolating a person against a black background creates a dynamic portrait. When you’re looking for portrait photography ideas, there are none more simple and effective than using plain shades of black or white.
- Check out this article on How to Take Great Photos in Bad Lighting Conditions
- See these Bright Ideas for Shooting in Daylight
Portraits with black backgrounds are powerful because they do not distract from your subject. The viewer’s eye is not drawn away as it can be with a white background. On the other hand, portraits with white backgrounds are popular with designers. They lend well to having text and other graphics placed on top in editing.
When you use a black background in portrait photography, you are able to focus the viewer's attention on the subject. In this portrait photography tutorial, I will share with you the black background photography tips I use for successful images.
Why You Should Learn Portrait Photography Techniques
I learned portrait photography because I had to, not because I wanted to.
As a young man, I was very shy. Taking photos of people was too difficult for me, so I didn’t make portraits very often. When I did, it was always with someone I knew and felt comfortable with.
When I landed a job in the photography department of a daily newspaper, I realised change was needed. Most pictures in newspapers will often have at least one person in them. As such, I watched and learned from some of the more senior photographers on the team. I saw two of them frequently use a photography technique that stood out to me. They would isolate their subject against a plain black background.
The portraits that they made looked fantastic in the newspaper. At the time though, I was not aware of how they were able to achieve this effect. These photographers had no black backdrop paper to work with. They had no studio or lights to rely on. Their portrait photography lighting setups were usually natural.
I was eventually able to gain some beginner portrait photography tips from them. They taught me to choose the right situations where the portrait photography lighting was suitable. This meant having the right light on the subject and on the background. I soon discovered that there was no need for Photoshop trickery with black background portrait photography.
 You don't even need Photoshop to create a portrait like this with a black background. Photo by: 'Kevin Landwer-Johan'.
- See also: 11 Day Mongolia Photography Tour
Where to Start with Black Background Portraits
It’s all about lighting. The best thing about it is that you do not actually need a black backdrop. Any colour or texture of background will do, so long as the lighting is right.
The most important aspect of black background portrait photography is that you are able to achieve enough contrast between your subject and the background. As such, the lighting that falls on your subject needs to be different to the lighting in the background.
It is also important that you learn to control your camera settings. If you do not set your camera up right, then you will run the risk of having an overexposed subject. You will then also have too much detail visible in the background which can make the image seem quite chaotic.
Portrait photography techniques often require you to balance the light on your subject with the light in the background. With black background portrait photography, you will want to avoid this. The less light on the background, the more successful you will be in rendering it a deep, rich black.
As I learned from my photographer colleagues, it is possible to achieve this look without the need for a studio or artificial lighting. I love this look so much that I have learned how to seek out the right locations to achieve this goal, whenever the light is right.
It is possible to train your eye to look for the perfect elements involved in creating a great portrait with a black background. With practice, you will be able to find situations in which you may isolate your subject against a black background. You can also learn to see when the circumstances are most favourable for creating these types of images.
The great thing about this photography technique is that you can also create the right conditions for taking portraits with a black background in a studio or even outdoors.
 You can create the perfect conditions for taking portraits with a black background either indoors or outdoors. Photo by: 'Kevin Landwer-Johan
Natural Portrait Photography Lighting for Black Backgrounds
Light is of the essence in photography. The amount of light and its quality govern the way that your photographs look. Strong, hard light creates high contrast. Soft, subdued light creates low contrast photographs.
The way we see light with our eyes and the way our cameras record it is different. Our eyes can see a broader tonal range than our cameras can record. As technology advances, this is changing. In the future, our cameras may well be able to capture more tone range in a single frame than our eyes can see.
In high contrast lighting, our cameras will record less detail than we see. Knowing this and looking for situations where the lighting and the location is right will make for great portraits with a black background. With the right light and camera settings, this style of portrait can be achieved with little or no post processing.
 This portrait was taken on a sunny day. Photo by: 'Kevin Landwer-Johan
I made this black background portrait on a sunny day when the sun was high in the sky. The conditions were right because the sun was above and behind my subject. You can see the direct sun on her hair and arm. It’s also lighting the hair and trunk of the baby elephant behind her.
How did I create this shot? Well, we were standing on concrete pavement which reflected the bright sun back into my model’s face. Behind my subjects was a large building. The part of the building making up the background for this portrait was shaded from the sun. This allowed me to render the background black, due to the amount of tone difference between the model's skin tone and the dark background.
To make the background even more black, I darkened it during post processing to enhance the contrast ratio.
 This portrait was taken on an overcast day. Photo by: 'Kevin Landwer-Johan
Even on an overcast day when the light is flat, it is still possible to make portraits with a black background. The lighting for my portrait of a monk standing in the doorway was very dull. However, because the interior of the warehouse behind him had far less light, the space appeared to be black.
Creating black background portraits is all about the light ratio between your subject and the background. This can be more challenging to control when using available light. Look for situations where the light ratio is sufficient. As you practice this technique, you will become skilled at seeing when the conditions are right.
- See also: 11 Day Kyrgyzstan Photography Tour
Black Background Portraits in the Studio
In a photography studio, you are in control of the lights and background. You often have more of a direct influence on your subject too. They are there purposefully for you to photograph them. These things afford you much more flexibility than working with only natural light.
The same principle applies. You need significantly more light on your subject than on your background. You need to position your lights and adjust their output so little or none of the light will affect your background.
Backgrounds do not need to be black. They can even be white if you have enough space and control of your lights. Keeping sufficient distance between the lights and the background is necessary. It’s also important not to have your subject too close to the background. If they are too close to it then the light illuminating them may spill over onto the background.
If too much light is affecting the background, you will not be able to render the background black. This can be so even if you are working with a completely black backdrop.
 Working in a studio allows you to control the lighting and the background. Photo by: 'Kevin Landwer-Johan
Working in a small studio space, you can use ‘flags’ to control the spill of the lights and keep it off your background. A flag is anything used to block light. You can use card, fabric, or other things to stop the light from hitting the background.
Positioning your lights well is important also. If you have your lights directly facing the background, then yo will be more likely to see the effect that it has. Place your lights at a forty five degree angle or greater to your subject. Doing this means that you will be less likely to have them reflect off the background and into your camera lens.
When shooting in a studio, you should also modify the output of your studio strobes. Using a bare flash, unless you are in a huge studio, will mean that your lights will affect the background. Umbrellas tend to spread the light so it’s nice and soft, however, the lighting may still spill onto the background. A soft box is usually a better option.
When you are working in a more confined space, attaching a snoot or honeycomb grid to the light will give you more control of its direction. With these types of light modifiers, there is less light spill to affect the background.
A larger studio space can give you more scope for how you may modify your lights and where you might choose to place them.
 You can use black fabric for your background in a studio. Photo by: 'Kevin Landwer-Johan
For this studio portrait, my background was a length of black fabric. I used one soft box above and slightly in front of the model. I also had lights shining in from beside her. Flags were positioned out of frame between the lights on the side and the background to avoid any spill.
 A perfect demonstration of the light ratio in this self-portrait of myself and my wife. Photo by: 'Kevin Landwer-Johan
This self portrait with my wife demonstrates how the light ratio works. Our background was black fabric and we were both wearing black. As there was more light on our clothing and my wife’s hair than the background, our shirts and her hair ended up looking grey. The background itself stayed black.
A Special Technique for Creating Black Backgrounds Using Natural Light
Photographing black background portraits in a studio will give you more control. However, most photographers don’t have ready access to a studio. Setting up and maintaining a studio is expensive and requires a good amount of indoor space.
I love the photos of American photographer, Irving Penn. His work inspired me to develop a method of taking black background portraits outdoors. Penn had a portable daylight studio he used in exotic locations to photograph local people.
After reading about Penn’s studio, I designed and built my own. It is portable and I have used it in many mountain villages in northern Thailand where I live. It is easy and relatively inexpensive for anyone to do. You can simplify this technique even more and still get great results. The main thing you need to do is concentrate on managing the light ratio.
 I use black fabric in the outdoors for creating dynamic portraits with a black background. Photo by: 'Kevin Landwer-Johan
Rather than use black backdrop paper, I use a piece of matte black fabric for my background. This absorbs the light well and is not reflective, as paper can be. By setting up a black background with the sun above and behind it, the light will also be blocked. I have lined the fabric with a sheet of thick black polythene to block light from filtering through. With my subjects backlit, I can then bounce light into their faces. The ratio of light on the background and my subjects is then sufficient for the background to render black in photos.
While this is a great effort to go to, you don’t need such a set up for everyday portrait photography. Even hanging a black backdrop on a fence or wall with the sun behind it can produce a black background. However, you must ensure that there is no sun directly lighting the background or filtering through it.
As you can see, it is possible to create black background portraits when working with natural light. Having some control over the light and background will make it easier to achieve.
I made this portrait of a Pwo Karen woman below in a small mountain village in Om Koi, Thailand. It was a sunny morning, but I was careful that no sunlight was shining directly on her. I used reflectors to bounce the light onto her face. The smoke from her pipe was backlit because the sun was behind her.
 This photo was taken on a sunny morning with reflectors to bounce light onto the subject's face. Photo by: 'Kevin Landwer-Johan
Making black background portraits is a great way to isolate your subject. The most important aspect is the light ratio. When you have enough contrast between the light on your subject and the background, you can create a black background.
The dynamic range of modern camera sensors often means that you'll need to do some post processing to finish your images. When the lighting ratio is sufficient, the work you will need to do at your computer is very minimal. I often use the levels or curves controls to balance out the image. Other times, I will simply use the burn tool to darken the background.
Once you are aware of this incredible photography technique and begin practicing it in-field, you will begin to see situations arise where you can create your own black background portraits. You do not need a studio or even a black backdrop. It's really that easy.
About the author: Kevin Landwer-Johan is a photographer based in Thailand. You can find more of his work on his website or by following him on Facebook and Instagram.
Have you tried any of the tips for taking portraits with a black background that we've listed above? How did it work out for you? Do you have any other tips that you can share with our readers? Leave a comment below!


