If you like being out in nature and taking pictures, this guide is for you! In this extensive guide, we’ll go over everything that has to do with landscape photography: how to scout locations, best times to shoot, compositions, gear, post processing, social media... we'll even talk a little bit about the business side of landscape photography.
- Discover The Ultimate Guide to Animals in Antarctica
- Check out this article on Understanding Metadata | EXIF for Landscape Photography
Being out in nature and capturing it is something almost everyone does nowadays. The most important thing while being out photographing in nature is simply enjoying it, taking in the fresh air and often relaxing the mind. It can also be addicting in many ways. You want to transfer the whole landscape and mood you experience into one photo. This is easier said than done. This article explains everything you need to know to make successful landscape photos.
Getting Started
Having a professional camera with lots of lenses or just shooting with your smartphone, this guide is for everyone! In fact, most of us started with photographing landscapes with our smartphone. When we’re on holiday or simply walking in a local forest of beautiful mountain trail, we always want to capture those beautiful sceneries and moments that randomly unfold. The best camera is the camera we have with us, and so we use our smartphones.
At some point, you might enjoy it so much that your interest goes to something ‘more professional’. You want to take ‘better’ pictures, maybe you start to gain interest in the post processing side, and finally print them.
When we talk about landscape photography we often talk about inspiration. Where do you get your inspiration from? Think of anything in your every-day life. Movies, series, art, events that recently happened, it can be literally anything. But if you want to keep taking interesting photographs, it's important to have inspiration from somewhere. If you have ideas, write them down. This can be types of photography or in landscape photography inspiration also comes a lot of times from a ‘location’. This can be a new spot near your house, a new city in your country, or a whole new country on itself. Exploring is a big part of landscape photography.
 The Milky Way reflects in an unknown lake in an unknown place in Kyrgyzstan. Photo by: 'Albert Dros'.
Scouting
Always Look Around!
So how do you find interesting locations? First of all, it’s important to always look around in your daily life. Even on your normal route to work, there might be something interesting to photograph. You will often just miss it because you take the same route everyday and pay zero attention to your surroundings.
It’s important to always have a fresh look everywhere you go. When you find something interesting, mark it on your map or simply take a picture with your smartphone. Your smartphone has GPS data, so you can always see the location where you took your smartphone photos.
Google Images
This may sound obvious, but Google is very powerful. You can find images and location from basically anything in the world by using Google images. Even if you have an image of a place and it has no location or name marked to it, you can use a Google reverse image search to find any data on similar images on google. This way you can find its location and more info about the image.
If you’re planning on visiting a new place, simply type that place in Google images and add ‘photo spots’ behind it. You’ll come up with the most popular images of that place and get some inspiration on what to expect.
One of the best resources of inspiration and locations nowadays is Instagram. But you have to know how to use it to get the most out of it.
You can simply search for locations. Even the most remote locations on Earth have images from locals. They’re usually not the greatest images but you can get a perfect idea of what to expect.
Another option to search for locations is hashtags. Via ‘places’, you can find the most popular images of those locations and then check what hashtags are used. Via these hashtags you can find more images of these corresponding places. Hashtags and Places on Instagram are a great way to scout for places.
Google Earth Pro
Google Earth is one of the greatest resources to see how things look on a location itself. With Google Earth, you can literally find your own house and car, in 3D! It’s scary.
Google Earth is super detailed nowadays. You can see how mountains look from certain vantage points, hikes, etc. You can basically check the whole area in 3D.
Google Earth is also great for scouting drone shots. Top down shots and even 3D views can be scouted.
Google Earth is a great tool to scout new vantage points in unknown countries, just because you can see areas that have never been photographed.
 A screenshot of a scouted dried up river in Kyrgyzstan on Google Earth Pro. Photo by: 'Albert Dros'.
 Actual result of a drone shot on location. Photo by: 'Albert Dros'.
Finding an Original Location or Shooting Hotspots?
It’s up to everyone how and what they want to photograph. It’s easy to find the hot spots on social media, go to the place and take the shot. These shots are also easy to be popular so it’s very inviting to shoot them.
But beware! They can be crowded!
If you’re just starting out and want to build a good portfolio, it’s very safe to go to locations that everything is known about. You’re guaranteed to get good shots because you know exactly what to expect. It’s riskier to explore completely new locations as you’re not guaranteed to come home with something really good.
But that’s the challenge! It’s up to you!
A great thing to do is visit an area with some classic spots and in between, explore some new trails that are less known.
 A classic spot in the Italian Dolomites. ‘Hot spots’ are still great to photograph especially if you get beautiful conditions. Photo by: 'Albert Dros'.
 Another autumn location during the same trip that was found next to a random road. When going to ‘hot spots’ you often stumble upon some other great spots that are not that ‘famous’. Photo by: 'Albert Dros'.
When to Shoot
Landscape photography requires ‘good’ light for photos to be interesting. But what is the definition of ‘good’ light?
Sunrise and Sunset
When you think of epic light, you automatically think of light that occurs during a spectacular sunset or sunrise. Sunsets and sunrises are the most preferred period to shoot for landscape photographers. Just make sure you’re at the location you want to be at least 45 minutes before sunrise (and also stay a while after sunset). This way you’re guaranteed to get the best light. Especially during sunrise, the light already hits way before the sun is above the horizon and this often gives the most spectacular colours in the sky.
The sun sets and rises differently everywhere around the world, so make sure you’re up to date on sunrise and sunset times.
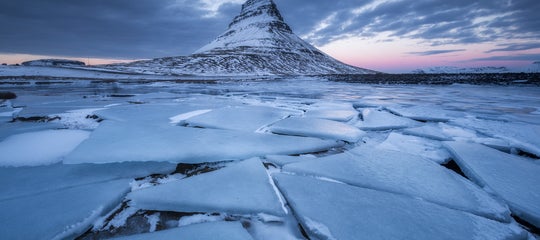
 A spectacular sunset at at the autumn winter transition in Iceland. Photo by: 'Albert Dros'.
Blue Hour
In landscape photography, the time between sunset (or before sunrise) and total darkness is called blue hour. The term blue hour is often not really correct, as the perfect blue hour light only lasts a short time of around 10 minutes, depending on the location.
The blue hour is very popular to photograph because it casts a very soft light, and is still light enough to take a good photograph. You get very soft tones in nature, soft alpenglow on the mountains, or a nice soft contrast between street lights and the night sky in the city.
 A winter blue hour shot of Amsterdam. Especially cityscapes are popular to photograph during the blue hour. The lights in combination with the evening light makes them look magical. Photo by: 'Albert Dros'
Night
Landscape photography during the night is magical. There are lots of options to photograph during the night. We can capture the ‘brightness’ of the night with long exposures with our camera. This way we can see much more light on our images than with our naked eye. It’s like a new world of photography and its beautiful.
Landscape photography during the night is popular for photographing the stars, star trails, Milky Way, the moon and many more things. You can also get creative with light, torches and light painting. And one of the best things about night photography is that it's very peaceful and quiet!
 Night image of a canyon in Kyrgyzstan where we used a candle in an old oil lamp to add light and atmosphere. Photo by: 'Albert Dros'.
Mid Day
Actually, any time during the day can be great for photographing landscapes. It’s important that you don’t limit yourself to thinking the only interesting light is during sunset, sunrise and the night. It’s just that we prefer to not shoot during the mid-day, simply because the light can be very harsh.
During the whole day, we sometimes experience ‘bad weather’. But in landscape photography there is no such thing. ‘Bad weather’ can create dramatic skies that are amazing to photograph. Or think of foggy conditions. Fog is magical in photos.
 A moody afternoon in Iceland. There is no such thing as bad weather. Photo by: 'Albert Dros'.
Knowing and Predicting the Weather
But how do you predict a great sunset? Or a foggy day? Lots of this comes from experience. Experienced landscape photographers use a combination of weather forecast with their own intuition to understand and predict the weather. There are a couple of ways to predict weather:
Local weather forecasts
This may sound obvious, but local weather forecasts can often give you a great insight on weather conditions. They often mention ‘chance of fog’ if there is predicted fog, mention cloud cover in morning and evening and tell you some things about the sun during that day. With that often limited information, you can draw your own conclusions.
Weather Pro App
This app tells you almost everything you need to know about weather. It tells you the weather forecast per hour on every location in the world and has radar maps with cloud cover. The app is often surprisingly accurate making it easier to predict if you’ll get a good sunset or sunrise.
Webcams
A great resource to check real time weather are webcams. You’d be surprised how many locations have webcams. Simply search for them on Google: *location* webcam.
With real time webcams, you can check the weather on location and see if it’s worth it to go there. Obviously, webcams are the best to look at right before going to a location.
- See also: How to Take Great Photos in Bad Weather
Visibility radars
Visibility radars are great to predict and see mist and fog realtime. If you’re interested in shooting foggy conditions in a forest, aim for a visibility lower than 1000m.
Lots of locations have local visibility radars and maps that you can check out.
 A foggy morning in the Netherlands. Foggy mornings are often easily to predict if you know the weather. Photo by: 'Albert Dros'.
Aviation weather
Aviation weather can be difficult to read if you’re not into aviation. But it often has great detail. You can see the different level of clouds: low, mid and high, and see how they develop.
Understanding aviation weather can be great for predicting sunsets or sunrises.
PhotoPills
The PhotoPills app shows you when the sunset/sunrise is in any part of the world. It shows you not only the time, but also the exact movement of the sun and moon. You can see exactly where the moon and sun rise, and where they set.
It also has moon calendars, real time Milky Way viewing in the sky, options to see star movement for star trails etc. It's basically everything you need to plan your photos.

Seasons
We can know and predict the weather, but it’s important to mention that things in nature never look the same. Things look completely different in every season. A forest can look snowy and ‘dead’ in winter which can still look amazing if you want to achieve a certain ‘Lord of the Rings’ look. It looks dreamy and alive in summer and gold in autumn.
Every season has its charms. Don’t limit yourself to visiting a location only once. Always think of how it can look during a different time of day, with different conditions in even different seasons.

 Exactly the same location photographed during different seasons. 1 in autumn and 1 in summer! Photo by: 'Albert Dros'.
Even though you can plan a lot, it’s important to always be ready for the unexpected! Sometimes unexpected weather conditions happen and you have to quickly anticipate to get the shot.
Don’t worry if you don’t always get the shot. This comes with experience.
Planning your shots
You might think some people are always ‘lucky’ to get that amazing shot of the Milky Way, lined up exactly with a building. Or a moonrise exactly on top of a church tower.
These shots are no luck. They’re planned carefully with tools that are available for landscape photographers.
As mentioned above, the best tool for the job is PhotoPills. So what shots are fun to plan?
Reflection shots
Think of canals in the city or a lake in front of a mountain range. Reflection shots are beautiful but you need calm water. You can plan these shots by simply checking the wind speed.
 A simple reflection composition often works very well. Photo by: 'Albert Dros'.
Long exposures
Sometimes, you see these long exposure shots with some kind of vortex effect. It looks like all the clouds are streaked out and are pointing to the middle. This is achieved with a long exposure.
For this, you need the right wind direction. You need wind that is coming towards you or coming from behind. This way the clouds move into a vortex shape. You can plan these shots by simply checking the wind direction beforehand.
 A long exposure shot along the canals of Amsterdam with the wind direction coming towards the camera. Photo by: 'Albert Dros'.
Moonsets and Moonrises
Photographing landscapes at night with the moon in the sky can be magical. It casts shadows on the landscape and gives magical light. Sometimes it almost looks like it’s daytime when you capture it on your camera.
But the real fun of planning moonshots is by photographing with a long zoom lens in relation to an object. By standing really far from an object and using a long lens, you can create shots where the moon looks very big in comparison with your foreground object. You can even plan the exact positioning of the moon on top of a church tower. These shots are challenging but very addicting and fun.
For these shots, PhotoPills is your friend. In PhotoPills you can see the line and altitude in which the moon is moving through the sky. It also has Augmented Reality views to let you see exactly where the moon will be in the sky during a specific period of time.
 A moonset shot right in between the 2 towers of the famous St. Nicholas church in Amsterdam, shot at 450mm. Planned with PhotoPills. Photo by: 'Albert Dros'.
- See also: Ultimate Guide to Photographing the Moon
Sunsets and Sunrises
If we want to get the best possible light on a certain location that we know beforehand, it’s important that we know where the sun sets or rises. It’s also important to visualise the shot in your head and think of what kind of light you want.
For example: When you’re shooting a high mountain range, it can be beautiful to have a sunrise behind the mountain range because you might get a colourful sky above the mountains. But if you choose to shoot a sunset on the other side, you might get a better shot with the sun casting light on the mountains itself. It’s a choice.
For the exact position and altitude of the sun, use PhotoPills. The same thing as moonshots with telephoto lenses also applies to telephoto shots of the sun!
 The last light of the setting sun casting a beautiful glow on the mountain. For this shot, the sunset was on the opposite side. This often works well in mountain scenes. Photo by: 'Albert Dros'.
Milky Way
Photographing the Milky Way is another thing that is very addicting. That moment when you see the Milky Way appear on your camera screen is unbelievable. It’s amazing that cameras can capture that amount of light and detail in the night sky. It’s great fun to plan the Milky Way as part of your composition.
The trick is to find a composition in your landscape that works together with the arch or alignment of the Milky Way. The Milky Way moves across the sky during the night because of the rotation of the Earth. It’s important to know its position and altitude in the sky. It looks different from anywhere on the Earth. In the winter months we can’t see the ‘core’ of the Milky Way. It doesn’t go above the horizon.
You can check all of these things in PhotoPills. It also has an Augmented Reality view where you can see the Milky Way in real time so you know its position.
There are a few things you need if you want to successfully photograph the Milky Way:
-
Low light pollution. Use a dark sky map (Google) to check where there is low light pollution near you.
-
Clear sky. With clouds you obviously don't see anything.
-
No moon in the sky. The moon gives a crazy amount of light.
 An erupting volcano planned with the Milky Way coming out of it. Photo by: 'Albert Dros'.
Star trails
Star trails are achieved by using long exposures or stacked exposures together over a longer period of time. It shows us the rotation of our Earth. Stars become lines and circles depending on where you point your camera in the sky. Star trails take quite long to make (a few hours during the night) but the result is often spectacular.
PhotoPills has all the tools you need to plan stars and see how your photo is going to look like by using a certain period of time and where to point your camera to check how your trails are going to look.
 A star trail over a period of only 30 minutes can already look spectacular. Photo by: 'Albert Dros'.
Gear
Landscape photography can be done with any kind of gear. We usually start out with our smartphones and buy a more ‘professional’ camera at some point because we want to create better photos.
When you’re buying your first camera it’s important that your camera supports manual settings. By understanding how your camera works and understanding the exposure triangle, you’ll quickly learn how to take technically good photos.
This article is not a gear guide, therefore we’ll not go too deep into this subject.

For landscape photography, any camera that starts at about $500 can be very decent to start out. If you want to be able to photograph the whole range of landscapes, you’ll need a camera that has an interchangeable lens mount. This way, you’ll be able to photograph with extreme wide angle lenses but also change lenses to extreme zoom lenses.
It's important that you decide for yourself what exactly you want to photograph and what you will use your photos for. If you’re only going to put them on in Instagram then you don’t need a super high end camera, because people will only see your pictures in a small size.
If you’re going to print them, then you’ll need a camera that performs better because on a bigger format, you will be able to see every little detail of your photo.
Another important aspect is low light performance. If you’re interested in doing a lot of photos with a higher ISO (photographing at night), you need a camera that has decent high ISO performance. Shooting the aurora and Milky Way shots require high ISO so a camera with good high ISO performance would benefit from this. Cameras with the best performance in the dark are usually full frame cameras.
 The Sony A7III on a cold morning. Photo by: 'Albert Dros'.
These days, high end full frame cameras are mostly used for landscape photography. Simply because they’re the most versatile and offer great image quality, dynamic range and high ISO performance.
However, landscape photography is also perfectly fine on ‘smaller’ sensors. Smaller sensors have a bit less dynamic range and high ISO performance in general, but they’re lighter and cheaper.
It’s important to do some research on what works best for you.
Must have camera equipment for landscape photography
Camera: A camera that you can set up manually with adjustable aperture, shutter speed and ISO.
Lenses: If you want to capture almost everything, it's important to have a very wide lens, a mid range zoom and a super tele zoom. Recommendations are 12-24 or 16-35 as a wide angle, 24-70 midrange, and 70-200 or 100-400 as a long lens. With these 3 lenses, you can capture basically anything.
Drones: Well, not really a must-have but drones can give that extra angle to your landscape shots. These days, drones are super popular. They’re also compact and easy to carry around, so having a drone in your gear is always nice to get shots from the sky.
 A beautiful drone shot of windmills peaking above the fog in the Netherlands. Photo by: 'Albert Dros'.
Camera bag: A good camera bag is a must. A bag is very personal but be sure to invest in a good camera bag. In general, good bags for cameras are Mindshift, Lowebro, Tenba, Shimoda and F-stop.
Make sure your bag is big enough for all your gear, but not too big so that it becomes annoying to carry. Comfort is very important and personal, so make sure you try out a bag before buying it.
Some camera bags are waterproof also which is a plus, and most bags come with their own rain cover. Most landscape photographers have different kinds of bags: a small one for ‘smaller’ trips and a big one if they need to bring everything.
 A good camera bag that holds all your gear and is comfortable is important. This example shows the Mindshift Backlight 36L. Photo by: 'Albert Dros'.
Filters: If you want to achieve longer exposures during the day, neutral density (ND) filters are crucial. The most important filters to carry around are a 6 or 8 stop, and a 10 stop filter.
Another filter that is crucial is a polariser filter, to filter out glare and reflections.
Optional filters are graduated ND filters to make part of the sky darker and make it easier to expose your images. For filters, see our Guide to Using Neutral Density Filters for Landscape Photography.
- See also: Camera & Gear Reviews
Accessories
Good accessories to have in your bag:
Remote controller: To do long exposures with your camera without needing to touch it. Also handy for longer exposures than 30 seconds.
Rocket blower: To quickly remove small sensor dust from your sensor. Can also be used to blow water from lenses and filters.
Raincoat for your camera: Always bring some plastic raincoats (or a high quality one). You never know when you’ll need to protect your camera from heavy rain.
Lens wipes: Bring good quality microfibre cloths to clean your filters and lenses.
Powerbank: A powerbank is always handy to bring if you need to charge your phone or even your camera. Some cameras nowadays can be charged with powerbanks.
Flashlight: Handy when you need to navigate around in pure darkness.

Camera Settings
When we’re shooting landscapes, settings are important but as important as you may think! Settings start to matter with more complicated shots like photos of the Milky Way or aurora. But in general, settings are quite basic.
Aperture
Aperture is one of the most important settings in landscape photography. It defines our depth of field and sharpness in a photo. For landscape photography we often want most of our photo in focus, from front to back. That’s why we tend to use apertures of around f/11 to achieve a big focus plane.
Shutter speed
This of course totally depends on the situation. When there is not much movement going on in our frame, we don’t care too much about shutter speed. In general, we select our aperture and select a shutter speed that gives us a correct exposure. It completely depends on the amount of light at that time available.
ISO
For landscape photography we prefer to use the lowest native ISO on our camera, often ISO 100 (sometimes 64 or 200). This gives us the greatest dynamic range in our files and a low signal to noise ratio. If we’re photographing at night in some cases, like an aurora or milky we crank our ISO up to 1600-3200 or higher.
Full manual mode?
Most photographers will tell you that you should always shoot in full manual mode. With landscape photography this is definitely not necessary. By simply using Aperture Priority you can get 99% of your shots.
In fact, lots of landscape photographers shoot on Aperture priority most of the time. If you’re not using a tripod and there is enough light, you can perfectly photograph on Aperture priority.
In this case, you choose your aperture and the camera will automatically select the shutter speed to get a correct exposure for your image. This will save you time of quickly adjusting shutter speed and often can get you quick shots of unexpected things happening. It's a great timesaver in good light situations.
 We often use Aperture priority mode when shooting landscapes. Photo by: 'Albert Dros'.
Histogram
When taking a photo it’s important to look at our histogram in camera. We don’t want peaks on the left or right side of our histogram because that would mean we have pure whites or blacks in our image. The detail in this part of the image will be lost. This is especially important if we want to process our image later.
Extra popular techniques
-
Bracketing: If we can’t fit the scene into the histogram because of extremely strong contrast (think of an intense sunset or sunrise), we may want to use ‘bracketing’. Bracketing is a technique where your camera will take multiple shots, dark and light, to capture the entire dynamic range of the scene. Most cameras have bracketing settings. Most used are 3 to 5 photos, with 1 or 2 stops of light different. The best results depend on camera.
-
Panorama: If you can’t capture the entire scene you want because your lens is not wide enough, you can shoot a panorama. Don’t use auto panorama modes on your camera. Instead, shoot the shots separately. The best thing to do is to shoot them in portrait (vertical) mode with an overlap of around 50%. You can later stitch them together in software like Lightroom for the best result.
-
Focus stacking: Sometimes we want to get very close to our foreground. So close that we can’t get everything in focus even when we’re using narrow apertures like f/14. In this case, there’s a technique called focus stacking. Focus stacking is simply taking multiple photos with different focus points (your camera or zoom is not moving). We can later combine the photos via a simple process to get a shot where everything is in focus.
These techniques are all used to overcome limitations of our camera and lenses. Our aim is to always display a scene in a photo the way we want it.
 An example of where bracketing was used to make a separate exposure for the foreground and one for the sky. Photo by: 'Albert Dros'.
 In this example focus stacking was used to get all the tulips from front to back in focus. Photo by: 'Albert Dros'.
Landscape photography is all about light and composition. Often different settings work for the same scene. The most important thing is to capture the moment properly. Try to not focus too much on settings people use for their images, but look more at how they composed their shot.
RAW
When shooting landscapes, make sure to shoot in RAW. If you’re going to process your images, you’ll have much more data available in RAW format.
If you’re always shooting JPEG, try to use RAW+JPEG in your camera. That way, you'll have both files available, if you ever want to dig a little deeper in post processing.
Finishing a landscape image with post processing is recommended but not mandatory. However, to achieve the best result, some post processing is often necessary.
Composition
When we’re seeing landscapes with our eyes we simply experience and see EVERYTHING. When taking a photo, it’s important to guide the viewer through our image and trying to transfer this experience into the photo. We have to carefully select a small (or bigger) part of the landscape to display in our photo. We can do this with lots of different lenses but the most important thing is that it looks interesting to our viewer.
There are a number of ways to create a visually pleasing composition. Here are some tips:
Leading Lines
Lines are the way to guide the viewer through your images. By defining lines in the image it makes it easy for people to navigate through your image without them even noticing it.
Leading lines can be achieved in lots of different ways. When you’re photographing landscapes for a while, it goes naturally. Think of obvious things like roads, but also not-so-obvious things like lines on rocks, placement of small plants, basically anything. Lines can be straight or curved, get creative!
 A simple composition of the lavender fields in france where all lines point to the house. Photo by: 'Albert Dros'.
 The waterflow is used here to get a curved line into the image. Photo by: 'Albert Dros'.
Balance
Another very important element in a photo is balance. There are many rules for balance, like the rule of thirds for example.
The most important thing about balance is that objects and portions of your image look balanced out. If you have a very thin sky with a huge foreground, the balance of the image is off. If you have a big tree on the left side of the image and there is absolutely nothing on the right, it’s the same thing.
Look at your composition and see if things are in balance.
 In this example a reflection composition is combined with a foreground element that balances out the image. Look at the different layers in the foreground - open space - reflection - sky element. They all have about the same size with a bit more emphasis on the foreground element, to balance the frame out. Photo by: 'Albert Dros'.
Reflections
Reflections are very pleasing in photos. Photographing an aurora in Iceland is beautiful, but what about a double aurora? It’s even better!
Look for lakes, pools or even little puddles. This also works great in cities where it has rained. Any puddle is a possible reflection shot. The trick here is to get super low with your camera. You won’t see the compositions from eye level. You almost have to get into the puddle to see it. Play around with it. The results can be great and creative.
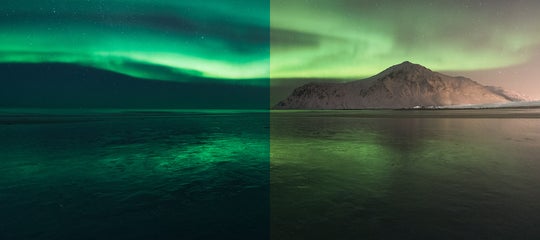
 A simple reflection composition yet it looks spectacular because of the reflecting mountain and aurora. Photo by: 'Albert Dros'.
Scale
When you’re standing somewhere on location, some buildings, rocks or mountains can be massive. But how can you translate this into a photograph that people see on a small phone?
The trick is to include objects to show the scale of the place.
Popular objects to define scale are people but you can use anything to define scale! The trick here is to position objects to increase awareness of scale. You can also do some ‘visual tricks’ to make things look even bigger. You can do this by smart positioning.
 The boat here is a bit further than the massive iceberg to show the scale even more extreme. Photo by: 'Albert Dros'.
- See also: Bright Ideas for Shooting in Daylight
How to scout compositions with a wide angle lens
When shooting with a wide angle lens, foregrounds are your friend. Foregrounds are often more important than the subjects itself because they usually take more space of your frame.
To find compositions, it’s important to not put your camera directly on a tripod and start shooting. Hold your camera in front of you and look at your live view. Put your camera low to the ground and see what happens. Walk around, slowly, and try to see different foreground elements. Streets, rocks, little flowers, contrasts, everything can potentially work as a foreground for a wide angle shot. Take your time to walk around in a scene before you use your tripod.
 A wide angle composition at 12mm with a bunch of rocks leading into the subject. Photo by: 'Albert Dros'.
How to scout compositions with a zoom lens
With a zoom lens, it’s different. When you’re using zoom lenses a lot, you automatically look for compositions in the distance. You see things very far away that can potentially be a good photograph.
Look for small details. Zoom lenses can also be great to make artistic minimalistic photos. Simple lines from some trees, or a texture on the ground. Anything could work.
A simple exercise when using a long lens can be standing in front of a wide landscape and looking through your telephoto lens, moving your lens slowly from left to right and up and down. This way, you’re forced to look through your smaller frame and you will start to see interesting compositions that only apply to this specific focal length.
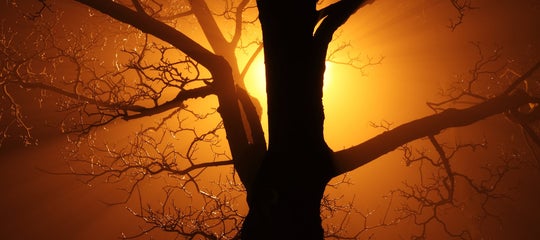
 A shot at 400mm of a single tree where the light hits. Photo by: 'Albert Dros'.
 Interesting edges of ice with the shadow falling on 1 side. Photo by: 'Albert Dros'.

When making compositions, don’t place objects close to your edges. This can quickly give your photo a very claustrophobic feel. Always leave some room between objects and edges. You can always crop a photograph a little bit in post, but you can’t get resolution back if you have a too tight composition.
Last but not least: these are all meant as tips. They’re not rules. It’s important to be creative and if you see something interesting that is not defined as any rule it doesn’t mean that it couldn’t work. Creativity is what can make a photo special!
Emotion
You can plan sunsets, sunrises, moonrises and Milky Ways, have the best gear and be totally ready for the job, but keep in mind that landscape photography is not only about all that. It’s also about emotion and to allow people to experience or feel something when they look at your image.
An image can be dramatic, cute, strong and scary. Try to think of the mood you want to transfer to your viewer. With some images, it may be important to tell a story somehow.
Try to evoke emotion. If your viewer is somehow emotionally drawn to your image, your image will be very successful. You can evoke emotion through many ways in images, by simply capturing a moment that already screams emotion, or by adding emotion in your image by post processing.
Post Processing
When you’ve shot your pictures in RAW, you can post process them. Good tools for post processing are Lightroom, Capture one, Photoshop and Luminar.
Most of the time, the pictures you took (especially in RAW) will look a bit flat and they’ll not really look like the scene when you’ve experienced it. In landscape photography, there is a lot of freedom in regards to post processing. Some people like to spend hours in front of their computer to do a lot of toning, dodging and burning (making some areas brighter and darker), painting on their image, basically doing a lot to change the RAW files.
Other people prefer to not do very much, sometimes doing only very subtle changes to the exposure and basic settings. It’s completely up to you!
 In this image strong form of split toning was used to give a slight tint of coolness to the shadows and very warm tones to the highlights. Photo by: 'Albert Dros'.
When you get into post processing, it’s important to be aware of all the techniques that are involved and that are available. This way, you’ll start to work backwards at some point. When you shoot an image, you already know what it’s going to look like before you've even processed it. You have some kind of vision of how you want your image to look.
It’s also important to develop some kind of personal style to your images. It’s great when people can recognise your images!
Regarding post processing techniques, there are lots of resources available online. But try to be original. It’s great to get inspiration from others, but in the end: try to give your own twists to an image.
Social Media
Nowadays, social media is a big part of landscape photography. Of course you don’t have to play a part, but social media can be a great way of sharing your work with the world and getting feedback. The best platforms to post your work are:
The most popular social network of them all. Instagram is great to get your work out there but it's not easy to get noticed because of the extreme amount of new images uploaded everyday. But it's still nice to show your work to your friends, as they probably all use Instagram.
 @iceland_photo_tours Instagram. Photo by: 'Albert Dros'.
Facebook is still a good platform to show your work and get feedback. There are many popular groups on Facebook that are very active and where you can get good feedback on your images.
500px
Although not as popular as a few years back, 500px is still a great platform to browse high quality content and show your work in better quality.
Flickr
On the return! Taken over by SmugMug, this is a nice community to share your work. The quality of which you can display your work is also very high here, so some photographers are still very much in love with Flickr.
 Albert Dros’ Flickr account. Photo by: 'Albert Dros'.
Own website
Creating your own good looking website is very important when you want to show your work to others, because you can design it according to your preference. Your own website is you! Having an appealing website with nice work and a little bit of information about yourself greatly helps when people want to know more about you as a person and potentially want to work with you.
Making Money
Eventually, you might be interested in making money with your landscape photography. You might be interested in something small just to cover gear expenses or you might want to make it your full time job. There are lots of different ways you can generate income from photography. Here are some examples:
Selling your work
The most obvious thing is to simply sell your work. This can be through prints or licenses. When you’re selling your work through prints it's important to know that printing is an entirely different aspect of photography. Transferring an image that looks great on your screen into a nice print is challenging and there are lots of different aspects you have to consider.
Selling licenses is another way to make money from selling your work. Licenses are often bought from magazines, companies who want to use your work in promotion, stuff like that. When you have your first request for a license, don’t be afraid to ask others how much a licence can normally cost.
Teaching
Photography is very popular nowadays and lots of people are interested in learning (that’s why you’re probably reading this guide). If you feel that you’re at a high enough skill level, then you can think of organising workshops.
Try to offer something unique. There are currently already so many people offering workshops that you really want to stand out if you choose this route. Give a workshop about something that is really local, that is really YOU. Something that other people can’t easily do.
Next to workshops, you can also give seminars and speeches about all kinds of aspects regarding photography. Or simply about your travels. There are many photo clubs everywhere who book photographers to come and talk about their work and teach them something.
Writing
Websites and magazines all over the world are always looking for content. If you can write articles about your own unique content, you can eventually sell it.
Commissioned Jobs
By having your own style, you can spark interest from companies that want you to photograph for them. Think local especially. When you’re known in your own city, you can often work with your local township to create promotional material from your own area and get paid for it.
Create a brand!
When you’re starting to make money from your photography, it’s important to create a brand. Your brand is you, your style that comes with your photos, the rates you ask. Basically everything around you. So make sure you got this right from the start, with a nice website, bio and most importantly: portfolio.
If you start getting clients and deliver good work, they’ll come back to you. Over the years, you’ll slowly build up a client base that will eventually come back to you every time and help you to generate a more steady income.
It’s not easy to make a good income from landscape photography, but it’s definitely possible. If you want to go full-time, it’s important to see if you really want to do this. Being passionate is most important here. If you’re not willing (or like to) spend 12-16 hours per day on photography, then it’s probably not the right (full time) job for you.
 We landscape photographers spent countless of hours to get that perfect shot. Photo by: 'Albert Dros'.
Passion
In the end, landscape photography is all about passion. The passion to capture the beauty of nature is something that every landscape photographer has. We all share the passion of wanting to explore our planet and visiting the most beautiful places, and in the end, to capture them in the most beautiful way. Our own way! I hope this guide helps you to get started or that it has inspired you in some way. I hope to see you soon on one of my tours!
Join Albert on a photography workshop and learn everything you need to know about landscape photography!

Albert is a Dutch photographer with an extreme passion for landscape photography. He aims to capture places and certain moments in the best way possible by using his own vision and unique style. His style consists of strong vibrant, sometimes fairytale like images in which he expresses himself. Albert has a background in Design, Video and Animation. He has worked for himself his whole life and has as a Master Degree in Multimedia & Entertainment Technology.
Albert loves to travel. Next to photo tours and workshops he likes to explore the world on his own or with friends. He has a passion for visiting the most beautiful spots in the world, whether known or unknown. Challenging himself is what keeps him motivated. Albert loves planning his shots carefully.
He does this with great detail to make sure his efforts have the highest chances of success. He sometimes plans days, weeks, months or even years to get that particular shot he wants. Challenging himself combined with planning and writing a story of the whole process is Albert’s specialty. He is always looking for new challenges and adventures. He is able to find beauty anywhere in the world: from misty mornings in the forests minutes away from his home to rooftops of the highest buildings in Dubai to remote locations in Iceland or the US. Next to taking photos, Albert also likes to teach and write about photography.
He occasionally writes for the most well known Photography magazines both on - and offline. Along that he has worked with many brands in the photography industry and is an official Sony Ambassador of Imaging.
His work has been featured in some of the biggest news outlets & magazines worldwide, like TIME, National Geographic and Adobe.