Rather than dealing with piles of labels and film in this modern age of digital photography, most of us have found ourselves working with numerous memory cards and hard drives, storing computerised information instead.
- Discover The Ultimate Guide to Animals in Antarctica
- Check out this article on Understanding Metadata | EXIF for Landscape Photography
In fact, every time that a digital photo is recorded, it is accompanied by a range of metadata, which is embedded within the image itself.
Although largely overlooked by landscape photographers, metadata can help you to become a better photographer and is the key to a smooth workflow, as well as the management of your photos. It can even be important from a business aspect and in terms of copyright protection.
In this article, we’ll look at what metadata is and how you can add metadata to your photos to improve upon your landscape photography.
What is File Metadata in Photography?
Metadata is digital information stored within an image that describes the photo itself. It contains significant details that serve to provide information about the image and how it may be used, in a way that can be understood by both humans and technology.
Metadata can be stored internally in a RAW file, JPEG, TIFF or DNG file, or externally as information outside of the original image.
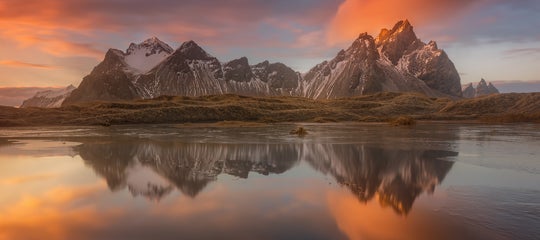
 Image metadata is an important part of landscape photography. Photo by: 'Wikimedia Commons'.
There are three types of metadata: 1) the basic metadata generated by in-built software in your camera; 2) extended metadata which you can add yourself later on; and 3) metadata that is produced during post-processing and saved in a separate file.
#1. EXIF Data
EXIF stands for ‘Exchangeable Image File Format’ and refers to the basic metadata that is generated and stored by your camera whenever you take a photo.
This data is embedded within your images and includes information about:
-
The camera model that you took the photo with, as well as its manufacturer;
-
The lens model and make that you took the photo with, as well as the focal length that you used;
-
The photo’s exposure values (shutter speed, aperture, ISO);
-
Metering mode;
-
White balance;
-
Whether a flash was used and its settings;
-
Date and time of when the picture was taken;
-
Resolution of the image;
-
GPS coordinates (if your camera supports this feature).
#2. IPTC Data
In addition to basic metadata, you can add extended information later on with the help of post-processing software. This type of metadata is referred to as IPTC data and was named after the ‘International Press Telecommunication Council’ – an organisation which first pushed for and developed standards for digital photo metadata.
This type of metadata embodies administrative information such as the creation date and location where you took the image, instructions for people using your images, as well as information about the visual content.
Some examples of IPTC metadata include:
-
Identifying the creator of the image;
-
How the image should be credited when it is published;
-
Titles;
-
Captions;
-
Keywords;
-
Further information about what is shown in the image;
-
Copyright information;
-
Underlying rights such as model releases, permission or licences that were obtained in the making of the photo (for example when shooting in a restricted area or on private property);
-
Rights usage terms;
-
Information on licensing the use of the image.
#3. XMP Data
Extensible Metadata Platform, also known as XMP data, is a recent format that was adopted by Adobe software. It includes all of the information of IPTC data, though allows for even more information to be stored in a separate file that sits alongside the original.
This information pertains to how you edited your RAW file, so that you will always have your original to revert to if needed.
How Do I Find Metadata in a Photo?
A question that we are often asked on our photo tours is how to find photo details, such as EXIF information. Luckily, metadata can be viewed relatively easily on your camera’s LCD screen, by toggling the ‘info’ setting in the menu.
 An example of image metadata. Photo by: 'Wikimedia Commons'.
You can also view find photo details on your computer, by right clicking on an image and going to the ‘Get Info’ menu on a Mac or ‘Properties’ menu on a Windows PC.
Another way to access, add and extract metadata from images is to use post-processing software, such as Adobe Lightroom or Photoshop.
Some photo-sharing websites on the Internet, such as Flickr and 500px, also allow you to check photo details online.
What Can EXIF Information Be Used For?
When you first start out in landscape photography, viewing the EXIF information of your images can help you to identify knowledge gaps that you may have pertaining to the technical side of things, which can lead you on the path to becoming a better photographer.
While may not remember the exact settings that you used to take a particular shot, especially if you happened to take several in a row with the same composition and in the same location, the EXIF data makes up for that by recording your camera and lens settings. That way, when you look back on your images at home, you can figure out why a certain image turned out the way it did, or how you were able to achieve a certain effect, simply by analysing the camera settings that you used at the time that the picture was taken.
You can even look at the metadata to see what focal length you were using, to help you understand when it is best to use a particular lens for landscape photography.
In fact, examining your own basic EXIF data, as well as that of others, can help you to learn quite a lot. If you’re not quite sure how an experienced landscape photographer was able to achieve a particular effect or shot, you can check out their metadata for an insight into the photography techniques they used. Then the next time that you’re out shooting, you can try out some similar settings for yourself.
It’s even possible to examine the GPS information of a particular image that you like, so that you can try to shoot from the same location.
Another way that metadata can be used is to help you to organise and sort your photos. This makes working with your photos much faster and easier, thereby improving your workflow. You can organise your photos according to where they were shot or the lens that you used. It is even possible to group photos with the same settings, which you can then work on in a batch.
More descriptive EXIF tags, such as keywords, can be used to identify your landscape photographs in a sea of millions. This is particularly useful for the business side of things, where you may be marketing your photos in the hopes of generating sales or licensing on stock photography websites.
Appropriate metadata in these circumstances can make your landscape photos easier to find, meaning that they’ll be more likely to be successful in catching the eye of the person who is in search of an image from a particular location, that exudes a specific mood or contains a unique element.
How to Add Metadata to Your Landscape Photography
While your camera records basic metadata in every image that you take, it’s also a good idea to key in some additional metadata for the reasons that we mentioned above.
Adding metadata to your photos is a straightforward process, made all the more easier once you are able to incorporate it seamlessly into your workflow. It’s easy to forget about it though, so it’s best to make it one of the first steps of your workflow, after you first load your images into your post-processing software.
To speed up the process of entering metadata, you can create a template that will input selected information for you automatically across files of your choosing. You can also manually enter specific information that pertains to each unique shot.
Adding Metadata in Lightroom
To manually edit the metadata for a single or several files in Lightroom, select them from the Grid view of the Library module. Next, choose ‘Metadata’ and go down to ‘Save Metadata To File(s)’.
Metadata presets in Lightroom can help you to save a lot of time, by applying a set of information across all of the images that you select. You can even add the metadata information automatically to your images upon Import into the catalogue.
To create a metadata preset, go to the Library module and choose ‘Metadata’. You’ll see the ‘Preset’ dropdown list at the top. Click on it and choose ‘Edit Presets’. A dialogue box will appear with all of the metadata information that can be entered. You can then enter as much or as little information as you like.
This preset can then be applied on Import from within the Import dialogue box. Simply go to the ‘Apply During Import’ section and from the ‘Metadata’ menu, choose the preset that you’ve made.
Adding and Modifying Metadata in Photoshop
To manually add or modify metadata in Photoshop, open the image that you’ll be working on. Next, go to the ‘File’ menu and down to ‘File Info’.
A new dialogue box will open, where you’ll be able to enter metadata information. Once you’re done, simply click ‘OK’ at the bottom of the dialogue box and it will save.
You can also create or import a metadata template from the same menu, which you can apply to any other files that you work on within Photoshop.
Examples of Image Metadata Tags to Use
The type of metadata that you choose to use for a photo is entirely up to you and what you’re comfortable with sharing, particularly in relation to your contact details. While you may not want to include your home address in the metadata, having a phone number, email and website address can be helpful for people who may want to get in contact about one of your images.
Some landscape photographers prefer not to share the locations of their photographs. However, to make your images easier to find by search engines and on stock photography websites, it’s best to attach all of the information that you have available about that particular photo. Generally speaking, for landscape images, location information should include not just the specific location where you took the shot, but also the state and country.
Identifying characteristics of the visual content should also be included in the keywords. Some examples are ‘waterfall’, ‘beach’, ‘glacier’, ‘mountain’ or ‘lake’. Even the seasons, ‘autumn’, ‘winter’, ‘spring’ and ‘summer’ can be useful for sorting images by metadata.
If there are people in your photo, then consider keywords about their demographics, such as age, gender and ethnicity. You might even include information about the colours that they were wearing, or the type of clothing they had on. It’s not unheard of for potential buyers to search for specific strings, such as “man wearing a red jacket in the mountains”. It’s also important to provide information about whether you obtained a model release, which can influence the ability for your shots to be used.
For animals or plants, you can include keywords such as the common name for the species and the region that they are from.
Metadata can also incorporate more conceptual keywords to make searching for your images easier. These include words such as ‘dramatic’, ‘serene’, ‘inspirational’ and ‘moody’. Also, consider using a handful of synonyms associated with your keywords, such as ‘viewpoint’ in the case of ‘lookout’.
When choosing keywords to include in your metadata, make sure that they are accurate and that they pertain to the image at hand. It’s best to leave out any words that don’t have anything to do with the image at all.
Image Metadata and Copyright Protection
The fact is that if somebody wants to steal your photo, then they’ll probably do it anyway. Metadata can even be removed from an image file, without needing any access to the original.
However, including copyright information in your metadata can be very beneficial in terms of protecting your images from illegal use, particularly by newspapers and magazines. The copyright details show up on image searches as well as on photo-sharing websites, informing users of how your photos may be used and distributed. This may deter people from using your images illegally, though it won’t prevent copyright infringement 100% of the time.
As you can see, understanding image metadata can help to improve your landscape photography and contribute to the overall success of your images. However, it’s an easy task to forget to do, even by experienced photographers. Just remember to give it the proper attention that it deserves by incorporating it into your workflow and you’ll be on your way to becoming a better landscape photographer.
The more that you get into the habit of using metadata, the easier it will become.
About the author: Serena Dzenis is a landscape photographer based in Iceland. You can find more of her work on her website or by following her on Facebook and Instagram.
Have you found EXIF metadata useful for your landscape photography? What are some examples of image metadata that you use? Share your workflow with us in the comments below!

Serena Dzenis is an award-winning photographer, author and journalist who is based in Iceland. She has written numerous articles for the Iceland Photo Tours website, both about photography in Iceland as well as the more general aspects of using a camera.
Well-known for her uniquely romantic photographic style and love for the winter season, Serena is not afraid of harsh conditions and in making the most of what this planet has to offer. Her open and friendly nature has seen her embracing challenges each and every day, teaching others to make their own future and to turn their dreams into reality.