You’re feeling the incredible rush of adrenalin as you weave between the icebergs at the Ice Beach in Iceland. The beautiful icebergs resemble diamonds, glittering on the black sand beach after washing up ashore from the Atlantic Ocean. You’ve got your camera and tripod in hand and you’ve taken great care to keep your feet dry by wearing knee-high gumboots in the surf.
- Check out these Camera and Gear Reviews
- See The Best Camera Gear Recommendations for Photography in Iceland
But then the unthinkable happens.
An unexpectedly big wave catches you unaware, sweeping you off your feet. At the same time, you get caught between two icebergs as they push in to the beach with the wall of water coming towards you. You tumble in slow-motion, as does your camera, falling hard into the freezing cold water below. Everything is soaked, from your outer layer through to your thermals. You drag yourself out of the water to safety. Then comes the inevitable thought… “is my camera okay?”
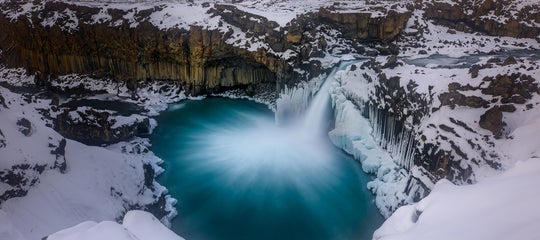
 It's easy to get your camera wet at the Ice Beach. Photo by: 'Iurie Belegurschi'.
Photography at the Diamond Ice Beach can be a risky business. Even the best of us have taken a fall into the unpredictable waves. There is no denying though that capturing the moment when the water recedes around one of those shiny icebergs is an exhilarating experience. The photos that you can produce at the Ice Beach are simply breathtaking!
If disaster happens to strike though and you end up getting your camera wet, try not to panic. Most cameras these days come with some form of weatherproofing or an outer layer of material that will protect them from the harsh elements in Iceland. There are also a few steps that you can take that will minimise the water damage caused and then hopefully, you’ll be back on your feet with a change of clothes and clicking away again at the Ice Beach in no time.
Step 1: Turn Off the Camera
 Switch off your camera as soon as it gets wet. Photo by: 'Jürgen Matern, Wikimedia Commons'.
As soon as you notice that your camera has come into contact with sea water from the Ice Beach during operation, you should immediately switch it off. Doing so will help to prevent any further damage from occurring by sea water coming into contact with the internal electronics. Water is a conductor of electricity, so leaving your camera on may cause it to short-circuit or even result in overall electronic failure. So as soon as your camera takes a dunk, be sure to switch it off!
Step 2: Remove the Camera Batteries
 Remove your batteries as soon as your camera gets wet. Photo by: 'FrankyDee, Pexels'.
The next step is to remove the batteries from your camera. Batteries can sustain damage quite quickly when immersed in water, as the water can get inside the casings, mix with the battery chemicals and then leak out again in a diluted chemical mess. This becomes a potential hazard if the chemicals come into contact with your skin, as you risk sustaining chemical burns.
Keep in mind also that seawater is very salty. The presence of salt tremendously accelerates corrosion, so if you don’t take the batteries out, then eventually the metal parts of the batteries that came in touch with the water will rust.
After you remove them from your camera, allow them to dry in an area with good ventilation.
Step 3: Remove the Memory Cards
 Remove your memory cards. Photo by: 'ShakataGaNai, Wikimedia Commons'.
Thankfully, most SD and CF memory cards are quite water-resistant, even if they happen to get completely soaked. However, it’s a good idea to remove them from your camera straight away, to ensure that you minimise the risk of losing any images you may have taken. Allow them to dry completely in a place with good airflow before you attempt to take any images off them. Your memory card may even contain the last image you took right before you got splashed, or the actual moment that it happened!
Step 4: Remove the Lens
 Clean the lens as soon as it gets wet. Photo by: 'Denis Barthel, Wikimedia Commons'.
Once your camera has fallen into salty seawater, you’ll want to clean the lens as quickly as possible to avoid any further damage. Before you remove the lens, check that there isn’t any water on the seal where the lens connects to your camera. If there is, then dab at it with a microfibre cloth to ensure that water doesn’t end up dripping inside the sensor compartment.
Once you have unscrewed the lens, be sure to place a cap immediately over your camera’s sensor to seal it off again so that it isn’t left open and vulnerable to any further mishaps.
Now that you’ve removed the lens, dab at the coating on the glass with your microfibre cloth. Make sure not to wipe, as most lenses have coatings that may be accidentally scratched or rubbed off. It is important to clean the lens as quickly as possible, as the saltwater can also result in deterioration of the lens coating.
Step 5: Check for Moisture Inside the Camera
 Check inside your camera for moisture. Photo by: 'Pxhere'.
If there is any saltwater from the Diamond Ice Beach in your camera, then you’ll need to make sure that you remove it immediately. As mentioned earlier, salt is a corrosive which can cause damage to the inside of your camera.
If there is any water in the battery compartment or the memory card slots, then use a small microfibre cloth to gently dab it away. Make sure that you don’t end up pushing any droplets of water further inside.
Step 6: Rinse the Camera
You’ve already gotten your camera wet, so why would you get it wet again? It might seem like the last thing you’d want to do but if your camera has been completely submerged in seawater, then rinsing off the salt is absolutely essential to prevent rust and corrosion.
To do this properly, you’ll need a large bowl of distilled water. Dip your camera into the bowl and make sure that it is completely covered with water for 5 seconds, then remove it and immediately pat it dry with a towel. If you’re not comfortable with this step, then you can always just wet a cloth completely and wipe it over your camera to remove any salty residue.
Step 7: Dry the Camera
Rice is a tried and true method of drying out electronics that have gotten wet. A better alternative though is silicone kitty litter, which mimics the effect of those silicone gel packets that you get every now and then when you buy something new. Just tip the rice or kitty litter into a large sealable bag, ensuring that there is enough within to cover your entire camera.
Before you place your camera into the bag with the rice or silicone kitty litter, make sure to open the door to the battery compartment and memory card slots. You’ll also want to keep the sensor covered so that rice or kitty litter doesn’t end up in inside. Then, seal the bag and leave it somewhere warm to rest for a few days, which will allow all of the water to be soaked up. How long you leave it for really depends on the amount of water that was involved in the soaking. If your camera was submerged for a few seconds, then you might need a day or two for it to dry. Ideally, you’ll want to set it aside for at least a week. Although you may be tempted to turn it on before this time to see whether it remains in working order, it is very important that you don’t switch your camera back on until it is completely dry, otherwise it may short-circuit and cause further damage.
Step 8: Professional Camera Repair
 Sometimes you'll just need to get your camera professionally repaired. Photo by: 'Goran Horvat, Pixabay'.
If you’ve tried all of the above steps and your camera still doesn’t work, then you should take it to your nearest professional camera repair shop for inspection. Depending on your level of insurance, salt water damage may or may not be covered for reimbursement and repair. You might be able to claim it under warranty, though it’s very unlikely. Keep in mind that there are no camera shops in the immediate vicinity of the Ice Beach, so you’ll need to wait until you’re able to get closer to Reykjavík before you’ll be able to do very much about it. Even then, they’ll likely need to send your camera away to the manufacturer, which may take longer than a week.
Please note that the above steps are not a guarantee that your camera will start working again if it gets water damaged in Iceland. If you are not comfortable cleaning your camera yourself, then the best advice is to seek professional assistance! However, the Ice Beach is not close to Reykjavík, so it’s a good idea to set into motion some of the steps listed above, in order to minimise damage before you can get your camera seen by a professional.
About the author: Serena Dzenis is a landscape photographer based in Iceland. You can find more of her work on her website or by following her on Facebook and Instagram.
Do you have any other tips for getting salt water out of your camera? Have you taken a dunking yourself at the Ice Beach in Iceland? How did it turn out for you and your camera gear? Leave a comment below!

Serena Dzenis is an award-winning photographer, author and journalist who is based in Iceland. She has written numerous articles for the Iceland Photo Tours website, both about photography in Iceland as well as the more general aspects of using a camera.
Well-known for her uniquely romantic photographic style and love for the winter season, Serena is not afraid of harsh conditions and in making the most of what this planet has to offer. Her open and friendly nature has seen her embracing challenges each and every day, teaching others to make their own future and to turn their dreams into reality.