Smartphone camera sensors have evolved a lot over the past few years. The different companies that produce smartphones are constantly coming up with new technology that closes the gap between phone cameras and popular DSLR camera brands such as Fujifilm, Leica and Pentax.
- Check out the Ultimate Guide to Composition in Photography
- Learn all about How to Take Great Photos in Bad Lighting Conditions
While smartphone cameras don’t offer extensive controls, they often come packed with settings and features that will help you to take different kinds of shots under a diverse range of conditions. These days, it’s getting easier and easier to produce professional travel and landscape photographs with a smartphone, particularly with the ongoing introduction of different shooting modes with every new smartphone model that is released onto the market.
Mobile camera modes are similar to the ones that you would find in the settings of a DSLR. They allow you to have more creative control over your images by providing the opportunity to adjust certain settings, such as the exposure, ISO, shutter speed, focus and other factors that may influence your shots. By understanding the different shooting modes on your smartphone camera, you’ll be able to decide which one best suits your style and learn how to control your phone like a DSLR, which will no doubt help to improve your landscape photography.
Smartphone Camera Modes and Settings Explained
Aperture Mode
The aperture of your smartphone camera is essentially the same as you would find on your DSLR. It controls the amount of light that reaches your smartphone camera sensor. A bigger aperture means that more light will land on the sensor as the diaphragm of the lens expands, while a smaller aperture will restrict the amount of light that is able to enter and create a narrower depth of field. This results in a photo where the foreground may be sharp and in focus, but the background is blurry.
This bokeh effect on a smartphone camera helps to emphasise subjects that are within 2 metres of you. Simply choose the aperture number that you want to use and the camera will blur the background.
 An example of how the aperture mode can emphasise subjects in front of you. Left is f/0.95 and right is f/16. Photo by: 'Roberto Pavic'.
Once you’ve taken a shot, the photo will usually show up on the screen of your phone. Unlike a DSLR, if you’re not satisfied with the amount of blur, then on most smartphones you can simply pick the photo, choose the photo that you want to edit and change the aperture.
The reason that this is possible is that smartphone cameras – particularly flagship models from Apple, Google, Samsung and Huawei – usually have a dual lens. A smartphone with a dual lens camera takes two pictures at the same time and then combines them for the narrow depth-of-field and bokeh effect.
I use a Huawei P30 Pro, which allows me to pick the part of the photo that I want to have in focus and to move the aperture slider from left to right until I am satisfied with the amount of blur. The aperture on this phone ranges from f/0.95 to f/16, so you can edit and save as many different versions as you want from the original photo. It’s a nice feature to have, especially for portrait photography, though can be very useful in landscape photography as well when you have an interesting subject in the foreground.
Night Mode
 Night mode is one of the fastest improving aspects of smartphone camera technology. Photo by: 'Roberto Pavic'.
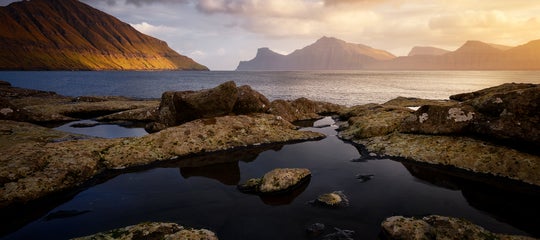
The night mode on Android smartphones is something that I’ve found really fascinating to use for landscape photography. This mode relies heavily on using the available light to create an exposure. As such, you may need to hold your phone very steady in order to obtain a sharp image, particularly when shooting with longer exposure times.
When using the night mode function on your mobile phone camera, it can take anywhere from around 1-10 seconds to take an image. The best part about it is that even when you’re shooting handheld, it is possible to get very sharp results without camera shake or blurriness, even when the subject is moving.
This is because when the night mode function is activated, your smartphone will take several photos in rapid succession. It then combines the image data to achieve maximum light and colour information, creating a single high-quality image that pulls data from the shadows and restores data to the highlights.
When using night mode in-field, try turning on the AI Image Stabilisation setting of your smartphone camera, which will further help you to achieve sharper images. This will reduce the need to use a tripod or to turn on the flash, meaning that you’ll end up with better landscape images with little effort. Keep in mind though that smartphone camera technology still hasn't caught up with DSLRs though, so you may not be able to capture the perfect photo of the Northern Lights, though you can still give it a go!
Portrait Mode
 Portrait mode can create interesting bokeh effects in the landscape. Photo by: 'Roberto Pavic'.
Shooting in portrait mode on a smartphone camera is very similar to aperture mode, though there are two significant advantages. The portrait mode often comes with a range of beauty and bokeh effects, which although designed for use with faces, can also help you to get creative with your landscape photography. For example, the beauty level can help you to smooth out a rough foreground, while the bokeh effect allows you to blur the light in the background with different shapes such as circles, hearts, swirls and discs. You can even add sunstars when shooting beneath the golden light of the Midnight Sun during summer in Iceland!
Monochrome Mode
 Monochrome mode is great for street photography. Photo by: 'Roberto Pavic'.
Monochrome mode can be very useful for street and architecture photography. However, it’s also wonderful for shooting landscapes, particularly if you want to produce something that’s a little more in the realm of fine art or if you happen to be shooting on a dark and cloudy day.
Winter in Iceland is the perfect time to use the monochrome mode on your smartphone camera, when the landscape is covered in a layer of pristine white snow. Take advantage of interesting foregrounds such as patterns at your feet, which can be used to provide contrast.
Some smartphones also have monochrome aperture, monochrome portrait and monochrome pro modes, which give you even more opportunities to explore. Keep in mind that when you shoot in black and white, you should pay special attention to textures, patterns, lights, and shadows. Also, you’ll have to spend a little more time editing monochrome photos in order to produce more contrast between the shades of black and white for more visual impact.
- See also: How to Take Great Photos in Bad Weather
Super Macro
Super macro is a great camera mode to use when you want to shoot something that is so close to your lens that you can't get a good focus on the subject. Compared to other camera modes, shooting with the super macro function can allow you to capture more details within the landscape and even lead to small surprises when you notice things that you don’t normally see with your eyes.
Most smartphone cameras tend to get a little bit blurry and have difficulty focusing at a distance of around 5-6 cm away, so this is a big deal for people who like to take close-up and detailed shots.
The most common subjects within the landscape that you can use super macro mode with are leaves, flowers, bugs, butterflies and bees, though sometimes you can even shoot food with the super macro function for a better perspective! Try using this function during autumn in Iceland, when the foliage in nature takes on brilliant hues of red, orange and gold.
Light Painting Mode
 The light painting mode is great for expressing your creativity with the landscape. Photo by: 'Roberto Pavic'.
Some smartphones, like my Huawei P30 Pro, have the option for you to shoot in Light Painting Mode. This mode often includes a number of options that will allow you to add awesome effects to your photos such as traffic trails, light graffiti, silky water and star trails. Though you’ll have to mount your smartphone camera onto a tripod when using this mode, the effects that you can create are worth it.
Traffic Trails
Traffic trails are a great effect to use during the blue hour when shooting cities or landscapes, particularly if there is a road that goes through your shot. Simply mount your smartphone on a tripod to catch the warm yellow and red lights of cars as they move through your frame.
Light Graffiti
Light graffiti allows you to create patterns out of light in the dark. Simply use a torchlight or something similar and write or draw something in front of your smartphone camera while it is taking an exposure. This is a great function to take advantage of when the Northern Lights haven’t come out to play at night or the stars have been obscured, as you can still get creative by making your own subject.
Silky Water
This option allows you to create that special milky effect with running water, such as rivers and waterfalls, without having to use any filters. You also won’t have to think about the exposure time. Simply focus on your subject, push the button to begin shooting, and away you go!
 An example of the silky water effect. Long exposure taken with a smartphone at noon. Photo by: 'Roberto Pavic'.
Here is an example of a photo of a waterfall taken both with and without the silky water effect on my smartphone. The difference is quite fascinating!
 Normal vs silky water effect with a smartphone. Photo by: 'Roberto Pavic'.
HDR Mode
 HDR mode allows you to recover detail from the highlights and shadows. Photo by: 'Roberto Pavic'.
Shooting with the HDR mode on your smartphone will allow you to capture more details within the lightest and darkest areas of your shots in order to create a single photo with even exposure. This means that you’ll have more dynamic range of colour in your images. Some smartphones will even allow you to take a photograph both in normal and HDR modes, so that you’ll have one or the other to fall back on just in case you don’t like the effect that it creates.
In-Built Filters
 Experiment with the in-built filters when shooting with your smartphone camera. Photo by: 'Roberto Pavic'.
Most smartphone cameras these days have their own presets or filters that you can choose to use during shooting. This is helpful if you’re not familiar with editing techniques or if you want to minimise the amount of time spent post-processing. For example, there are polarising filter effects and even a range of filters that mimic certain types of film, including sepia mode and monochrome. Experiment with the filters while you're taking photos of the landscape. You might find one that you particularly like that allows you to express your creativity.
Underwater Mode
Underwater mode does exactly that – it allows for the best type of exposure when you are shooting in water.
Before using the underwater mode on your camera, you should be absolutely sure that your smartphone is waterproof. Waterproof means that your phone will be resistant to water regardless of how long it is submerged, while water-resistant means that it will stop water from entering to some degree, but not entirely.
If you’re not sure, then my advice is to not place your smartphone in water without some form of protection such as an underwater housing.
- See also: Camera & Gear Reviews
Pro Mode
 Shooting with a higher ISO on your smartphone camera can allow you to capture the stars at night. Photo by: 'Roberto Pavic'.
Perhaps the best of all the camera settings on a smartphone is pro mode. With pro mode, you can choose the type of light metering that your phone camera uses in order to achieve better results. You’ll also be able to control the camera’s sensitivity to light by adjusting the ISO, set the exposure time with your shutter speed and even compensate the exposure to make your photos appear brighter or darker. Other options that you can play with in pro mode include the white balance as well as whether you allow your phone to autofocus or choose to manual focus instead.
These types of settings may take some time to get used to, but becoming familiar with the pro mode on your smartphone camera and understanding how to use it will give you greater control over your creativity, so don’t be afraid to try it out... particularly if you'll be heading overseas for photography.
Though smartphone cameras these days come with a range of different shooting modes, not all camera phones will have the ones that I’ve listed above. Check to see which ones are available on your phone and experiment with how you can use them. These shooting modes are there to help you to take different kinds of shots in a range of diverse conditions so that in a few clicks, you can be more creative and take better landscape photographs.
About the author: Roberto Pavic is a landscape photographer based in Croatia. You can find more of his work by following him on Facebook or Instagram.
Would you like to practice landscape photography with a smartphone while travelling? Check out our autumn photography workshops in Iceland!