Most landscape photographers will tell you that you should invest in a good set of filters if you want to really harness your creativity in-field. But how will you know which filters are the best for you? Where should you even start looking if you’re keen to purchase a new set of filters?
- Find out How to Back Up Photos While Travelling in Iceland
- Learn about What to Do if Your Camera Gets Water Damaged in Iceland
Sorting out which filters you’ll need for landscape photography can be difficult, particularly if you’ve never used them before. From neutral density filters to polarisers and even light pollution filters, we’ll go through what the must have filters are that you should have in your kit, which will make a real difference to your landscape photography.
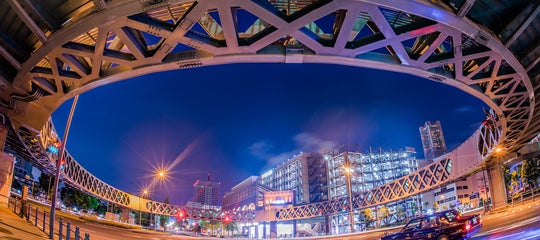
 There are some filters that are more useful for landscape photography than others. Photo by: 'Iurie Belegurschi'.
#1. Solid Neutral Density Filters
Solid neutral density (ND) filters are an essential tool in landscape photography. These types of filters reduce or modify light across all wavelengths, without affecting colour. When placed in front of a lens, they reduce the amount of light reaching the sensor, allowing you to shoot at longer shutter speeds or higher apertures in bright conditions.
 NiSi neutral density filters. Photo by: 'Nisi Filters'.
Solid ND filters are great for long exposure photography and for creating shallow depth of field. They allow you to really get creative with your landscape photography by creating motion blur effects, such as the silky and dreamy effect that you often see with waterfalls and other moving bodies of water. They are also used for streaking clouds across the sky, which can alter the atmosphere of your shots. You can even use an ND filter in broad daylight when shooting wildlife, in order to create delicate bokeh by using a larger aperture.
There are two types of solid ND filters: single fixed and variable. Single fixed ND filters adjust for one level of light, while variable ND filters adjust for several different levels of light, usually with a rotating mechanism within the same filter. The latter means that you won’t have to swap different filters in order to adjust how much light is reaching your sensor. You can simply dial in the level of reduction you would like and shoot.
The most common solid ND filters used in landscape photography are the 3-stop, 6-stop and 10-stop. A 3-stop ND filter is often used to create a realistic sense of motion, while the 6-stop and 10-stop filters may be used for longer exposures from 30 seconds to several minutes.
Keep in mind though that when using ND filters, your images may be affected in terms of image quality, colour reproduction and sharpness. Some brands may impart a ‘colour cast’, which can make your images appear to be warmer or even cooler. While these effects may sometimes be desirable, they can oftentimes be annoying. As such, it’s important to do your research before making an investment.
Some photographers will argue that with the advent of technology, it is no longer relevant to have ND filters in your kit. This is a personal preference and will depend a lot on the capabilities of your camera. For example, the Sony mirrorless systems offer the ability to produce long exposure photographs in-camera, by taking many different shots and merging them using an app. You can also take bracketed images and combine them later on during post-processing to achieve higher dynamic range.
However, if these techniques aren’t the right fit for you, then it’s a great idea to have either a 3-stop, 6-stop or 10-stop ND filter in your camera bag. They really will help you to make a difference to your photography!
#2. Graduated Neutral Density Filters
Graduated neutral density (GND) filters differ from solid ND filters in that they feature a gradient from the top of the filter towards the middle, creating a graduated ND effect.
 Graduated neutral density filters. Photo by: 'NiSi Filters'.
GND filters are usually darker at the top and clear in the bottom half. They are useful for helping you to balance the exposure across an image, particularly when there is a large section either at the top or bottom of the frame that is prone to overexposing.
Perhaps the most conventional way to use a GND filter is to help balance a bright sky with a darker foreground. This even applies for night photography, when shooting the Aurora Borealis, Milky Way or the stars. When shooting at night at a large aperture and higher ISO, you can use a GND filter to block out the sky while you take a long exposure for the foreground. Then, you can simply remove the GND filter during the last 20-30 seconds in order to expose for the sky, resulting in a single image without the need for merging two separate exposures to create the same effect.
There are three types of GND filters: soft edge, medium edge and hard edge. While most filter manufacturers produce only soft and hard edge GND filters, more have begun to produce the middle-ground between the two.
Of these, the most common GND filters used in landscape photography are the 3-stop and 4-stop soft or medium edge. This is because they have a softer gradient than a hard edge filter, which is more suitable for shooting objects rising above the horizon line in the landscape, including mountains and trees. Hard edge GND filters are more useful when there is a flat horizon, such as when shooting directly out to sea.
Again, some photographers will say that GND filters have become obsolete with newer camera technology. However, others believe it is still essential to have a GND filter or two in your kit. For landscape photography, GND filters are an important accessory that will help you to get creative in-field, particularly if you want to produce certain effects in a single shot with minimal post-processing.
While it is possible to reproduce a GND filter effect using Lightroom, Photoshop or some other type of post-processing software by using the graduated filter tool, the effect that you will achieve may not be the same in terms of quality. Sometimes, it may not seem as realistic as a physical GND filter used in-field. As such, it’s a good idea to keep either a 3-stop or 4-stop GND soft or medium edge filter in your kit. If you have both, then you can even ‘stack’ them (use them at the same time) for even brighter situations!
#3. Reverse Graduated Neutral Density Filter
Reverse GND filters are similar to normal GND filters, though the effect is turned around. Rather than being darker at the top of the filter and graduating to clear in the bottom half, a reverse GND filter has a gradient extending outwards from the middle of the filter, gradually reducing in darkness as it nears the top of the filter.
As with regular GND filters, reverse GND filters feature a bottom half which is clear, so that light in the foreground will not be restricted from reaching the sensor. This is meant to help you achieve a well-balanced exposure across the entire frame of your image.
The reverse GND filter is something that a lot of photographers overlook the need for when first starting out in landscape photography. However, these are specially-designed filters for shooting in situations when there may be a lot of luminance on the horizon line, such as during sunrises and sunsets.
Reverse GND filters are great for bringing back the detail in the horizon during bright lighting situations. You can even stack a reverse GND with a regular GND to darken the sky and draw the eye inwards towards the centre of your shot, while the sun and the horizon line will be properly exposed, retaining all of the lovely details in the distance.
However, using a reverse GND filter is not suitable in all cases. If you have an object that begins below the horizon line and extends above it, such as a lighthouse, an animal, a mountain or a tree, then it will darken the top of the subject but not the bottom. As such, it’s important to think carefully about when you apply this filter. If applied correctly, it can drastically improve your landscape photography.
While it is possible to bracket your images and to process them later on with software in order to achieve a similar effect, reverse GND filters may be more versatile in landscape photography situations when you have something moving below or above the horizon line, such as people, wildlife or birds. Using a reverse GND filter will also mean that you’ll have to spend less time sitting in front of your computer. If this appeals to you, then it is worthwhile to carry one of these filters in your camera bag.
- See also: The Best Lenses for Wildlife Photography
#4. Circular Polariser
A circular polariser is a filter that you can use in a variety of different situations. This type of filter only allows light travelling within a single direction to enter the lens, whilst blocking light of other polarisations. The result is that it will reduce glare and reflections in the landscape, such as water or on rocks. In doing so, the vividness of colours and contrasts in your frame increase. As such, you can use a circular polariser to darken skies, enhance autumn colours and green foliage, as well as to increase the details of clouds.
Circular polarisers also allow your camera to see through bodies of water, like lakes, puddles or rock pools, into the depths below. The result can be highly interesting, making your landscape photos appear to be much more dynamic.
 Circular polarising filters. Photo by: 'NiSi Filters'.
Given that circular polarisers reduce the amount of light entering the lens, you can also use them when you want to shoot with a slower shutter speed. For example, shooting with a circular polariser in a situation where there is a waterfall surrounded by lush green forest will really make the colours pop, while creating that silky, dreamy water effect for a look that is truly enchanting.
Using a circular polariser is quite easy – you simply have to screw one on to the front of your lens and rotate it until the polarising effect suits your taste. To disengage the polarising effect, simply rotate it back the other way.
The effect that you can create with a circular polarising filter is one that is unable to be recreated in post-processing or with the use of in-camera apps. As such, it is definitely a must-have filter for landscape photography that every photographer should keep in their camera bags.
#5. Light Pollution Filter
The light pollution filter is a relatively new addition to the camera market. While most landscape photographers still haven’t heard of them, they are an invaluable addition to your kit and should be considered by anyone with an interest in night or astrophotography.
These types of optical filters are designed to block out certain wavelengths of artificial light within the landscape, allowing you to obtain better results when photographing the night sky. The resulting images often retain the natural colours observed within the landscape, whilst having improved contrast and of course, reducing the effect of light pollution.
These types of filters are perfect for landscape photographers who shoot in urban areas, backyards, for deep sky photography, Milky Way photography and also for capturing the Northern Lights.
While the effect of a light pollution filter can be recreated later on with post-processing software, some photographers prefer to use the filter to reduce their time spent in front of a computer. Of course, this comes down to personal preference. If you find yourself shooting often at night and prefer to achieve the results in a single shot, then this is an absolute must-have filter to have in your camera bag.
Choosing the right filters for landscape photography doesn’t have to be difficult. In most cases, you’ll be able to increase your creativity in-field simply by investing in one or a few of the filters mentioned above. By utilising filters, you’ll begin to notice a marked difference in your landscape photography and even be able to spend less time editing at your computer. That’s more time to spend outside doing the thing that you love!
About the author: Serena Dzenis is a landscape photographer based in Iceland. You can find more of her work on her website or by following her on Facebook and Instagram.
Learn how to use filters for landscape photography in the beautiful surrounds of Iceland. Check out our range of photography tours and workshops which are designed to take your photography skills to a whole new level.

Serena Dzenis is an award-winning photographer, author and journalist who is based in Iceland. She has written numerous articles for the Iceland Photo Tours website, both about photography in Iceland as well as the more general aspects of using a camera.
Well-known for her uniquely romantic photographic style and love for the winter season, Serena is not afraid of harsh conditions and in making the most of what this planet has to offer. Her open and friendly nature has seen her embracing challenges each and every day, teaching others to make their own future and to turn their dreams into reality.