One of the most valuable tools in landscape photography is the Graduated Neutral Density (GND) filter. While they may seem innocuous, these essential pieces of camera equipment can help you to express your creativity in-field in a variety of different ways.
- Check out these articles on Photography Techniques
- See these 11 Tips to Help You Capture Stunning Landscape Photographs
If you’re a landscape photographer who is thinking of purchasing a brand new set of filters, then you’re probably wondering which are the best filters that your money can buy. There are so many different types to choose from, with varying levels of gradient from soft edge to medium and hard. In this article, we’ll take a look at the differences between the transitions and how you can apply GND filters in-field when shooting to improve your landscape photography.
What is a Graduated Neutral Density Filter?
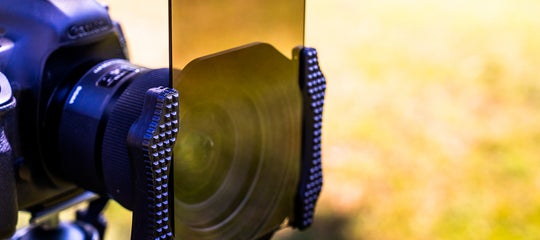
A GND filter is a type of neutral density filter used in landscape photography. It is usually a rectangular-shaped piece of optical resin or glass that features a gradient transitioning from dark to light, hence why it is called ‘graduated’.
The darker part of the filter should not impart any colour cast to an image. For this reason, we refer to the filter as being ‘neutral’ in terms of colour gradation.
Why not just call them graduated filters? The answer is because it is possible to find graduated filters of different colours on the market. An example is sunset filters, which are tinged orange or red.
What Does a Graduated Neutral Density Filter Do?
GND filters are designed to allow for variable light transmission when taking an exposure. The gradient helps you to manage the light in the scene, by reducing the amount that reaches the sensor in the area that is darkened with gradient. The darker the gradient is, the less light that will be let through that section of the filter. The aim of this is to prevent overexposing part of the image when there is a high dynamic range.
Essentially, the darkened part of the GND filter allows you to reduce the dynamic range in the scene, so that your camera can expose correctly for the range of tones from highlights through to the shadows within the scene.
In doing so, GND filters can increase contrast in local areas where the darkened part is situated, such as clouds in the sky. By providing more contrast between light and dark areas, they can improve colour and detail.
What is the Difference Between a Soft Edge and a Hard Edge GND?
GND filters come in different rates of transition. The most common are ‘soft edge’ and ‘hard edge’. However, some manufacturers have begun introducing ‘medium edge’ GND filters to their collections.
The ‘edge’ refers to the rate of transition itself. With a soft edge GND, you’ll notice that the gradient from dark to clear blends softly across the filter, so that the line of transition is not really obvious.
 Soft, medium and hard GND filters. Photo by: 'NiSi Filters'.
On the other hand, a hard edge GND filter is characterised by a gradient from dark to clear with a definite transition that seems to cut straight across the middle.
A medium edge GND filter sits between the two, with the gradient from dark to clear being softer than a hard edge but more obvious than a soft edge.
While there are three terms to classify GND filters, the rate of transition amongst manufacturers is not really standardised. As such, the rate of transition can vary across brands, meaning that one GND soft edge filter may have a harder edge than the same GND filter made by another company.
- See also: Ultimate Guide to Long Exposure
When to Use Which Type of GND Filter?
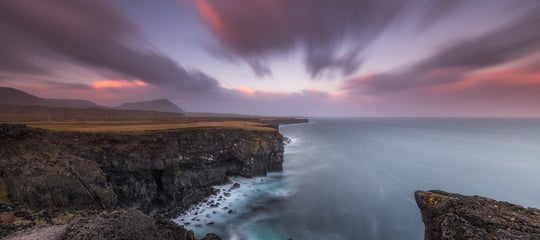
GND filters are very useful for landscape photography when shooting during the golden hour. During these moments, the sun is often very bright, while the foreground can be quite shadowy. By using a GND filter, you’ll be able to expose for the light in the foreground while maintaining the detail in the sky, particularly if you’re shooting into or somewhere near the sun.
While GND filters are often used during the day, you can also use them for shooting the stars or the Aurora Borealis at night. I can see you scratching your head already, but hear me out.
When you’re shooting at night, exposing for the foreground will mean that you may end up using a shutter speed so long that it will introduce star trails in the sky. Rather than taking one shot for the foreground and another for the stars to blend together using post-processing software later, you can try using a GND filter when initially exposing for the foreground, then removing it during the last 20-30 seconds of the exposure to capture the stars in the sky. This will prevent any star trails while allowing you to achieve a well-exposed foreground.
Day and night aside, when should you use a soft versus a hard edge GND filter? While most landscape photographers agree that it is best to use a soft edge GND filter when there is something in the way of your horizon (such as a mountain or a tree) and a hard edge GND filter when the horizon is flat (like a seascape), it can actually be a little bit more complicated to choose which filter to use.
Ultimately, you should consider the subject that you are shooting. However, you will also need to take the lens that you are using into account. The reason is that the longer the focal length, the softer the transition will appear. Therefore, if you are using a 200mm lens, you may not even be able to see an effect from a soft edge GND filter in your images.
When to Use a Soft Edge GND Filter
A soft edge GND filter features a very smooth transition from dark to clear. The top of the filter will be the darkest, gradually changing so that the middle of the filter is light while the bottom half is generally clear.
The transition itself will be barely noticeable in your images, though the GND filter will still do its job of blocking light where the darker parts are situated.
Soft edge GND filters are best used when shooting landscape photos with an ultra wide lens or a wide angle zoom lens. They are also a good choice when there are obstacles in the landscape that rise above or obstruct the horizon line, such as mountains and trees. The softness of the gradual transition should allow for these objects to be exposed correctly when the GND filter is aligned on or near the horizon line.
When to Use a Medium Edge GND Filter
The transition of a medium edge GND filter from dark to clear is much more noticeable than with a soft edge. The top of the filter will be the darkest, while the middle will be light and the bottom half clear.
Medium edge GND filters are best used for landscape photography in the 35mm to 50mm focal length range. They are also great to use when there is much more difference in the brightness between the foreground and the sky.
While you may still use medium edge GND filters with objects that rise above the horizon line, in most cases, they will make these areas of your image appear too dark. As such, they are best for when there are smaller mountains or trees above the horizon, so that the underexposed areas will not be so noticeable.
When to Use a Hard Edge GND Filter
With hard edge GND filters, the transition from dark to clear is very noticeable, to the point where it can even resemble a straight line. It will seem very much as though the top half of the filter is darkest, while the middle has a thin lighter strip and the bottom half is clear.
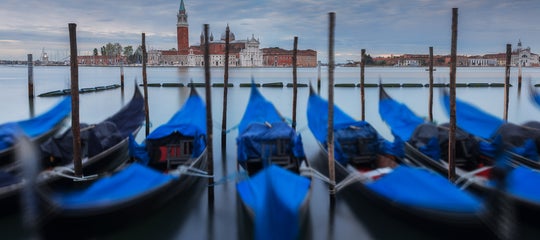
Hard edge GND filters are best used when shooting landscapes at longer focal lengths of 70mm and above. They are also great to use when the horizon is flat without any obstructions, such as with seascapes or when shooting straight out to the horizon at sea.
If you use a hard edge GND filter with objects rising above the horizon, such as mountains and trees, these areas will appear to be very underexposed. The effect may not be so pronounced with a telephoto lens though you will certainly notice it when shooting with an ultra wide, a wide angle or a medium zoom.
How to Use a Graduated Neutral Density Filter
Whether you have a soft, medium or hard edge GND filter, the process to use one when taking a photo is virtually the same. You’ll need to take into account where you position the filter and how the rate of transition will impact upon your image.
First of all, make sure that you have an adapter ring attached to your lens, to which you may fix your filter holder.
Next, slide the GND filter into the holder as you look through the viewfinder or LCD, making sure to be aware of the area of transition.
Now, you can simply move the GND filter up or down to suit the scene. Generally, it’s a good idea to line the transition area up with the horizon line, or somewhere just below it. Be mindful of trees and mountains that may get in the way. If the gradient appears to be too dark in these areas, then you may need to tilt the filter holder so that your GND filter continues to cover the area that needs to be underexposed, while still correctly exposing for the objects rising above the horizon.
Are Graduated Neutral Density Filters Necessary?
The use of GND filters will allow you to be more creative in-field when practicing landscape photography, so that you may capture the scene according to your vision in a single exposure.
However, these days, you can try to replicate the GND filter effect by using post-processing software, such as Adobe Photoshop. It’s as simple as selecting the gradient tool and applying it to your image. This method can sometimes yield a nice result, though it can also look very artificial, particularly if you have overexposed areas in the sky which are very difficult to fix just by applying a painted gradient.
Another way of capturing the entire dynamic range of a scene without the use of GND filters is to take a series of bracketed images, which you can blend together with post-processing software later on. This method involves taking images at different exposures, such that you’ll have at least 3 images – one exposed correctly for the highlights, one for the shadows and one for the medium tones. It’s what is known as the ‘high dynamic range’ (HDR) technique, which allows you to capture and blend together the entire tonal range of light in a scene. The downside of this technique is that you won’t be able to create long exposure effects, such as you would with a GND filter.
While taking bracketed images may initially seem like a drawback, you’d be surprised at the leaps and bounds that technology has taken in this day and age. There are even cameras on the market – such as the Sony A7RII – which will apply bracketing with the use of electronic apps. The result is the merging of images in-camera to create a single image with a long exposure and GND effect without the need for physical filters.
In the end, whether you choose to use GND filters for your landscape photography or to create the effect by another means, you will still have to deal with rate of transition, which will no doubt have a large effect upon your images. By understanding when to use a soft versus a hard edge GND filter, you’ll be better equipped to bring your creative vision to life and on the path to improving your landscape photography in no time.
About the author: Serena Dzenis is a landscape photographer based in Iceland. You can find more of her work on her website or by following her on Facebook and Instagram.
Are you thinking of purchasing some filters for landscape photography? Not quite sure how to use them yet? There's no better place to practice than in-field on a photography workshop in Iceland. Join this incredible 3 Day Photo Tour of the South Coast & Vatnajokull National Park and begin testing your skills today!

Serena Dzenis is an award-winning photographer, author and journalist who is based in Iceland. She has written numerous articles for the Iceland Photo Tours website, both about photography in Iceland as well as the more general aspects of using a camera.
Well-known for her uniquely romantic photographic style and love for the winter season, Serena is not afraid of harsh conditions and in making the most of what this planet has to offer. Her open and friendly nature has seen her embracing challenges each and every day, teaching others to make their own future and to turn their dreams into reality.