More often than not we consider photography to be a two-dimensional medium. Our images are viewed on our computer screens and smartphones simply as “pictures”. Each photo bottles a small sliver of memory and serves as a reminder of the places we’ve been, the thoughts we’ve had and the things we’ve done.
- Explore these articles on Photography Techniques
- Discover these 7 Easy Steps to Achieve Amazing Long Exposure Photography in Iceland
But what if I told you that you were wrong? Not wrong about the part where photos represent memories and emotions and experiences; that’s completely true. I’m talking about the belief that our images are two dimensional. While our images aren’t physically three dimensional objects, they actually skip over that third dimension and jump right to the fourth. That elusive fourth dimension is time.
Believe it or not, photography and time are forever joined. Every photo we make is a product of the careful balance of time with our shutter speeds ruling with complete supremacy over how the effects of passing time appear within our photographs.
I know all this might sound a little heavy for you to read in an online article on photographic technique but I can assure you that it’s all true. The manner by which we allow time to interact with our photographs is ultimately the deciding factor in determining the perceived dynamics within our photos.
All of our images are built on a foundation of light and its transformative effects. We control light through the management of time and can therefore indirectly dictate the effects of motion.
Wait...where was I??? What was I getting at??? Ohhhh that’s right: time, light and motion.
In this article, we're going to look at virtually everything you need to know in order for you to get started with presenting a dynamic sense of motion with your photographs through long exposure camera work. You’ll learn what effects the deliberate manipulations of shutter speed have on the way motion and light are captured. We’ll talk about the basic concepts of long exposure photography as well as everything you will need to get rolling.
Let’s do this.
Motion, Time and Exposure
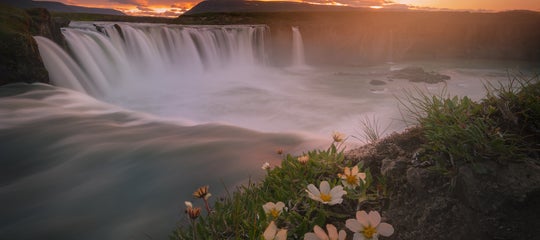
 All photographs capture motion. Photo by: 'Adam Welch'.
In a way, all photographs capture motion but depending on the length of the exposure, we don’t always perceive that motion in the finished image.
Einstein had it right, in the end it’s all relative. The perception of movement in a photograph is dependant on the motion of the subject relative to the shutter speed we set for our cameras. This means that if the shutter is faster than the movement of an object, that movement will be arrested. If our shutter is slower than the movement of an object, the movement will be more apparent.
Of course, long exposure photography isn’t an “all or nothing” endeavour where you have to choose between allowing motion to be seen in your photos or not. There are a nearly infinite amount of variables to consider depending on your particular image and your intent.
Understanding Motion and Shutter Speed
At its core, long exposure photography is shockingly simple. It all comes down to how your camera perceives motion. We control this interaction using shutter speed. The camera – for all its wonderment and abilities – cannot think, even though we’d sometimes like for it to be able to. So, it’s up to us as photographers to dictate how our cameras capture the motion present in a scene.
We must learn to gauge the relationship between subject motion and shutter speed so that we can bring about a desired visual effect in our images. The deciding factor for controlling the perception of motion involves being able to discern how fast (or slow) our shutter speed should be.
More accurately, we might refer to shutter speed as “shutter time”. When you think of your shutter as a measure of time and not speed, the correlation between motion and your shutter becomes much more easy to swallow.
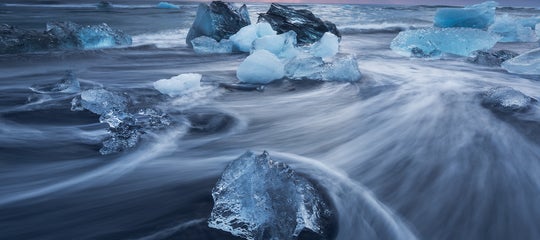
 Understanding the shutter speed will allow you to capture motion. Photo by: 'Adam Welch'.
In most cases, your camera will be more than capable of recording long exposures without the need for any highly specialised gear. We’ll talk a little bit about some “essential” pieces of kit you’ll need for long exposure photography in the next section. For now, let’s focus on your camera and lens and some things you’ll need to know if you’re going to leave that shutter open for extended periods of time.
Camera Settings
There are few absolutes in photography but when it comes to using long exposures in your work, you will absolutely need a camera that is capable of shooting in full manual mode. Since we’ll be needing to adjust the shutter speed, aperture and ISO, it’s paramount that your camera will be capable of fulfilling this need. Thankfully, virtually all DSLR and most digital cameras today allow for manual adjustment of these settings.
 You need a camera with bulb mode to make use of long exposures. Photo by: 'Adam Welch'.
Some general guidelines for ideal camera settings, no matter what sort of long exposure you might be shooting, are as follows:
Long Exposure Noise Control
Turn off long exposure noise control should your camera have this feature. Digital camera sensors produce a relatively large amount of heat during long exposures, especially at high ISO settings. The side-effects of this heat is something called “hot pixels” which are just brightly coloured pixels.
 Hot pixels are easy to get rid of in post processing. Photo by: 'Adam Welch'.
Long exposure noise control is essentially an in-camera version of a process called “dark frame subtraction”. Simply put, this is a process where a completely blank image is made for the same duration as the original exposure and is then used to “subtract” the hot pixels from the image.
This can be problematic for long exposures as it will literally double the exposure time required for all your photos. A 30 second exposure will require a 30 second dark frame exposure when automatic long exposure noise control is enabled.
 Turn off the long exposure noise reduction function of your camera. Photo by: 'Adam Welch'.
Furthermore, it’s much more effective, not to mention more convenient, to deal with hot pixels and digital noise using your post-processing software.
Use a Low ISO
Use your lowest allowable ISO setting. It might go without saying but in order to shoot longer exposures at any given aperture, you will need to make your camera sensor less sensitive to light. This means that it’s always a good idea to use the lowest ISO setting your camera offers so that you can utilise those longer exposure times.
Using a lower ISO also means there will be less electricity pumped into your camera’s sensor which translates to less heat. This will result in less digital noise and those “hot pixels” we mentioned earlier.
Small Aperture
Use smaller apertures to compensate for longer shutter speeds. The amount of time we leave the shutter open controls the duration of the exposure and results in the sense of imparted motion within our images.
On the other hand, it is our aperture setting that controls the amount of light which enters our camera and by default dictates the length of our exposures.
Remember, the larger the “F-Number” setting for your aperture the smaller the aperture physically becomes. This means that an aperture of F/22 is smaller than F/11 and will let in less light.
Self-Timer
Turn on your camera’s self-timer. It’s amazing just how much camera shake we can induce just by pressing the shutter button. Believe me, no matter how gently you think you’re being with that little button, even the lightest touch can introduce sharpness robbing you of the effect of camera motion.
To combat this, simply enable your camera’s timer. Most cameras have a two-second timer option which will allow your camera ample time to settle while keeping the time between shots more than manageable. The benefits of those two seconds is more than worth the wait.
Mirror Lockup
Enable your camera’s mirror lockup feature. This is something that will only apply to DSLR or other SLR type cameras. After all, you can’t lock up a mirror on a mirrorless camera.
SLR stands for Single Lens Reflex – this means that you are looking directly out the front of the lens when you peer through your camera's viewfinder. This little feat of optical magic is facilitated by a mirror mechanism that reflects the light coming into the camera up into the viewfinder. This mirror flips up and out of the way during each and every exposure.
 Enable mirror lockup for long exposures. Photo by: 'Adam Welch'.
That’s why your viewfinder briefly goes black during each shot. Unfortunately, the action of that tiny mirror moving can introduce enough camera shake to cause problems during lengthy exposures.
 Most DSLR cameras have mirror lockup. Photo by: 'Adam Welch'.
To get around this, most modern DSLR cameras now have a function called “mirror lockup” and it does exactly what the name suggests. When mirror lockup is enabled the mirror system of the camera is moved out of the way before the shutter opens thusly allowing time for the vibration to dissipate. Mirror lockup is a great way to reduce camera shake during long exposures but the downside is that it renders your viewfinder useless after it is set. This means that you should have your shot composed exactly as you desire it to be before locking the mirror.
Tools You’ll Need
It might be surprising but you can begin making great long exposures using very little in terms of specialised gear. In fact, you’ve probably already got everything you need to get started already. Here’s a short list of the tools you’ll need to make long exposure images.
Camera
I know it might come as a bit of a shock but you will require a camera. We’ve already discussed the importance of using a camera that is capable of allowing manual exposures but there are a few other things that we need to mention as well – namely, the ability to use “Bulb Mode", as well as the resulting considerations that might arise.
 Bulb feature is important in long exposure photography. Photo by: 'Adam Welch'.
Bulb Mode is a feature found on the majority of cameras, which allows for full start/stop control of the shutter. Most modern DSLR cameras only allow for exposures up to 30 seconds in duration. For some long exposures, especially single shot astrophotography (with those cool star trails), you'll need to use exposure times which can range anywhere from 15 seconds to 10 minutes or even longer. For these types of shots, you must have a camera capable of shooting in Bulb Mode and this means that you will also need a….
Remote Shutter Release
While Bulb Mode opens up a whole range of creative and technical shutter control, it also means that it limits the way in which we fire the shutter. Bulb Mode only functions while the shutter release is triggered. So, unless you want to keep your finger on the shutter button for however long the exposure requires (meaning that you'll likely introduce some camera shake), then you will need some type of remote release to start and end the exposure.
 A remote shutter release is useful for landscape photography. Photo by: 'Adam Welch'.
These days, most remote shutter releases are fully wireless, cheap and extremely compact. There are, of course, fully wired cable shutter leases as well. Remote shutter releases range widely in terms of features but bare bones models are quite easy to use and connect to your camera.
A Quality Tripod
Say it with me: “I shall always use a tripod for long exposures.” One more time… "I shall always use a tripod for long exposures”. Dealing in absolutes is often a slippery slope when it comes to photography. However, in this case, a tripod is supremely needed in order to produce quality long exposure images, no matter the content.
If you are shooting with a shutter time longer than the reciprocal of your focal length (known as the Reciprocal Rule) then you should absolutely have your camera mounted on some sort of solid platform.
 A quality tripod is a must for long exposure photography. Photo by: 'Adam Welch'.
Most long exposures will fall well beyond the reciprocal of even the most widest of lenses, so a sturdy tripod will almost always be needed in order to limit the effects of camera shake during your exposures.
Notice that I’ve used words like “quality” and “sturdy” to describe the tripod you should be using and not “expensive”. Just make sure that your tripod is rated to at least double the weight of your heaviest camera setup and meets any other specific requirements you might need. Save your money for where it counts...which we’ll talk about in the next section.
Filters, Filters, Filters!
For most situations, making use of low ISO and small apertures will allow you to shoot relatively lengthy exposures even in bright daylight with no other gear needed other than your tripod. That won’t always be the case. There will be scenes that require exposures which go well beyond the basic capabilities of your camera and in those times, you will need a little help.
Behold, the tinted glory of neutral density filters!
 Neutral density filters allow you to slow down the shutter speed. Photo by: 'Adam Welch'.
Neutral density filters (ND filters for short) are the long employed workhorse tools of photographers and videographers. An ND filter can be thought of as sunglasses for your lens. They work by reducing the incidental light so that longer shutter speeds may be used when the conditions would otherwise be far too bright.
 You can get round or rectangular/square ND filters. Photo by: 'Adam Welch'.
ND filters come in a variety of densities with each one graded by how many stops of light it blocks.
Don’t worry, it’s all actually very straight forward. A 3-stop ND filter will block out 3-stops worth of light. This translates to being able to shoot a shutter speed which is 3-stops longer than would otherwise be possible without the ND filter, given all conditions remain equal.
In simple terms, the darker the ND filter, the longer the exposure you will be able to achieve.
But filters for long exposure photography don’t stop at just ND filters. No no. We have other helpers that can aid in taming complex lighting situations, such as sunrises and sunsets. During these times, there may be a vast difference in the luminance between the foreground and background elements. We call these Graduated Neutral Density filters or GND filters. Think of a GND filter as a “half and half” type of ND filter.
 GND filters balance the light in your photos. Photo by: 'Adam Welch'.
The purpose of a GND is to compensate for the difference in luminance values so that a long enough exposure can be made to fully expose the darker areas of a photo, without completely blowing out the brighter areas.
 GND filters can also help you to slow down your shutter speed. Photo by: 'Adam Welch'.
Just like ND filters, GND filters come in a variety of densities and in soft or hard gradation.
 Graduated neutral density filters come in soft or hard gradation. Photo by: 'Adam Welch'.
One more filter to mention if you plan on making long exposure images primarily of the night sky is a somewhat more recent development in the photography world – the so-called “night sky” or “dark sky” filter. These are specialised filters that work to filter out specific wavelengths of light which are commonly produced by city lights and other light pollution.
 Night sky filters help to cut down on light pollution. Photo by: 'Adam Welch'.
Night sky filters don’t offer the dramatic effects of, let’s say an ND filter, but the results are usually quite noticeable and useful when shooting skies that have a good amount of artificial light pollution.
Technical Considerations for Long Exposures
As we near the end of our long exposure journey, I want to talk about a couple of things that you should keep in mind when you’re out in the field (or city or beach or wherever) shooting your long exposures. Some of these are commonsense tips and some are a bit less obvious.
The 600 Rule
A close cousin to the Reciprocal Rule is a piece of knowledge known as the “600 Rule”. It’s especially useful if you shoot a lot of astrophotography.
The 600 Rule gives us a way to approximate how long of an exposure is possible before the rotation of the Earth begins to blur starlight, based upon the focal length of the lens you happen to be using.
 Star trails are not helpful when you want a sharp image of the Milky Way. Photo by: 'Adam Welch'.
This is a great thing to know when you’re attempting to capture un-streaked images of the Milky Way or other celestial bodies.
The 600 Rule is quite simple: divide your focal length into 600. That’s it. No other fancy calculations or math involved.
 How to calculate the 600 Rule in long exposure photography. Photo by: 'Adam Welch'.
So this means that a 14mm lens will have a maximum exposure of about 42 seconds before those stars begin to streak.
A 50mm lens will yield a 12 second maximum exposure and a 35mm would be about 17 seconds.
Reciprocity Failure
I’ll admit it freely....I love shooting film. In fact, I use my film cameras about as much as I shoot digital these days. If you happen to be one of “those types” who uses a film camera for long exposure images, then you might have heard of something known as “reciprocity failure”. It’s actually fairly difficult to explain but as film is exposed to light, it actually becomes less light sensitive as the exposure progresses.
 Reciprocity failure is a problem when shooting longer exposures with film. Photo by: 'Adam Welch'.
This requires that the exposure be extended based on the particular reciprocity failure rate of the film you happen to be shooting. Oftentimes, this information can be found on the film container or even in various apps online. With film photography making a huge resurgence in recent years, having an understanding of reciprocity failure might prove invaluable should you ever come over to the Dark Side of digital cameras.
Bring Extra Batteries
I hope it goes without saying, but you should always bring at least one extra battery along, no matter what you’re shooting.
Long exposure times chew through battery life as your camera’s sensor devours the energy while that shutter remains open. If you know you’ll be shooting multiple long exposures during a single outing, then two or even three extra batteries will be a prudent move. It’s always better to have more power than not enough!
Watch Out for the Dew!
This might not be so obvious of an issue to watch out for but it can cause problems just the same. If you are shooting at dusk, just as the temperatures begin cooling off as the day transitions into night, then you will likely be photographing while the dew begins to settle.
Dew accumulates gradually and normally doesn’t cause any problems photographically. However, if you are making images of the night sky with your camera remaining static for long periods of time, it’s a good idea to wipe the lens face every few minutes to make sure a great long exposure image isn’t clouded by a sneaky layer of fresh dew.
Let’s Recap…
Long exposure photography is perhaps the most readily accessible way by which you can inject an enormous amount of creative juice into your photos. A long exposure can turn water to silk and the stars into streaks of fire. You don’t need much to get started with long exposure photography other than a camera with manual exposure capability and a sturdy tripod.
Here are a few things to keep in mind if you decide to delve deeper into the world of long exposure photography:
-
Use the lowest ISO possible
-
Reduce camera shake as much as you can by using your cameras timer or a remote shutter release
-
Enable your cameras mirror lockup feature if available
-
Turn off long exposure noise control in your camera settings
-
Remember the 600 Rule for calculating night sky exposures
-
Invest in a couple of quality ND and GND filters to manage unruly lighting
-
Always pack at least one extra battery and a fresh lens cloth
Producing successful long exposure photographs is a product of understanding how motion relates to the shutter speed of your camera and then being able to transmit that motion into your photographs. Being able to do this takes patience and practice and allowing yourself to make mistakes. As you become more and more proficient with your long exposure work you will learn what gear and techniques produce the best results for you and your images. This guide will help you take the first steps and the rest will be up to you!
About the author: Adam Welch is an adventurer, photographer and author based in the USA. You can find more of his work on his website or by following him on Facebook and YouTube.
Do you have any other tips for long exposure photography? What have you tried that works and what hasn't worked so well? Leave a comment below!