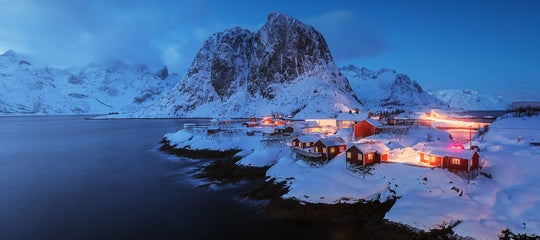
One of the main questions that people ask us on our landscape photography workshops after arriving at a location is, “What camera settings do you recommend?”
- See these 10 Tips to Master Wide Angle Landscape Photography
- Find a wide range of Winter Photo Workshops in Iceland
Every situation differs depending on the time of day and the location, so there is not any single right answer to this question. Typically, you should adjust your camera settings by taking into account what you are trying to achieve with your image. However, there are some tried and true settings which will work well for landscape photography if you're not quite sure where to begin. In this article, I'll give you a few tips to consider which will help you make the most out of your next landscape shoot.
RAW vs JPEG
I always shoot in RAW. JPEG files are compressed, internally processed files. By shooting in JPEG, your camera is throwing away valuable data in the interest of saving space.
Even though it takes up more space on a memory card to shoot in RAW, having that data will allow you to make much more precise adjustments during post-processing.
Whenever you try to do serious edits to a JPEG file, the fact that it has already been compressed will mean that there will be some loss of quality. As far as your computer thinks, the JPEG is the final version and all edits have already been embedded into the file.
Think about if you were to unwrap a present but then tried to rewrap it without the paper looking worse for the wear. It’d be really hard. So even if you don’t shoot in RAW, you should start doing so in order to take great landscape photos.
Every image needs editing, landscape shots in particular, and RAW files will give you the most data to work with.
 ISO 200 f8 ¼ second. Photo by: 'Brian Rueb'.
File Compression and Bit Depth
Have you ever noticed that photography files can be in 8-bit, 16-bit, 32-bit, etc? To put it simply, files with a higher bit depth have more data and are going to allow you more ability to process those images.
JPEGs are 8-bit files. However, RAW files can give you a much higher bit depth. Some cameras even let you adjust that. When it comes to subtleties in colour, you’re going to get better results the higher the bit-rate that your file is. So aim to shoot with the highest bit-depth that your camera will allow. In post-processing, you will likely work in 16-bit, before converting to 8-bit for display on the Internet.
 ISO 50 f22 ½ second. Photo by: 'Brian Rueb'.
Focusing
Manual or Autofocus?
With landscape images, I’m typically on a tripod, so I focus manually. I’ll also use the live view quite often so I can zoom in and really make sure it’s sharp.
Any time that I handhold my camera, I’ll use auto-focus. When shooting landscape images handheld, I’ll typically use a multi-point focus area of 3-4 points and move that to an area roughly within the first third of the image in order to get a certain part of the image in focus.
How you focus is up to you but typically, if you're using a tripod, then you should focus manually.
Focus Point Selection
Many photographers don’t know that you can move focal points around in an image when you’re in auto-focus mode. Knowing how to move the focal points, as well as the different amount of focal points that you can work with in your camera can be a very helpful tool in ensuring that you'll take the sharpest images.
AI Servo or Single Shot?
If you’re shooting a moving subject like wildlife or sports, then AI servo is the way to go. It will constantly look for movement to focus upon.
With landscape photography, we’re typically shooting fairly stationary subjects and usually from a tripod. There is no need for the camera to keep trying to find the focus, so switch to Single Shot instead.
White Balance, Dynamic Range Boost (in-camera) Noise Reduction, and In Camera Picture Styles
When it comes to these in-camera settings it’s important to know that most of them are designed to help those photographers who shoot in jpeg. These are designed to help make jpegs look better. I always forget how many people have digital cameras, and how many of them don’t shoot in RAW. Even if you shoot in RAW all the time, it’s good to know the pluses and minuses of these settings.
 ISO 400 f16 ½ second. Photo by: 'Brian Rueb'.
Colour, Contrast, Sharpness and Noise
White Balance
White balance is how your camera adjusts the colour based upon the amount of artificial or natural light.
Artificial light is very warm, so we need cooler white balances to bring it to normal (around 3300-3800K).
Natural light is very cool, so we need warmer white balances to warm up the colour (5500-7500K).
If you shoot in RAW, then you can adjust your white balance in post-processing. However, I still like to adjust the white balance in-field to see how warmer and cooler colour tones might accentuate the shot. I’ll often shoot a sunset or sunrise on the "shade" mode of white balance.
Dynamic Range Optimiser (D+ Settings)
Many newer cameras are all about that buzz phrase, 'dynamic range'. Sony, Canon and other manufacturers have taken to making settings to help adjust for scenes with crazy dynamic ranges, such as sunsets and sunrises. These are only going to affect your images if you're shooting in JPEG.
If you are shooting in RAW, then turn this setting off.
Long Exposure Noise Reduction
Turn this setting off. Most of the time, the software you’re going to use for post-processing has great noise reduction possibilities. When you shoot with long exposure noise reduction turned on in-camera, then each time you take an image, the camera will need to take another image of the exact same length of time to try and reduce the noise.
It’s not terribly bad when the exposures are one or two seconds in length, but when you start taking long exposures that are thirty seconds or longer, it can be a pain. In addition to all the waiting, you’ll be draining your battery a lot faster too.
 ISO 320 f16 1/80 second. Photo by: 'Brian Rueb'.
Picture Style
I love using picture styles in camera. Most of these can be customised to boost saturation, colour tone, sharpness and more.
Picture styles are designed to be used for making a JPEG image look better. By adjusting these to increase saturation, contrast, and colour tone, your screen previews will look better, giving you a sneak peak on how an image might look after processing. If your white balance is adjusted for an aesthetic value too, then you will really be able to see something nice on your camera before you take it home.
If you are shooting in RAW, then there is no need to have any picture style settings turned on. Simply switch all the settings to zero.
Playback Display Settings
Histogram
There have been so many instances when I have thought that I had a great image, only to be disappointed when I got that image home onto the screen. It looked SO GOOD on the back of the camera!
Camera display screens can be set too dark or too bright, which can affect the way that we see an image. While an image may look great on the back of your camera, when you get home, you may very well find blown out highlights or noisy shadows.
Turn on the histogram in the playback display settings of your camera. This will allow you to see where the values in your image are and whether you can add or subtract more time from your exposure. The dark values are recorded on the left side of the histogram, while you'll be able to see the brighter values on the right.
The way I describe the histogram to my high school students is as the “Histogram House Party”. Think of the histogram box as a house, while the little peaks and valleys of the actual histogram are people in the house. If all the values are congregated on the left side, you'll have to assume that some of the people are still outside of the house, waiting to get in. They are “in the dark” so to speak. You'll need to add more time to the exposure to move those people farther inside the house, so those “values” that are outside can come in.
If the histogram is bunched up on the right, then you'll have to assume that some of those people are outside now, and once they’ve left the party, they aren’t coming back in. They’ve had “too much exposure”, so they won’t come back. As such, you'll need to reduce the exposure.
If any of the values are already in the party, then you'll be able to work with them in post-processing to brighten or darken them.
In most newer cameras, the histogram is visible on the display while you shoot, so you can monitor the house party in real time while you adjust your exposure. Learning to read your histogram will help you to see what you’ve truly captured as opposed to what you think looks good on the screen.
Many photography histogram functions will also have a highlight alert system that will blink at you for areas that are overexposed (some will blink for underexposure too). Switch this setting on and it will help you to remember to check your histogram.
 ISO 250 f18 10 seconds. Photo by: 'Brian Rueb'.
One-Touch Zoom
Nikon has a great function where on image review, you can click the zoom button and instantly go to 100% zoom to review an image for sharpness. If your camera model has a feature like this, it can be great to help speed up that image review time in the field.
Auto-Rotate
If you find yourself going from horizontal to vertical camera orientation a lot, it might be nice to play with the rotate functions in your image settings to find out which way works best for you. That way, if you’re shooting vertical, then you won't have to take the camera off the tripod in order to see the image in the right direction.
Camera Exposure Settings
For landscape photography, It all starts with the basics; Aperture, Shutter Speed, and ISO. If you don’t feel comfortable using these interchangeably…I would learning them and how each works together with the other two.
Often with landscape photography, we are dealing with some kind of trade off. Knowing what you’re losing when you adjust one of the three will help you make the right decision in the field.
Aperture
Aperture is the size of the hole in the lens that will allow the light to enter. Often the changes in the size of this hole are referred to as ‘f-stops’. The higher the f-stop (f/16, f/18, etc.), the smaller the hole and the larger the depth of field.
The smaller aperture size related to a larger number can confuse some folks, so to simplify, remember that the LARGER the f-stop, the LARGER the area of focus will be.
With a dynamic depth of field, I’ll typically shoot at around f/11 to f/16. However, each lens is different and each lens has a “sweet spot” or aperture that everything looks sharper at. You’ll have to read reviews online, or test your lenses yourself on the same composition to see how well each aperture will work.
Even though a lot of lenses will go to an aperture of f/18 or higher, many of these lenses will lose sharpness at those higher apertures.
 ISO 500 f13 1/40. Photo by: 'Brian Rueb'.
Sometimes, it's not a bad idea to think about using those other apertures as well and being selective about what we focus on. Smaller apertures such as f/4 or f/5.6 can really emphasise a specific part of the scene. The important thing to remember is that if you are using higher apertures in low light, then you’ll need to bring a tripod in order to avoid having to try and handhold your camera at a longer shutter speed, or bumping up your ISO to a noisy level.
If you are unable to get all of the frame in focus with a single shot at a certain aperture, then you may need to focus stack.
Shutter Speed
This refers to how long the shutter stays open in order to allow light to enter the camera. More time or longer shutter speeds equal blurred motion, whereas less time at faster shutter speeds result in varying degrees of frozen action.
The key with shutter speed is to remember that you can’t handhold a camera without introducing some level of shake below 1/30th of a second with most wide angle lenses, and much faster with zoom lenses. Longer shutter speeds typically need higher apertures and/or filters to achieve.
ISO
ISO refers to how hard the camera sensor is working to use the available light. The higher the ISO, the less light the sensor will need to make an image.
However, shooting at a higher ISO can mean more noise or grain. This is because the sensor is really being pushed to use less than ideal amounts of light.
 ISO 200 f18 .4 second. Photo by: 'Brian Rueb'.
When it comes to landscape photography, you will likely be using a tripod. This means that you'll be able to keep your ISO low, in order to have the least amount of noise in your images. Where possible, you should shoot at ISO 100. If you can't get the desired effect that you want at a lower ISO, then bump it up a little at a time until you achieve the desired result.
When shooting moving water after sunset, the time needed to create a balanced exposure can increase greatly. Sometimes, long exposures can look amazing, but if you find that you want a little bit more texture on the water, then you may need to increase your ISO to achieve a faster shutter speed.
A good tip is to set your camera on Auto ISO when shooting in the evening. Place it on your tripod and then set your aperture to the desired f-stop. Start with whatever shutter speed will allow you to shoot at ISO 100. Gradually speed up the shutter speed until you've taken a shot at every ISO from 100-12800. Then, go home and check the noise levels of each image against the others. Apply your favourite noise reduction effect to each image. You'll quickly be able to see where your camera stops performing up to your standards.
 ISO 50 f14 1/8 second. Photo by: 'Brian Rueb'.
Metering
With landscape photography, switch to evaluative metering. It will take into account all the different light available and usually give you a good starting point to work with.
Spot metering is great for when you have a very specific portion of a frame that you’re trying to photograph.
Exposure Compensation
Whenever I shoot in Aperture Priority mode, I make sure to utilise exposure compensation. Whatever metering system you use, the camera is going to try to get a balanced, middle-weighted exposure. This can still lead to some blown-out highlights or shadows that are too dark. However, exposure compensation allows you to override the camera's desire to keep the light metre in the middle, by adding or subtracting light as needed to make a better exposure.
Camera Modes
People wonder constantly which camera mode they should be in. I would highly discourage anyone from shooting in what I sometimes refer to as “Bigfoot” mode, or the green 'full auto' selection.
The reason I refer to this as Bigfoot mode is that if you DO see Bigfoot, most people will be so afraid, they’ll forget all their camera settings anyway. As such, you might as well just put it in full auto and spray and pray.
While I would encourage everyone to learn landscape photography in Manual mode, there are benefits of using other modes, the main one of which is Aperture Priority (Av) in landscape photography.
 ISO 400 f118 1/250. Photo by: 'Brian Rueb'.
Aperture Priority vs. Manual
Aperture Priority is a mode that allows the photographer to select the aperture they want based on the depth of field that they’re trying to achieve. The camera will pick the shutter speed that corresponds to give a properly balanced exposure.
When I say properly balanced, I’m talking about the camera's light metre being directly in the middle. The advantage to this shooting mode is that the photographer will always get a decent exposure. The camera is going to give you a balanced exposure.
The problem with Aperture Priority mode is that newer photographers often just see a “good” exposure on the back of the camera and assume that the photo is good. However, when you let the camera pick the shutter speed, you have to make sure it’s one that will work for your situation.
When handholding your camera, you may not be paying attention to the fact that the camera is picking a shutter speed that is too slow for the best sharpness. It’s picking 1/15th or 1/20th of a second, which isn’t extremely slow, but slow enough to create a little softness or blur that is not noticeable until the image is on a screen.
Another issue with this mode is that because the camera's goal is to create a balanced exposure, sometimes the exposure will still be a stop over or underexposed from what the ideal exposure might be.
The final issue is that when using a graduated Neutral Density Filter with Av mode, the camera will often compensate and greatly reduce the effect you’re trying to achieve with the filter.
Shooting in Manual Mode
With Manual mode, having a list of steps to follow can encourage you to do the same thing every time and hopefully avoid panicking when the light gets good.
First, set your aperture to the desired depth of field.
Next, move the shutter speed to the point where the light metre reading is in the middle.
Once you have that, look at how fast the shutter speed is and determine if that is what you'll need to get the shot that you're after. If you're handholding your camera, you'll need a faster shutter speed. If you're on a tripod, then is the shutter speed fast enough to stop any moving foliage? Or is it slow enough to create some motion in the water? If not, then you'll need to adjust your ISO to get the shutter speed that you need.
Once you're set, take a test shot and check the histogram.
 ISO 400 f14 1/40. Photo by: 'Brian Rueb'.
Quick Tips: Camera Settings for Landscape Photography
Every situation is different but these settings will give you a good starting point, kind of like a mini landscape photography cheat sheet of sorts.
Settings for Creating Motion in Images
With motion, it’s all about longer shutter speeds. Keep your ISO low, around 100, and bump up your aperture to get longer shutter speeds.
Typically, you can start at f/16. However, depending on the lens, you might not be able to go higher if it starts to get soft edges at higher apertures.
Keep your white balance on auto for anything other than sunrise, sunset or night photography.
Turn off Dynamic Range Boost.
Shoot in RAW and use a tripod.
 ISO 50 f20 1.6 seconds. Photo by: 'Brian Rueb'.
If you're not able to get a long enough shutter speed with the settings above, then you might need a neutral density filter to hold back the light. Remember, the longer that the shutter is open, the less detail any movement will have. Anything in a 2-3 second range should give you some interesting movement.
However, when shooting waterfalls, the more volume of water that there is, the faster the shutter speed you will need. Massive waterfalls can easily turn to white blobs of no detail if your exposure is too long. An exposure time of 1/3 to 1/2 a second can keep the detail in the water for a more visually appealing effect.
When it comes to streams and rivers, keep your exposure around 1/10th to 1/2 a second in order to retain details in the water for added overall interest.
Settings for Maximising Depth of Field
Shooting at a higher aperture will get you better depth of field. Use an f-stop of at least f/11 to begin with, then increase the aperture if your foreground subjects are close to the lens.
If your subject is closer than about one metre (3 feet), then you might need to look at focus stacking.
Set your ISO low to around 100 and again, turn off any dynamic range boost.
Keep your white balance set to auto and focus manually.
 ISO 50 f18 .6 seconds. Photo by: 'Brian Rueb'.
During brighter times of the day, you can shoot at a higher aperture, such as f/18 or f/20 for greater depth of field.
Again, be aware that some lenses can have softer edges at higher apertures.
Settings for Shooting Sunrises and Sunsets
Keep your ISO low, around 100 if you're shooting on a tripod.
Start with an aperture of f/11-f/13, then check how your images look on screen for depth of field.
The shutter speed can be whatever it needs to be in order to achieve a balanced exposure.
You can set your white balance to "shady" mode in order to warm the tones a little. However, if you'll be shooting in RAW, then you can always set the white balance to auto and process the image later.
 ISO 100 f18 2.5 seconds. Photo by: 'Brian Rueb'.
Landscape photography or any kind of photography in nature can be tricky, no matter how long you’ve been at it. While we can all start with some basic recommendations for camera settings, we know very well that the situations we encounter can and do change from place to place, as well as throughout the day as the light rises and sets.
The great thing about landscape photography is that with all the advances in cameras and information available online, there is no shortage of resources available to us in order to improve our skills. So practice using your camera settings in-field. Bring this article along and try each of the things on the list to see what they do. Practice taking shots at different shutter speeds (use a tripod to help keep the composition the same) and dial in different ISO settings in order to understand which ones are noisy for your camera.
There is no one best way to shoot landscapes but a little basic knowledge of your camera settings and lots of practice will help you to improve your photography.
About the author: Brian Rueb is a photographer based in the USA. You can find more of his work on his website or by following him on Facebook and Instagram.
There's only one way to master your camera settings and that's by practicing in-field! Our expert guides will teach you everything you need to know to create your own stunning landscape photography portfolio.