Whatever kind of photography your are into, whether you are just starting out or you are a veteran photographer, and no matter what kind of camera or lens you use, you should know what the golden hour is, when it happens and how to take advantage of it.
- See this Ultimate Photography Guide to the Cinque Terre in Italy
- Check out How to Use Complementary Colours in Photography
It’s one of the fundamental things to know about in terms of photography. You may have heard the common saying “photography is all about light”. Well, to have a deep knowledge of the golden hour will help you a lot in mastering the art of photography and capturing great pictures.
In this article, you'll discover what the golden hour is, how to properly control for the light at that time of the day and how you can take advantage of the golden hour light to make your photos pop, whatever genre of photography tickles your fancy!
What is Golden Hour Photography?
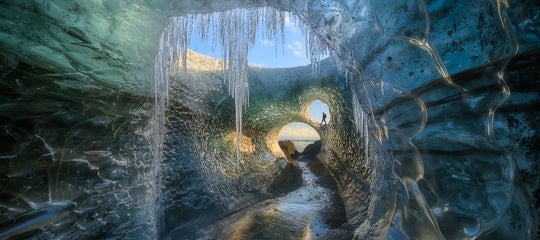
 What is the golden hour? Photo by: 'Leonardo Papèra'.
Golden hour photography refers to photos taken right after the sun has risen in the morning and before the sun is about to go below the horizon in the evening.
Later on, we'll talk about the right times of the day to catch the golden light, depending on your location and the time of the year. Just as an introduction, consider that the golden light can last as little as 30 minutes and as much as 6 or 7 hours, so we’ll need to narrow down a few variables to better understand when the right time is to go out for a shoot.
What Makes the Golden Hour Magical?
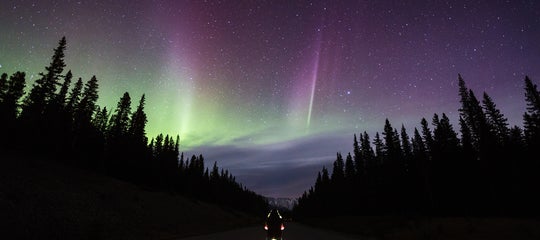
 Rationally speaking, what makes the golden hour so photogenic? Photo by: 'Leonardo Papèra'.
Soft Light
One of the main reasons why the golden hour is so popular amongst photographers is because the light becomes softer during that time. This means that you won’t find yourself having to shoot with the harsh midday light and its strong contrasts. Instead, you'll be working with a soft and delicate light.
Warm Light
Another important reason why photographers prefer to be out during the golden hour is the warmth of the light.
During the day, the sunlight tends to be white-ish, where during the golden hours, a warmer light will be cast all over your subjects, creating a completely different (and generally better) atmosphere.
Directional Light
During the golden hours, the sun will be low on the horizon. That means that you can change a lot in your photos just by deciding in which direction to shoot. Do you want the sun in your picture, to have a strong light point? Or do you want some side-light coming into your frame to light up your subject(s)?
While you won’t have many choices with harsh daylight, during the golden hours, you can play a lot more with the sunlight.
Long Shadows
If the sun is low on the horizon during the golden hours, that can only mean one thing: long, big shadows to use in your photos for more contrast and to highlight the importance of your subject(s) hit by the warm sunlight!
When is the Golden Hour?
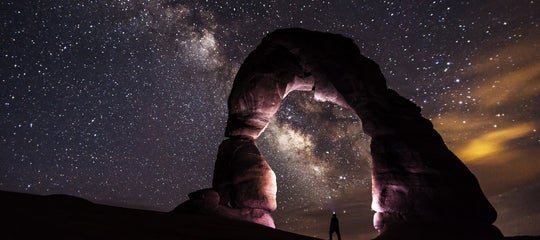
 How do you figure out the golden hour times? Photo by: 'Leonardo Papèra'.
Earlier, I briefly stated that the moment of the day defined as the “golden hour” is when the sun has just risen and when it is about to set. Unfortunately though, in real life it is a little bit more complicated than that. Why? Because the sun will rise and set at different times throughout the year and those times will change depending on the location you find yourself in at that specific moment.
There isn’t a universal “sunrise time” or “sunset time”; each day of the year is slightly different, while various locations correspond to particular golden hour times.
- See also: How to Photograph Rainbows in Iceland
Golden Hour Differences Throughout the Seasons
As I was just saying, golden hour times are subject to variations throughout the year. This is a result of the Earth's rotation.
From March to September, the northern hemisphere is oriented towards the sun and so it gets more light. On the other hand, the southern hemisphere is exposed to the sun and will receive more light from September to March.
The 22nd of December (winter solstice) is the shortest day in the northern hemisphere and the longest day in the southern hemisphere. The 20th of June (summer solstice) is the longest day in the northern hemisphere and the shortest in the southern hemisphere. I think you get the idea, right?
So what about the location? The answer is the latitude: at the Equator, the days will have 12 hours of light and 12 of darkness. The more you move away from the Equator (towards the north or south), the more you’ll be further away or closer to the sun the more that the golden hour times will be affected.
If you are above the Arctic Circle (or in Antarctica, let’s say) in winter, you’ll barely see any daylight, while in summer you will experience the Midnight Sun. If you live in any of the temperate zones, the changes in golden hour times will be less visible, because you’ll be closer to the Equator. During winter, you may get days with 9 hours of daylight, while in summer you may have 14 or 15 hours of daylight.
How to Check What Time the Golden Hour Starts
So, now that you know the differences in golden hour times throughout the year, depending on your location and why these differences occur, it’s time to find a solution that will make your life easy and that will allow you to find out when the golden hour will start at your location quickly and easily.
Luckily for you, there are quite a few options to do that!
-
Online: There are many available websites where you can easily check what time the golden hour will start, such as Golden Hour Calculator or The Photographer’s Ephemeris. All you have to do is to enter your location or coordinates, select the date you want to know the golden hours for and magically, they will tell you everything you need to know, from golden hour times to sunset, twilight times and much more!
-
Smartphone Apps: Nowadays you can be sure of one thing: there’s an app for everything! Of course, there are also a few apps that will help you plan your photography sessions during the golden hours. Apps such as Photopills, Sun Surveyor or even The Photographer’s Ephemeris (yes, the same website as above, they also have an app!) are available both for iOS and Android. All you have to do is insert a place and a date; the rest will be done by the app!
 Knowing when the golden hour begins is important to achieving successful images. Photo by: 'Leonardo Papèra'.
How to Use the Golden Hour in Photography
Until this moment, all I’ve done is to provide you with a lot of nice information about the golden hour. However, I've yet to give you any tips and tricks about how to exploit this particular time of the day in each different genre of photography.
Why should you get out really early (or really late) to take photos? Why can’t you just use filters or particular techniques to shoot with the harsh daylight? Let’s be serious: in practice, is it worth to go shooting during golden hours?
Now is the time to find out the answers to all of these questions that may be burning in your head.
Portrait Photography
Have you ever tried to take the same exact shot around noon and then later in the evening, during the golden hour? If you haven’t, you should try. That’s the easiest way to understand why being out during the golden hour is fundamental for a portrait photographer.
Let’s start with the fact that, as I already told you above, the light is softer and warmer during the golden hours. As such, you won’t have any strong contrasts between lights and shadows but the whole image will look much more balanced.
You can also control the light on your subject a lot better during the golden hour compared to shooting in the harsh midday light. During the day, the sun is high above the horizon and (obviously) the sunlight is coming from above, you’ll barely see any differences when repositioning your model. This won’t happen during the golden hours as the light is directional and the sun is low on the horizon. You'll be able to decide if you want your subject to be hit by the last light of the day or if you want them against the sun to experiment with some creative lens flares in your images.
Oh, you didn’t know? If you place the sun at the edges of your frame, you’ll get flares all around the shot; with a little bit of practice, you’ll be able to control these flares and have them right in the areas of the frame where you want them to create some beautiful atmosphere!
If you're interested, then I highly recommend that you read all about Understanding Lens Flares in Photography.
Wildlife Photography
 Wildlife photography during the golden hours can be tricky. Photo by: 'Leonardo Papèra'.
Practicing wildlife photography during the golden hours will be.. tricky, to say the least. Wildlife photography is already a difficult genre if you do it in the midday light, so you should prepare to practice a lot for shooting wildlife during the golden hours.
Why? Well, here are just some of the challenges you have to face:
-
Raising the ISO: The light is fading during the golden hours, so be prepared to shoot at a higher ISO. You'll need to have a camera which will allow you to do that.
-
Keeping your shutter speed fast enough: You don’t want blurry images or movements, so be sure to use fast enough exposure times to capture whatever animal you are shooting.
-
The exposure will change a lot depending on your subject position: Your subject may be moving quickly but you’ll have to change the settings of your camera faster if you don’t want overexposed (or underexposed) shots.
-
Planning: The chances of having your subject right where you want it to be at the best time of the day is not an easy thing to achieve. You’ll have to meticulously plan your photography sessions if you are aiming to capture great wildlife photos during the golden hours.
This brief list isn't to discourage you but to make you aware of the things you will need to take into consideration when practicing wildlife photography during the golden hours.
On the other hand, if you manage to capture some nice wildlife images during that time of the day, the results will be incredible to say the least. Similar to portrait photography, you’ll have the chance to shoot your subject beneath the last light of the day and in the direction of the sun, for some beautiful rim light effects on the edges of your subject.
Remember to always keep the face (or the eyes at least) of the animal in light, unless you are aiming for some particular effect.
Landscape Photography
 Landscape photography is perfect for shooting during the golden hours. Photo by: 'Leonardo Papèra'.
In landscape photography, being out during the golden hours can dramatically change the atmosphere of your photos. While it can be exhausting sometimes to wake up really early in the morning or stay out until late in the evening, shooting during the golden hours can be immensely rewarding.
One of the first things that I had to change my thinking about when I decided to take landscape photography more seriously was that I had to always be out during the golden hours of the day (possibly even earlier or later!) if I wanted to really improve upon my skills.
By now, you are probably wondering why being out during those times of the day is so important. Similar to what I've already mentioned for the other genres of photography, shooting landscapes during the golden hours will give you softer, warmer light. You won't have any strong contrasts in the scene but instead, you'll have warm and pleasant tones to work with. If your lens is pointing in the direction of the sun, then you may even be able to capture a beautiful sun star in your images.
Cityscapes
 Cityscapes are beautiful in the golden light. Photo by: 'Leonardo Papèra'.
Going out to shoot in a city during the middle of the day, early in the morning or late in the evening are two completely different experiences. Towns are super busy during most of the day, while they are generally really quiet during the golden hours. So, being out at those times will allow you capture images with fewer people getting in the way of your shots. You'll also find that you might even enjoy being in the city a lot more.
Okay, but aside from not having many people roaming about in your photos, what are the other upsides of shooting cityscapes during the golden hours?
-
Illuminating architecture: What's more beautiful than a panoramic view of a city, with the golden light hitting the buildings? Not many things, honestly. So, one of the ways to capture this beauty is to find a spot where you have a great view of the city and wait for the best light to come!
-
Silhouettes: The difference in terms of luminosity between the buildings already in the shadows and the sky illuminated by the last light of the day will be huge, so you’ll get the chance to play a lot with the silhouettes of buildings just by exposing for the highlights. The geometry and patterns that you’ll find can be quite amazing to shoot!
Location Planning and Scouting for Golden Hour Photography
 Plan and scout for your golden hour photography shoot. Photo by: 'Leonardo Papèra'.
Whatever photography genre you like to practice, there is one common denominator to them all: the planning and scouting of the location where you’ll shoot. This part of the shoot, which is often not given much thought, is fundamental if you want to return home with some nice shots.
Luck is always a variable to take into consideration when going out to shoot but with careful planning and scouting, you can reduce the influence of luck in achieving the shot you are after.
So, what should you do before going out?
Check the Weather Forecast
Obviously, the first thing to do is to check the weather forecast! The golden hour is famous for its golden light but if the sky is cloudy, then you won’t get any golden light at all and it may be that you head out for absolutely nothing.
In some genres (landscape photography for example) however, an overcast sky might still result in some incredible conditions for shooting at sunset or sunrise. In this case, the golden hour might mean that some of the clouds will still be tinged by colour. As such, it may be worth it to head out even if the forecast doesn't look very promising.
Visit the Location Beforehand
I totally understand that sometimes, it can be quite hard to scout the location before you actually go there to shoot (for example while being on a trip, or visiting a city). However, if you have the means and the time, then make sure to do it.
Knowing exactly where the sun will rise (or set), what will be illuminated by the light and what will be in the shadows, as well as where your subject should stand for the perfect shot are all things that are difficult to know without visiting a location. The apps that I wrote about a few chapters above will help you plan your shoots to some degree but scouting the location before you go will give you an advantage that no app can provide.
Study the Subject
If you are a wildlife photographer, then make sure that you understand your subject’s characteristic behaviours before heading out.
Portrait photographers should find a location that will fit perfectly with their model and the kinds of shots that they are aiming for.
Meanwhile, for landscape photographers, the location itself will be your subject so make sure to check the weather forecast beforehand. While the location may be important, don't forget that the lighting on your subject is important too!
How to Shoot During the Golden Hour
 You'll need the right equipment for golden hour photography. Photo by: 'Leonardo Papèra'.
Finally, let's get to the best tips you need to know in order to capture incredible images during the golden hours. From what kind of camera equipment you should use to the best camera settings, how to compose a shot and the bracketing technique, discover everything you need to know for stunning golden hour photography below!
Camera Equipment
It goes without saying that the equipment you should have with you when shooting at the golden hours can vary a lot depending on which genre of photography you'll be undertaking.
Portrait Photography
Generally when shooting portraits, it’s nice to have very bright lenses (for example 50mm f/1.8 or f/1.4, 85mm f/1.8 or f/1.4, 35mm f/1.8 or f/1.4, etc.) to achieve a lovely bokeh effect in front of or behind your subject. When shooting during the golden hours, you’ll get a warm, soft tone all over the frame and that’s what will really make your shots stand out!
Wildlife Photography
You'll need a telephoto lens that can possibly reach at least 300mm: it would be even better if it could reach 500mm or 600mm. One more thing that could be helpful is a camera with great high-ISO capabilities, fast frames per second ratio and great autofocus, since you’ll be shooting in low light conditions amidst complex scenes where focusing can be hard.
Landscape Photography
When practicing landscape photography, a wide-angle lens (anything from 14mm to 35mm) is generally the way to go, so be sure to have at least a lens in that focal range within your backpack. It should also have a good resistance to lens flares if you want to have the sun in your frame, so that you won’t have flares ruining your shots.
City and Architecture Photography
My recommendation for these types of photos is to use a wide angle lens, possibly with little distortion so that the buildings will be as straight as possible, even at the edges of the photo. A camera that has a great dynamic range to handle high contrast situations is also recommended!
No matter what photography genre you are into, I highly suggest that you always go out during the golden hours with a tripod; remember that you’ll be shooting in low light and high contrast conditions, so a tripod can be incredibly useful to reduce camera shake. You might even need to bracket your images to achieve the full dynamic range of the scene (we’ll talk about this technique later, don’t worry), and a tripod will be fundamental in this case.
- See also: The Orton Effect Explained
Golden Hour Camera Settings
The settings that you should use when shooting during the golden hour can vary a lot depending on your subject.
Portraits
If the bokeh effect and some artistic lens flares are what you are aiming for, be sure to have your aperture wide open and to shoot with a fast enough shutter speed so that you won’t end up with blurry shots. Regulate the ISOs accordingly and keep them as low as possible to reduce noise.
Wildlife
I recommend using wide apertures and really fast shutter speeds. Your subject will likely be moving quickly, so you'll need to keep your exposure times as short as you can. You'll probably need to raise the ISO but remember that a noisy image is acceptable, whereas a blurry shot is not.
Landscapes and Cityscapes
I'll put these two together, since the settings you should use are pretty much similar. If you are looking for a sunstar, then close your aperture to at least around f/11. With a tripod, you won't need to care that much about exposure times, just as long as you don't clip the highlights. If you are shooting handheld, then keep your shutter speed fast enough so that you won't end up with blurry images.
- See also: Bright Ideas for Shooting in Daylight
Composition Tips for Golden Hour Photography
The light during the golden hours is directional. This means that the sun will be low on the horizon and depending where you position your subject (and your camera), the resulting image can vary dramatically. No matter what kind of shots you are aiming to achieve, you will generally have three options when shooting during the golden hours:
Shooting in the Direction of the Sun
You’ll need to have a strong point of interest that will capture your viewer’s attention but at the same time, your subject may end up in the shadows. Be sure to handle the dynamic range of the scene correctly, otherwise you’ll end up with a bunch of underexposed images!
 Sunbursts can elevate your golden hour photography. Photo by: 'Leonardo Papèra'.
Shooting with Side Light
With this option, you won't have to deal with the strong contrasts generated by the sun. The scene will be much more balanced and your subject will be bathed in a lovely warmth. If you manage to be at the right angle, then you may end up with some nice glow at the edge of the frame.
 Side light gives a wonderful atmospheric glow. Photo by: 'Leonardo Papèra'.
Shooting in the Opposite Direction of the Sun
You'll pretty much end up with everything in your frame illuminated by the last (or first) light of the day. As such, unless you have some elements already in the shadows, it will be much easier to handle than shooting directly into the sun!
 When you shoot in the opposite direction of the sun, your foreground will be lit nicely. Photo by: 'Leonardo Papèra'.
Bracketing for Golden Hour Photography
This widely used technique consists of shooting more images with different exposures, so that you’ll have the full dynamic range of the scene. It can be useful when there are strong highlights and dark shadows in the frame at the same time, meaning that you can’t expose well enough with a single shot.
 Two bracketed images of the same scene. Photo by: 'Leonardo Papèra'.
As you can see in the screenshot above, I had to take two photos with different settings to achieve the full dynamic range of the scene. The shot on the left is exposed for the shadows and is really bright – you can see all the details, even in the darkest parts of the mountain. However, the highlights are blown out.
The shot on the right is exposed for the highlights, so it’s quite dark but I have recovered all of the details in the brightest parts of the frame (around the sun and the clouds).
With Adobe Lightroom, you can automatically merge together these two shots with the HDR function. With Adobe Photoshop, you can work with masks and merge them manually.
After a lot of post-production work, you can see below the final result of the two photos when merged together. The sky is actually from 10 minutes before the two RAW images.
 The bracketed images merged together. Photo by: 'Leonardo Papèra'.
Golden Hour Post-Processing Tips
All photos taken during the golden hour should have nice warm tones, compared to the harsh daylight of the afternoon. You should keep this in mind when editing your shots and set the colour temperature accordingly.
For example, in the two images above, the colour temperature that the camera automatically selected was way too blue. I can assure you that the whole scene was a lot warmer than in those RAW files. To convey what I actually saw in-field, I used Adobe Camera RAW to fix the white balance by warming up the scene and adding a few extra points of magenta too.
Don’t go too far with the temperature warmth though. You'll also need to keep the shadowy parts of your images more neutral compared to the highlights, since the shadows are naturally colder than the highlights. You can play with the colour balance in Adobe Photoshop or with the HSL (hue-saturation-luminosity) in Adobe Lightroom or Camera RAW in order to achieve the colour separation that you need between the shadows and the highlights.
 Don't be too heavy handed on changing the white balance. Photo by: 'Leonardo Papèra'.
I really hope that after reading this article, you will understand the importance of shooting during the golden hours. The common saying is that “photography is all about the light”, which is absolutely true. As such, you should take advantage of the golden hours, since that’s when you’ll have the best possible light for outdoor shoots.
 Golden hour photography has a time and a place. Photo by: 'Leonardo Papèra'.
While shooting during the golden hours is important, don’t focus too much on the golden light. For too many years, I focused just on shooting during these times of the day, not even taking into consideration that I could take some great shots during the rest of the day. There’s always something to photograph, no matter what the time, so be sure to keep your mind open and to always be ready to shoot. You never know... you might end up taking your next best image during the golden hours as well as in the broad daylight. Just remember that!
About the author: Leonardo Papèra is a landscape photographer based in Italy. You can find more of his work on his website or by following him on Instagram.
Have you tried any of the tips listed above? What are your tricks for shooting during the Golden Hour or using it to your advantage? Leave a comment below!