Iceland is a very windy country. If you’ve decided to visit, then you’ll probably already know that the wind here can be detrimental to your travels. No one ever knows how strong it will be or how hard it can actually hit.
- Learn about How to Start Taking Landscape Photos with a Smartphone
- Discover this Fundamental Guide to Sharp Focus in Handheld Landscape Photography
- Check out our Interview with Michael Shainblum
The wind in Iceland is notoriously changeable – it ranges from pleasantly calm to incredibly harsh. The windiest months occur between October and April, which coincides with the winter season and the viewing of the Northern Lights. However, it can be just as windy (if not windier) in the Highlands, which are only open for 3 months of the year between mid-June and mid-September.
To put things into perspective, the average wind speed in Iceland is 19 kilometres per hour. During winter, the wind speed can be up to 70-95% stronger, with an average wind speed of 25-26 kilometres per hour. Strong winds like this can lead to road closures, making it impossible for you to get from one destination to the next. Wind gusts, which can reach up to 180 kilometres per hour, can also result in overturned cars, shatter windows and significant environmental damage.
If you are not sufficiently prepared for the wind, then it can easily ruin your vacation. Likewise, wind can make it impossible for a photographer to capture sharp images when shooting the landscape in Iceland. It will be even more difficult to use a tripod, let alone to make a long exposure at night whilst maintaining steadiness and keeping things sharp.
As a landscape photographer, if you are ill-prepared for the wind in Iceland, then you may find yourself returning home with blurry images or not taking many photos at all.
To make things easier for you while you’re in-field, we’ve collated some of our top secrets to taking landscape photos in Iceland when it’s windy. Of course, these tips won’t result in ultra-sharp images by themselves, but if you follow along closely, then you’ll be able to ensure that a higher number of your photos will be sharp and usable once you get home and start post-processing.
Secret #1: Don’t Raise the Centre Column
When it’s windy in Iceland, it’s best to shoot handheld. However, if you must use your tripod, then it’s best to use one that is sturdy.
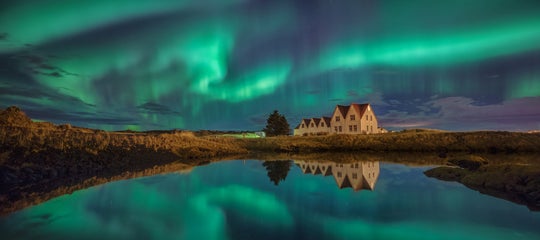
 You'll need a tripod to be able to get a sharp photo of the Northern Lights at night. Photo by: 'Iurie Belegurschi'.
A good tripod is fundamental to landscape photography, though when you’re travelling, you’ll probably forgo certain important aspects to make carrying it a whole lot easier. Although you may be bringing a top of the range tripod with you to Iceland, chances are that you’ve opted for something light and portable for travel purposes. As such, you may be sacrificing some level of stability.
In your quest to shed weight from your luggage, you may have even chosen to bring along a tripod that is smaller than what you would normally use. We see this all the time in-field – people using tripods that are lower than their eye level, so they’ll often bring up the centre column to make up for the height. However, did you know that the centre column is the weakest part of your tripod? When you raise it, the entire tripod becomes susceptible to vibrations from the environment, shaking in the wind and putting your entire set-up at higher risk of blowing over.
Therefore, if it’s possible, it’s best to keep your centre column as low as you can. Doing so will reduce shake caused by the wind and allow you to take sharper photos.
Secret #2: Lower the Tripod
If your composition allows, then you can lower your tripod to help reduce the effects of vibrations and shake caused by the wind. Most of the time while you’re practicing landscape photography in Iceland, you’ll be getting down low with a wide-angle lens anyway to capture the detail of foreground elements. As such, you probably won't be losing too much in terms of height when you lower the tripod.
By simply collapsing a single section of each tripod leg, you’ll be able to increase the stability of your tripod which will result in less blurriness across your images.
 Lower the tripod so that it doesn't shake in the wind. Photo by: 'Iurie Belegurschi'.
When deciding upon which leg to collapse, always choose the thinnest one. Thinner tripod legs are more susceptible to vibrations from the wind, so it makes sense to collapse them first to create a sturdier set-up.
In addition, when collapsing the legs, always lower legs of a similar width at the same time, rather than mismatching them. This will contribute to the stability of your tripod.
Secret #3: Use Image Stabilisation
Image stabilisation is a technique employed by some digital cameras and lenses to reduce blurring associated with motion.
It is designed to combat camera shake at slower shutter speeds or with long focal lengths (telephoto or zoom lenses). It does not prevent motion blur but rather reduces the blur that results from normal shaking of the lens with hand-held shooting.
 Image stabilisation can be helpful when shooting in the wind. Photo by: 'Iurie Belegurschi'.
This can be particularly useful when photographing wildlife or in high action situations, such as sport photography.
However, image stabilisation is not designed to be used for landscape photography when you have a camera mounted to a tripod. In fact, while the image stabilisation function is in the process of trying to detect vibrations, it can actually cause vibrations to occur in your camera. This can inadvertently lead to blurry photographs as the vibrations reverberate through your tripod. There is one exception though in which this theory doesn’t apply.
When it’s windy in Iceland, you can actually turn on the image stabilisation feature of your camera or lens to help reduce blurriness caused by your tripod shaking in the wind. The feature actually does a great job of ensuring sharper photographs when shooting in windy conditions. Who would have guessed?
Secret #4: Don’t Hang a Bag From Your Tripod
You’ve probably heard a lot on the grapevine that you should hang a bag from your tripod when it’s windy. Some tripods even have a hook on the centre column to make it easier for you to do so.
Well, we’re here to tell you that you probably shouldn’t hang a bag from your tripod because doing so actually doesn’t really help.
 Don't hang a bag from your tripod, unless you want a pendulum effect. Photo by: 'Iurie Belegurschi'.
Although hanging a bag from your tripod can lower the centre of gravity of your entire set-up with your camera and lens attached, shake is bound to occur and when it does, it will result in some degree of blurriness to your images. Put quite basically, if it’s windy enough in Iceland to make your tripod shake, then it’s probably also windy enough to turn your bag into a pendulum.
When both your bag and tripod are shaking, both at different frequencies, there will be additional resonance added to the overall vibration effect. As such, your photos will probably turn out less sharp than if you were to have taken them without a bag attached to your tripod.
The only benefit to hanging a bag from your tripod is to prevent your set-up from blowing over in high wind. However, as we’ve already mentioned, wind gusts can be quite extreme in Iceland. Therefore, hanging a bag from your tripod may not be quite enough to stop your set-up from blowing away.
Secret #5: Remove the Camera Strap or Tie it Down
When it’s windy in Iceland, your camera’s strap may blow around and even hit the tripod as you are steadying up for a shot, leading to unwanted blur. You might choose to remove it, though many camera straps attach to the camera via girth hitches at the strap mounts. Removing these can be quite difficult, so to prevent the strap from causing vibrations, you can tie it down instead.
 Remove your camera strap when shooting on a tripod if possible. Photo by: 'Iurie Belegurschi'.
To do so, simply roll up the camera strap and secure it with a rubber band or a zip tie. Just keep in mind that if there’s enough wind to move the strap around, then there is probably enough wind to shake your camera and tripod around, with or without the strap attached.
When you’re out practicing landscape photography on a windy day in Iceland, there can actually be some benefit to leaving the strap on your camera. By keeping your camera strap around your neck, arm or wrist as you are shooting, you’ll be able to prevent it from falling over should a big gust of wind come from nowhere.
Secret #6: Anchoring the Tripod
To increase the sturdiness of your tripod when you’re shooting in Iceland, it’s a good idea to make sure that your tripod is anchored down. This might mean pushing your tripod’s legs firmly down into packed black sand or, in some cases, physically holding the tripod around the neck and pulling it downwards to keep it stabilised into the ground.
 Anchor your tripod when it's windy. Photo by: 'Iurie Belegurschi'.
Needless to say, this technique is for those who can hold on steadily. If you inadvertently move or shake just a little bit, then you may actually introduce additional camera shake. So if you think you can keep a grip on your tripod with a steady hand in the wind, then you may just be able to capture sharper landscape photos in Iceland.
- See also: How to Take Great Photos in Bad Weather
Secret #7: Block the Wind
The wind in Iceland never blows steadily; there are always blustery gusts interspersed with eerily quiet lulls. If you can wait for these calmer moments to shoot, then it’s best to do so. If you can’t though, then that brings us to lucky secret number seven – blocking the wind.
To reduce camera shake and to ensure sharper images while you’re photographing the landscape in Iceland, try positioning your body as close as possible to your camera while you’re shooting, such that you’re actually acting as a bit of a wind blockade. If it’s not too cold, then you can even open up your jacket and use it as a bit of a shield! Doing so will help to stabilise your tripod and just might lead to you getting that super sharp shot that you've been waiting for.
About the author: Serena Dzenis is a landscape photographer based in Iceland. You can find more of her work on her website or by following her on Facebook and Instagram.
Have you got any other tried and tested tips for taking sharp landscape photos in Iceland when it’s windy? Leave a comment below!


