There may be times when you'll see a wonderful scene, though what you'll end up capturing won't even come close to what you may have witnessed in that moment. This is something we all struggle with at some point or another because there is just something about reality which is really hard to convey in a photograph. Have you ever wondered why this might happen? Could the camera be at fault? Perhaps the lens isn't suitable for the scenery?
- Learn all about The Power of Foreground in Landscape Photography of Iceland
- Discover The Most Popular Destinations for Photography Around the World
Our eyes see in three dimensions. That's one more dimension than your camera can see. One of the biggest challenges in photography is translating a three-dimensional scene into a two-dimensional medium. So, how can you achieve a three-dimensional impression in your pictures?
Well, the answer is simple: by the clever use of subjects and leading lines. When used well, these elements of composition can help to define the foreground, middle-ground and background, in order to create the feeling of depth in your photographs. The result will be that the viewer is transported right into the middle of the scene, even though it is only a plain old picture.
Combining foreground elements with an exciting middle-ground and background can be a game changer for your photography once you have practiced the technique and trained your eye to see certain compositions. So let's take a look at the power of foreground in improving your images. We'll go over some possibilities for compositions that will help you to frame and compose your images in a new and different way, starting with the basics and moving on to more specific applications.
Defining Layers
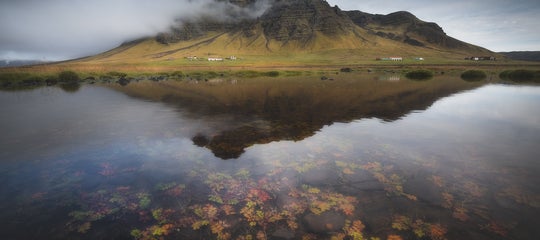
First of all let’s take a look at the structure of a well-composed landscape picture and define the foreground, the middle-ground and background. As you can see in the image below, the layers are easy to identify.
 Blue is the foreground, green is the middle-ground and red is the background. Photo by: 'Felix Röser'.
I have masked the single layers in this picture for you, so you can clearly see how the picture is “constructed”.
If you want to compose images like this, then the easiest way is to work your way from the background to the foreground. It usually doesn’t make as much sense the other way round. While a stunning backdrop doesn't always need a spectacular subject in the foreground, the opposite isn't always true. A great foreground can’t compensate for a rather boring background.
Foreground elements should always assist your main subject and help the viewer to find a way into the picture. As such, you should define your background or main subject first. Then, you can spend some time looking for a fitting foreground which directs the viewer's eye and adds depth to the photograph.
Leading Lines and Connecting Image Parts
Have you found a composition with all three layers? Alright, now it gets a little bit tricky. As if finding a three dimensional composition wasn’t enough, you'll now have to make sure that you connect the foreground and background in a harmonious way so that the layers won't feel as though they are completely separate from each other.
A great way to connect the parts of your image is to use leading lines, which direct the viewer through the picture and make it easier to understand. Look for elements like, stones or rocks, vegetation, structures on the ground, basically anything that can create a line or a direction. Use these to make a connection between the layers in your image.
In the following picture, I used the sand that was formed by the wind as perfect leading lines. Rivulets in the sand make for perfect leading lines. Photo by: 'Felix Röser'.
The green line from left to right leads the viewer through the different layers of the image and connects the foreground with the rest of the picture.
Of course, you are not limited to just static elements when it comes to creating good leading lines. Moving elements can also serve this purpose well. Take water for example, like in the following picture.
 Water can make great leading lines. Photo by: 'Felix Röser'.
The flowing water in this image has created leading lines from the corners to the centre. You can use longer exposure times for flowing water to achieve this effect. Observe the wave patterns to see in advance where the lines form. This way, you'll be able to properly compose the image.
Keep experimenting and try to train your eyes to see lines and directions within a frame. This will take your images to the next level!
Points of View
The point of view also plays an important role when it comes to adding depth to pictures. Most foregrounds will be somewhere close to the ground and will only look good if you get up close – that is, if you have a wide angle lens that will allow you to frame the background and foreground at the same time.
When using a wide-angle lens, lower your tripod and get closer to your subjects. A nice side-effect of going lower is that all the other parts of the image will come a little closer together, so you can get rid of oversized middle-grounds which may be difficult to connect with the background.
 Getting down low with a wide-angle lens will exaggerate your foreground elements and minimise a boring middle-ground. Photo by: 'Felix Röser'.
For the image above, I lowered the perspective pretty far to get as close as possible to these beautiful ice structures. The river creates a good leading line which connects all three layers of the picture.
If you have lines that go from the foreground through the middle-ground, then it can be nice to heighten the perspective. Try extending your tripod higher to include all of the interesting elements in your picture. Your foreground will shrink and the focus will move from the bottom towards the centre of the image.
Ultimately, which point of view you choose will depend mostly upon which options are available to you in terms of subject elements. There is not one solution that will fit them all. It might take some time to really balance an image correctly. Looking at pictures of other photographers whom you admire and analysing them can make things easier for you in the field.
However, changing your perspective is not the only thing you can do when it comes to adding depth to your landscape images. There are some other ways that you can work with the foreground apart from using leading lines.
Frame Within the Frame
The “frame within the frame” technique, or the “reveal” as some might call it, is as simple as it sounds. This involves using the foreground to frame your main subject by creating a sort of window through which the viewer must pass in order to see the main attraction of the image.
Usually, this will create a lot of depth and emphasise the centre of a picture – that is, if you use the technique in a classic way. Of course, you can also place your main subject at a different place within the frame for different effects.
 How you place your elements in the frame will affect the level of depth that your image conveys. Photo by: 'Felix Röser'.
In the image above, the trees on either side of the frame create a passage which the viewer must look through, revealing the mountains and the rising sun in the back.
 Placing the main subject off-centre can also be an effective composition. Photo by: 'Felix Röser'.
In this image, the glacier ice forms a tunnel which the viewer's eye will wander through until they reach the background.
The Bottom Anchor
Another approach is the "bottom anchor" technique, which gives your image a solid base to stand on. A bottom anchor can be anything that sweeps across the bottom of the image, including flowers, rocks or trees. This technique prevents the viewer's eye from wandering out of the frame and can make your image feel more balanced. It is also able to add a three dimensional layer to your image, which again creates the illusion of depth.
Let’s take a look at some examples for this technique.
 The bottom layer technique in action. Photo by: 'Felix Röser'.
In the image above, I used the nicely shaped rocks and trees for my bottom anchor, combined with leading lines created by the shoreline and the rock layers in the right corner.
 Aldeyjarfoss in the north of Iceland. Photo by: 'Felix Röser'.
The bottom anchor is a bit more obvious in this image. As you can see, the snow prevents the eye from "losing grip" and keeps it focused on the centre of the image.
Combining and Balancing
In my landscape photography, foregrounds play a really important role. Most of my time when I'm in the field, I find a fitting foreground so that I can really get the balance between all the parts of my image right. I think balancing is a good keyword here because for me, the act of composing a photograph simply means that I have to find a balance. All parts of the image have to interact with one another in harmony. One part of the image should not dominate the others.
I often combine the techniques that I've mentioned above as they can work perfectly together and often complement each other. Again, this is also a question of balancing! It is easy to overdo it and tp miss the point where it is enough. Let me show you an example of how I combine these techniques to create depth using foreground elements.
 A combination of techniques will help you to create depth with foreground elements. Photo by: 'Felix Röser'.
In the image above, I combined the “frame within the frame” with the “bottom anchor” technique, as well as some leading lines that point right to the centre of the image, where I want the viewer's eye to be.
Stay Flexible
I hope that these pointers about how to use the foreground to add depth will help to improve the images that you take in future. Remember, it's all about the balance and how you connect the foreground with the background. While this technique can be a really powerful tool in your landscape photography, it's important not to get too focused upon it.
There have been times when I just haven't been able to find a way to balance things just the way that I like them. In those moments, I have stood in majestic scenery, seemingly unable to take an image. For me, this has always been a huge mistake. Put simply, my mind was not flexible enough to adapt to the circumstances. Rather than trying to find a great foreground, I should have thought of other options to capture the scene.
Sometimes, the search for a fitting foreground can be really frustrating! Certain locations just won't offer you the option of interesting foreground elements. It is better to realise this and to accept it rather than missing out on good light. In the end, a picture without a strong foreground is still better than no picture at all!
Thanks for reading and have fun in the field!
About the author: Felix Röser is a photographer based in Germany. You can find more of his work on his website or by following him on Facebook and Instagram.
Learn photography in-field from the landscape photography professionals! Join one of our photography workshops and tours in Iceland!

Felix Röser is a professional Landscape- and Advertising Photographer based in Nuremberg, Germany.
Since he started his own business as a freelance photographer four years ago, his pictures were published in several magazines around the globe, such as the Redbull Adventure online magazine or the Digital SLR Photography Magazine. He also had several exhibitions, one of them in the Bavarian Ministry of Finance and Home.
With the money of his first job as a self-employed photographer he made a dream come true. He booked flight to Iceland and went on a single backpacking-tour all around the island for three weeks. During this time he fell in love with this wonderful country and its majestic nature.
Since then he started traveling the world with his good friend and fellow german photographer Stefan Hefele. Not being specialized in only one type of landscape his portfolio is quite a treasure box of amazing places around the earth. Strong foreground compositions and vibrant colors are characteristic for his work.