Even if you are only a beginner photographer, chances are that you have already encountered or heard the words “HDR photography” at least a couple of times in your life. This particular photography technique became incredibly popular during the last decade, especially when there weren’t yet digital cameras with a super wide dynamic range.
- Check out this article on HDR Photography in Iceland | Exposure Blending for Beginners
- Learn all about How to Use Leading Lines for Better Compositions in Landscape Photography
When the HDR technique first came about, it was seen by many as an “over-kill” for photos (you’ll discover why later on in this article), since it meant that the shot had been post-processed with a very peculiar workflow. For this reason, it immediately received a negative meaning in the photography world.
In later years though, photographers began to use the HDR technique for its true purpose – capturing the entire dynamic range of an image in order to keep the highlights under control and still see all the details, even in the darkest of the shadows, at the same time. The results of using this technique began to appear more and more natural. These days, its original bad reputation has almost disappeared. Now, HDR photography no longer refers to a particular post-processing workflow but rather, it is just a technique that allows photographers to get the perfect exposure in each part of the frame.
What is HDR in Photography?
HDR literally stands for “High Dynamic Range”. When it is used in a photography-related context, it refers to the technique of capturing the full dynamic range of the view you are trying to shoot.
The technique consists of taking multiple exposures with different settings and then merging them together in post-production.
On the field, your goal should be to snap a series of different exposures in order to have all the details of the scene, from the whitest of the highlights to the darkest of the shadows. A good tip is to start from the brightest and go all the way to the darkest (or vice versa) so that you’ll recognise them easily late onr. Some photographers even take a dark frame or a shot with their hand in it so that they know where the HDR sequence is starting.
Best Settings for HDR Photography
The logical question you may wonder now is: what settings should I change? Well, you should know that there is not a general rule as every situation is different.
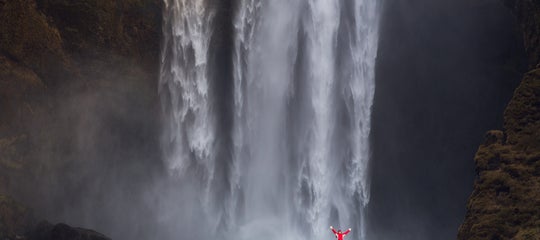
My personal recommendation is to play with the parameter that isn't changing within the scene you want to capture. As an example, let’s say that you are shooting a landscape with some flowing water in it: if your goal is to shoot that flow at a shutter speed of 1”, then you should adjust the ISO and/or aperture to obtain a lighter and darker exposure.
 There are no real hard and fast settings for HDR photography. Photo by: 'Leonardo Papèra'.
Another example is that if you are shooting a scene that requires a great depth of field and you would like to use an aperture of f/13, then to get the full dynamic range of the frame, you will probably want to change the shutter speed and/or ISO instead of the aperture.
Why? Because later in post-production, it will be easier for you (or for the software, if you are doing it automatically) to merge all the exposures together. The less differences there are between one shot and the next one, the less complicated it will be to produce the final HDR image.
 Adjust the variables that don't need to change, such as the ISO and shutter speed if you want to have a particular aperture. Photo by: 'Leonardo Papèra'.
Is HDR Good for Photos?
The HDR technique was born before all the “big-megapixel" cameras with great sensors, capable of capturing an impressive amount of details even in the most difficult light conditions. That’s the main reason why nowadays, many photographers think that taking multiple exposures to get HDR shots is not necessary anymore. With better sensors, it is becoming easier and quicker to expose for the highlights (following the famous rule of exposing to the right of the histogram), and the results are pretty much the same.
Although the most recent camera sensors have improved a lot to capture a wide dynamic range, HDR might still hold its value in certain cases. For example, when you have a strong source of light in the frame (e.g. the sun, some kind of artificial light, etc.) it’s still recommended to take more exposures because with a single shot, you’ll barely be able to recover all the details in the shadows. Even if you manage to do so, they won’t be comparable in quality to an HDR shot. The darkest shadows will be much more noisy and grainy.
My tip here is to always shoot multiple exposures in the field; then in post-production, you'll be able to see if you can bring out all the details from the darkest shot while still maintaining image quality or if you'll need to merge more shots to obtain an HDR photo.
The conclusion is that even if camera sensors have become incredibly good at capturing a wide dynamic range, they still can’t completely replace the good old HDR technique in many cases.
 HDR is a great tool for bringing out the details of your images. Photo by: 'Leonardo Papèra'.
When Should You Use HDR Photography?
As a general rule, you should remember to use the HDR technique every time you see that you can’t capture the whole dynamic range of a scene in a single shot. In other words, if you can't manage to keep the highlights under control whilst maintaining all the details in the shadows, then you should opt for an HDR photo.
Let's take a look now at how the HDR technique can be applied across different photographic genres with a few practical examples.
Landscapes
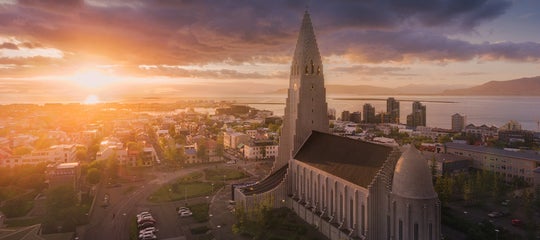
Landscape photography is probably the genre where it’s more likely that you will end up taking HDR photos. This is because you’ll often have to deal with the sunlight, especially during the golden hours (which are the best times of the day for shooting) when the sun will be low on the horizon, creating a very strong contrast between the parts still hit by the light and the ones in the shadows. In cases like these, you’ll be forced to shoot multiple exposures to get an HDR photo as a final result.
If you are aiming to shoot multiple exposures for an HDR photo, then it is important to always have your tripod with you. Without your tripod, you won’t be able to take a series of completely identical shots without moving the composition. In order to merge the shots later in post-production – whether you do it manually or let the software do its magic – your series of shots must be perfectly aligned, otherwise the edges of each shot won’t match together when you try to merge them.
When starting to take the sequence, it’s easier if you start from the lightest frame and go all the way to the darkest one (or vice versa), so that you’ll be able to recognise them faster when you get to the post processing stage. There isn't a minimum or a limit to the number of shots you should take; rather, you’ll learn with practice and experience how many you will need for each different situation.
 You should use the HDR technique for very high contrast landscapes. Photo by: 'Leonardo Papèra'.
Nightscapes
In night photography, the HDR technique might be even more important than in “normal” landscape photography.
On a warm summer night, if you were to go out to shoot the Milky Way, then you should be aware that even with a super wide angle lens (e.g. 14mm on a full frame camera), you won't be able to take really long exposures. The reason for this is that the stars will tend to trail throughout the shot, which is generally an undesirable result. You'll probably also be wanting to use a wide aperture of around f/2.8 with a high ISO such as 3200 or 6400. When you shoot with settings like these, you won't be able to go over 20 or 22 seconds of exposure if you want to maintain pinpoint stars rather than having star trails. However, a shutter speed like this will mean that your camera won't really have enough time to expose for the details in the foreground, especially if it is really dark. It also won't be able to capture the quality or sharpness of these details.
The solution in this case is to make an HDR image. By taking multiple exposures – at least one for the sky and one for the foreground – you'll be able to have a super sharp, starry sky in tandem with well-exposed, sharp details in the foreground in your final HDR photo.
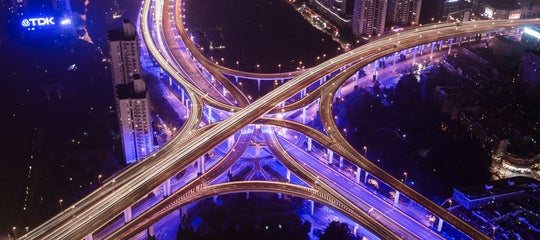
Let's take a look at another example. Say you decide to go downtown with your camera, with the aim to capture some beautiful cityscapes at night. The city lights are glowing and you really want to capture that atmosphere, without blowing out the lights. However, as soon as you put your camera on the tripod and take your first few shots, you immediately notice that something is wrong. If you expose for the shadows, then you'll get the city lights completely clipped. On the other hand, if you expose for the highlights, then you'll end up with a completely underexposed image.
Mmh, any ideas about how to solve the problem? Yep, you got it right, with the help of the HDR! Again, you should take multiple exposures with different settings to be sure that you'll get the full dynamic range of the scene, so that you can merge them together later in post-production.
Personally, I never shoot a nightscape image without creating an HDR photo of at least two different shots. It doesn’t matter how good your camera performs at higher ISO ranges, you’ll still need more than one shot to achieve a clean final result.
 The HDR technique will allow you to retain details in the foreground during night photography. Photo by: 'Leonardo Papèra'.
- See also: Guide to the Aurora Forecast in Iceland
Portraits in Sunlight
Have you ever tried to take a portrait shot with the sun behind your subject? How about during harsh daylight conditions? If you have, then you should know that it’s kind of hard to handle both the highlights and the shadows at the same time, in one single shot at least.
Sure, you can settle down with compromises, maybe by clipping out a small part of the highlights or leaving some not-so-interesting parts of the frame very dark, but would you be satisfied with the final result?
Even if it’s more difficult than with landscapes, you can still work with the HDR technique in portrait photography. You just need to be really quick at taking the sequence of shots, while your subject must stand as still as possible so that your shots are almost identical, just taken with different settings.
Lowlight and Backlit Scenes (Indoor Photography)
As I already mentioned before, the sunlight won’t be the only source of light that will force you to use the HDR technique. Any strong source of light in the frame, such as flashes or artificial lights, will be enough to extend a lot the dynamic range of the shot and so it will require you to take multiple exposures.
Even a controlled environment such as a photo studio or any indoor shooting venue may have a wide dynamic range that your camera sensor won’t be able to include in a single shot. As such, you should take a sequence of different exposures to keep all the highlights and shadows of the frame in check.
Why HDR Photography Has a Bad Reputation
To give you a quick understanding of why HDR is considered by many photographers as such an abominable technique for post-processing pictures, I edited one of my own shots following the classic HDR workflow. As you can see below, it's not great, right?
 The classic 'terrible' HDR look. Photo by: 'Leonardo Papèra'.
HDR received its bad reputation back in the days when a lot of people were referring to this technique as a means of adding a lot of contrast or clarity, brightening the shadows and darkening the highlights. This kind of workflow obviously will lead to rather unreal and “pumped up” results such as in the image above, often creating a lot of artifacts while reducing a lot of the sharpness and overall details in your images.
For a short window of time, this so-called HDR editing technique was quite trendy and many people were using and abusing it. These days though, almost no one is using this terrible workflow anymore. Most photographers have given it up in favour of more natural ways of using the HDR technique. To give you an idea of how you can do this, take a look at the shot below. It's the same image as above, though has been edited following a more balanced and delicate workflow, with the aim to keep the scene as real as possible. While it may seem less “spectacular” and for sure less eye-catching, the details are well preserved, no artifacts were created and the whole scene appears to be far more natural.
 A more natural interpretation of the HDR look. Photo by: 'Leonardo Papèra'.
How to Create an HDR Image
There are multiple ways to obtain an HDR photo; the overall technique is the same as I have already explained throughout this article but the methods to achieve the final result may vary, depending on your preferences.
Nowadays, many cameras have a dedicated auto-HDR feature which basically lets the camera software take the photos and then edit them for a final HDR image. If you have a fairly new camera, then you can probably choose to do it by yourself or let the camera do the job automatically.
Oh, and I still haven’t mentioned smartphones or tablets. Many of them have integrated HDR features too.
Auto HDR Mode
Many of the cameras made in the last few years have an auto HDR feature in-built. On compact cameras, you won’t have much control over the outcome. Meanwhile on DSLR and mirrorless cameras, you should have at least some options to get the result you want, like how many shots the camera should take or how the software should measure the exposure. In all of these cases, you should end up with a final shot with a huge dynamic range and all the details preserved in the shadows and the highlights.
Manual HDR
If you don’t have a newer camera or you just want to have full control over the whole HDR process, then the only possible way is to do it by yourself.
To do this, you should take a sequence of shots with different exposures (like I explained earlier) and then merge them together with some post production software to get the HDR photo. As I like to have complete control both in the field and in post production, this is by far my favourite and recommended way to capture HDR shots.
It will probably take you a little bit of practice to understand how many shots you need in each situation and how to perfectly merge them together in post production but the results, in my opinion, will be greater than any auto-HDR mode could ever deliver.
On Your Smartphone
It’s not a surprise that nowadays, phone cameras perform incredibly well in most lighting conditions. Even if they can’t replace DSLR or mirrorless cameras yet, you can still get away with some really nice phone shots sometimes.
To help you to capture great pictures with your smartphone, most operating systems such as iOS and Android currently offer HDR features in their built-in camera apps, which basically do the same thing as the auto-HDR mode of your DSLR camera. The only difference is that the smartphone does it in an even easier and faster way. The final results are limited by the camera quality but most of the time, you'll end up with a pretty decent image!
 You can even create HDR images on your smartphone. Photo by: 'Leonardo Papèra'.
HDR Photography Software
There is a lot of post processing software out there that offers you the possibility to merge a sequence of photos either automatically or manually. As such, you'll be able to choose between endless parameters to achieve a final image just like how you initially imagined it.
Adobe Lightroom or Photoshop
Let’s start with the most popular photo-editing software of all time – Adobe Lightroom and Photoshop. Between their endless features, they also give you the possibility to merge HDR sequences together!
 Step 1 in Lightroom. Photo by: 'Leonardo Papèra'.
With Lightroom, merging more photos together to get an HDR picture is easier than it seems. You just need to select an entire sequence, left click on one of the photos, go to the "Photo Merge" section, then select "HDR".
 Step 2 in Lightroom. Photo by: 'Leonardo Papèra'.
The next thing you’ll see is the window above here. I like to always leave the "Auto Align" box ticked (in case the tripod moved a bit during the sequence) and the "Auto Settings" box unticked. If you allow the software to apply settings automatically, then it will work on contrasts and colours in such a way that it will give your photo the terrible HDR look.
I generally leave the deghosting amount on "None" or at maximum on "Low", since it may create some unwanted artifacts within the frame.
If you follow the steps above, then you'll get your final HDR photo in Lightroom, bursting with plenty of details.
 Step 1 in Photoshop. Photo by: 'Leonardo Papèra'.
In Photoshop, the process to produce an HDR image is quite similar. From the header tab “File”, scroll down till you find the “Automate” menù. From there, select “Merge to HDR Pro".
 Step 2 in Photoshop. Photo by: 'Leonardo Papèra'.
After you click on “Merge to HDR Pro”, the window above will appear. Click on "Browse", which will allow you to select the sequence that you want to merge. When you are ready, give it the "OK" and let Photoshop do its magic!
Photomatix
Photomatix is a completely dedicated software for HDR photos and probably the best one if you just need to work on getting the full dynamic range of the original scene. It has many more precise and selective options than Lightroom or Photoshop, since the software rotates completely around the HDR technique. For example, you can work selectively on how much of each shot you want in the final photo, as well as tone mapping and many other options.
The results that you can achieve with this software and a little bit of practice are just incredible!
Phone Apps for HDR Photography
While the built-in camera apps of smartphones are already doing a great job in general with producing HDR images, there are many dedicated apps that you can easily download both for iOS and Android that might work even better in some cases. I recommend Snapseed (Android/iOs) and the Adobe Lightroom App (Android/iOs). They both offer an HDR mode which works great in many difficult lighting conditions!
Common HDR Mistakes and How to Avoid Them
 It's not easy to produce a natural-looking HDR image. Photo by: 'Leonardo Papèra'.
There are a few mistakes that are easy to stumble upon along the process of creating a good HDR image; let’s see which ones are the most common and how to avoid them!
Not Taking Enough Shots to Cover the Entire Dynamic Range
If you don’t take the sequence properly, maybe by forgetting to capture some of the darkest shots or some of the brightest, then you may end up missing some parts of the dynamic range of the scene. Then when you try to merge all the shots together, some parts of the final photo may not have the amount of details that you wanted.
Moving the Composition During the Sequence
If you move the composition too much during the series of shots, the editing software may not be able to align all the photos together and consequently, will not be able to produce the final HDR image. Even by merging them manually, it’s going to be really hard to arrive at a final shot since the single frames still won’t be aligned.
Selecting Shots From Different Sequences
The chances that something has moved from one sequence to the other are quite high, so you may end up with some artifacts in your final HDR image if you select shots from different sequences.
Pushing Too Much on Colours and Contrasts
Well, this is more of a general mistake and not just in relation to HDR images. However, in this case for some reason, it is more common to see.
Try to keep the scene as natural as you can by not pushing too hard on the contrasts and colours, otherwise you’ll obtain a very weird-looking result.
 The HDR technique is a very valuable tool in photography. Photo by: 'Leonardo Papèra'.
As you can see, the HDR technique, if wisely used, is one of the best ways that you can capture the entire dynamic range of a scene and recreate the atmosphere that you witnessed. Due to its bad reputation within the photography community, it is still not considered as important by many photographers. However, the truth is that HDR can be fundamental sometimes to producing a highly detailed image – the key is in editing to create natural and aesthetically pleasing results. My hope is that the HDR technique will be able to redeem itself in the coming years, so that we will all finally appreciate it for its importance in the world of photography.
About the author: Leonardo Papèra is a landscape photographer based in Italy. You can find more of his work on his website or by following him on Instagram.
Practice your HDR photography skills in-field on this 8 Day Summer Photography Workshop in Iceland! Learn from the best photography guides as you explore new boundaries.