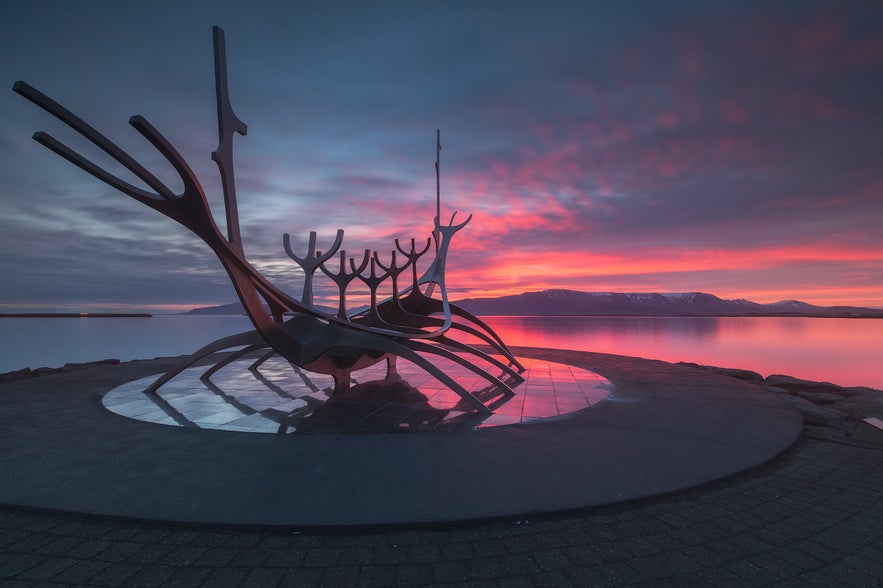
You may have seen photos of the Sun Voyager in Reykjavík, or even heard about it in conversation from people who have visited Iceland. Known in Icelandic as 'Sólfarið', the Sun Voyager is one of the most memorable and photogenic of all the sculptures in the Reykjavík area.
- Check out these 12 Tips for Capturing Amazing City Skylines
- Discover How to Make Mesmerising Minimal Photography
- Find out more about Photography Techniques
This beautiful artwork by the seafront in Reykjavík gleams on the best and worst of days. It may be viewed from the car as you drive by, or marvelled at in person when you visit on foot. Sculpted by the famed artist Jón Gunnar Árnason (1931-1989) as an ode to the sun, this gorgeous outdoor piece of art was actually designed to commemorate Reykjavík's 200 year anniversary. Sadly, Jón Gunnar passed away a year before the Sun Voyager was placed in its current position by the seafront in Reykjavík.
Perhaps what makes the Sun Voyager stand out the most is that it is shaped like the bulk or hull of a ship. Although often mistaken for a Viking's ship, it is nothing of the sort. Rather, this 'dream boat' is formed of stainless steel as a symbol of hope, progress and freedom.
As the Sun Voyager points toward the sea, it seems to hint of seeking the unknown – a voyage of anticipation, hope, excitement and promise – yet mysterious and dreamlike in nature. Its shape resembles the bare essence of a ship set against the background of the harbour with Mount Esja in the distance, leaving the rest up to the imagination. The sculpture has a simple, elegant and classic quality to it, coming across as somewhat ethereal in its beauty.
The form of the Sun Voyager may indeed make it seem as if it were floating on air. In the end, it may well be its very openness to the experience and interpretation of the individual observer that lends the sculpture its greatest effect.
True to its name, the sun does wonders for those seeking to photograph the Sun Voyager, as the steel body of this sculpture reflects the rays in quite wonderful and weird ways. Even the base of the sculpture offers a reflection of the vessel, making for an intriguing and photogenic element in its own right.
Equipment You'll Need to Photograph the Sun Voyager
-
A reliable camera
-
Wide angle lens
-
Tripod
-
Graduated neutral density filters
-
Neutral density filters
-
Memory card
While filters are not imperative to your shots, graduated neutral density filters can help you to balance out the exposure between the sky and the Sun Voyager itself. You can also use neutral density filters to create a longer exposure, thereby blurring the water in the background for a dreamy effect... or even just to blur out the motion of anyone who may accidentally get into your shot! By using a very long exposure time, such as a few minutes, you can bet that your photo of the Sun Voyager will turn out as though you were alone and nobody else was there while you were taking it!
As it often gets very windy down by the seafront, it's important to have a tripod to help you minimise camera shake while you photograph the Sun Voyager. You can also handhold your camera though it can make things a little bit more difficult. If handholding, be sure to switch on the image stabiliser function of your lens or camera, to help to minimise shake for sharper images.
Best Camera Settings for Photographing the Sun Voyager
To ensure that your shots will have the entire Sun Voyager sharp and in focus, set your aperture to somewhere between f/11 to f/16.
Your shutter speed will depend largely upon the effect that you are trying to achieve. To freeze-frame the moment, try shooting at 1/125. For long exposure effects, you can even have your shutter open for a few minutes. Try experimenting with graduated neutral density filters, as well as neutral density filters of different stops, in order to maximise your creative potential.
If you'll be using a tripod when photographing the Sun Voyager, then adjust your ISO to the lowest that it will go – usually 50 or 100 for most cameras. This will help to minimise noise in your images. However, if you'll be handholding, you'll need to increase your ISO to somewhere between 400-800. If you'll be handholding your camera while it is particularly dark, then you might even need to increase the ISO even further.
How to Compose a Photo of the Sun Voyager
There are many different ways that you can compose a photograph of the Sun Voyager, though the most popular is from the front, looking out to sea. Although not very big, the sculpture is staggeringly beautiful with the water and vast skies behind, as well as the mountains on the horizon in the distance.
Try experimenting with your camera at different heights and angles while using a wide-angle lens, in order to emphasise the size or components of the sculpture itself.
The Best Times to Photograph the Sun Voyager
The Sun Voyager is a modern symbol of Reykjavik, which has been featured on many postcards. As such, you can expect this iconic landmark to be busy all year round.
As the Sun Voyager makes for a lovely location and a great photo opportunity, it can get quite busy with photographers and other visitors during the day. It has become one of the most popular attractions in Reykjavik and is also a very well-known selfie spot. The trick to capturing the perfect photo of it, with hardly anybody around, is to get to the Sun Voyager at the right time.
Winter
During winter in Iceland, the Sun Voyager is particularly beautiful during twilight. When the first snowfalls cover this sculpture, it makes for an enchanting wintery scene.
 Winter in Reykjavik. Photo by: 'Iurie Belegurschi'.
Keep in mind that there will always be fewer visitors just before sunrise than the sunset, so the best time to shoot it is just before dawn or during dusk.
In the crux of winter in Iceland, the sun will rise rather late in the morning, around 10:30am. As such, aim to get there an hour before sunrise, so that you'll have time to figure out your composition and to witness the transition of the colours and the light in the sky.
Also during winter, the ring of mountains along the horizon behind the Sun Voyager will be made clearer with distinct lines of snow and ice. This adds a wonderful touch and variety to the mix, especially when sculpture itself is clad in ice and snow.
Be careful when visiting the Sun Voyager in winter though, as the steps down towards the sculpture can be very icy.
Beneath the Northern Lights
As you can expect, the Sun Voyager looks simply stunning beneath the mystical light of the Aurora Borealis. It's a great location for Northern Lights photography within the city, particularly if you don't have a car or if you're staying in a hotel somewhere nearby. The only thing is that the surrounding night lights of Reykjavík can lead to light pollution, making for very yellowish-shots. To remedy this, set your white balance manually to a cooler temperature, or fix your white balance later on during post-processing.
 Northern Lights over Straumur outside Reykjavik. Photo by: 'Edwin Martinez'.
For your best chances at seeing the Northern Lights over the Sun Voyager, it's best to visit Iceland during autumn, spring or winter. This is because the skies will be dark enough to show the activity of the Northern Lights, though you'll still need to keep an eye out for any cloud cover over the city.
There is no use trying to photograph the Northern Lights over the Sun Voyager in Iceland during summer, as there won't be any darkness in the sky, meaning that the Aurora Borealis will not be visible.
Summer
Perhaps the best time to photograph the Sun Voyager is during the summertime in Iceland. Facing the majestic Mt. Esja, the Sun Voyager is in a wonderful spot for photo opportunities, whether you are enjoying a midday stroll or taking in the full significance of the artwork’s name beneath the golden light of the Midnight Sun.
Yes, you heard us right. There are times in Iceland when the Sun Voyager will be lit by golden light.
 Reykjavik in the Midnight Sun. Photo by: 'Iurie Belegurschi'.
During a couple of weeks surrounding the summer equinox in June, the sun will never set in Iceland. Rather, it will come close to the horizon before seemingly bouncing back into the sky. The result is a drawn-out number of golden hours, often around midnight... hence why it is called the Midnight Sun.
With endless hours of daylight, you can be sure that most people will be in bed by the time that the magical golden hour of the Midnight Sun takes hold, meaning that you'll most likely have the Sun Voyager all to yourself.
If you prefer to shoot in darker, more atmospheric conditions during summer, then it's best to visit the Sun Voyager from mid-May to the end of July, when the sun gets low enough on the horizon for the sculpture to be basked in twilight during the morning and evening hours. During these times, the mountains Esja, Skardsheidi and Akrafjall in the distance, as well as the rolling waves of the sea, further complement the view of the sculpture itself. On very clear days, you may even see as far as the beautiful Snaefellsnes peninsula, with its legendary Snaefellsjokull glacier glistening on the faraway peaks.
Photographing the Sun Voyager When You'd Least Expect
The weather in Iceland changes everyday by the hour (sometimes even by the minute!), so it's worthwhile revisiting the Sun Voyager a couple of times during your trip, even if you've already photographed it once. It can look completely different beneath the varying conditions.
In fact, for more unique photographs of the Sun Voyager, try shooting it during the rain, or even when it's windy! You can bet that there will be fewer people around as you put your own dramatic, creative and artistic take on this already fascinating sculpture.
- See also: How to Take Great Photos in Bad Weather
Where is the Sun Voyager?
The Sun Voyager is a little isolated from the other sights in Reykjavik but it's an easy walk from the city centre. If anything, it makes for a good reason to stroll along the shoreline and take in the views.
 Harpa Concert Hall. Photo by: 'Iurie Belegurschi'.
Once you're down by the water, the Sun Voyager can be easily found along the seafront, just a few minutes walking distance east of the Harpa Concert Hall, by Sæbraut road.
Access is free to the public.
About the author: Serena Dzenis is a landscape photographer based in Iceland. You can find more of her work on her website or by following her on Facebook and Instagram.
Would you like to improve your photography skills in the beautiful surrounds of Iceland? Check out our range of photography tours and workshops which are designed to take your photography skills to a whole new level.


