
Ultimate Guide to Blue Hour Photography

- What is Blue Hour Photography?
- When is the Blue Hour?
- How to Plan Your Blue Hour Photography Shoot
- Apps and Websites for Blue Hour Photography
- Best Subjects to Shoot for Blue Hour Photography
- What to Pack for Blue Hour Photography
- Tripod
- Camera
- Lenses
- Remote Shutter Release
- Torch / Flashlight / Headlamp
- Stopwatch
- Camera Settings for Blue Hour Photography
- Post-Processing for Blue Hour Photography
- Tips for Blue Hour Photography
- Tip #1. Arrive Early
- Tip #2. Use a Tripod
- Tip #3. Shoot in RAW
- Tip #4. Take Multiple Exposures or HDRs
- Conclusion

The sun hasn't risen yet but you are starting to clearly see the details of the landscape; the shapes and lines that were swathed in shadows are finally becoming familiar again, while the night has clearly passed and gone. The birds are starting to sing again and you still feel cold as hell, even though you can see the first light of day coming through. Photography-wise, you can finally start to reduce a bit the shutter speed and decrease the ISO, and maybe close down your aperture to gain a bit of depth of field. Every shot must be well-prepared though, since the light is changing every minute, otherwise your exposure won’t be right.
- Check out this Golden Myanmar | 12 Day Travel Photography Workshop
- Explore these articles on Landscape Photography
- Discover the Ultimate Guide to Golden Hour Photography
This is what it's like to shoot during the blue hour in the morning. You can take the text above, reverse it, and you’ll also have an accurate description for shooting the blue hour in the evening! If this intrigues you, then let's take a look at what the blue hour actually is, why you need to shoot it, as well as all the tips and tricks that go into capturing great blue hour photos. Keep reading if you want to nail blue hour photography!
What is Blue Hour Photography?
When we talk about blue hour photography, we refer to pictures taken during a specific window of time that generally happens twice a day (well, apart a bunch of exceptions) – specifically when the sun still needs to rise in the morning and right after it has set in the evening.
 Blue hour at the Lofoten Islands in Norway. Photo by: 'Leonardo Papèra'.
You can easily recognise photos that were made during the blue hour as they generally have a strong blue-ish hue all over the shot, no matter where the photo was taken.
If you are shooting cityscapes, then you’ll probably have a nice dark blue sky with the first city lights turning on. If you are shooting wildlife, then you’ll notice a blue cast over your subject. Even if you are shooting landscapes, you’ll probably end up having that blue-ish cast all over the scene.. I think you've got the drill by now, right?
When is the Blue Hour?
As I already hinted above, the blue hour is a specific time of the day that in 90% of world’s countries, happens twice a day, all-year round. The remaining 10% is for those countries that are located near the Earth’s poles. During winter and summer, these countries may only experience one blue hour per day (or even none!), since they have the Polar Night in winter and the Midnight Sun in summer.
 The blue hour happens right before sunrise and after sunset. Photo by: 'Leonardo Papèra'.
The specific time when the blue hour happens is right before sunrise and right after sunset; to be more specific, you should start shooting around one hour to 50 minutes before sunrise in order to capture the start of the blue hour. If you keep shooting after sunset for the same amount of time, then you'll also be well-placed to capture the blue hour. That’s when the “magic” happens and the whole scene gets filled with those wonderful blue tones!
Since each location has its own blue hour times (and we’ll learn how to discover them in the next chapter), let’s say that generally, to shoot the blue hour, you must be at the location a lot earlier than the actual sunrise and/or stay on the spot a lot later than the actual sunset.
How to Plan Your Blue Hour Photography Shoot
There are many types of photography where you can just grab your camera, go out and shoot. Unfortunately, blue hour photography isn’t one of those. Taking photos at blue hour always requires a little bit of planning beforehand, no matter what you aim to shoot. Luckily, nowadays, we have many ways to easily set up the perfect blue hour shoot!
Apps and Websites for Blue Hour Photography
The best way by far to plan your blue hour photography session is to use dedicated apps on your smartphone or by checking certain websites. This way, you’ll get to know exactly when the blue hour will start or end on the particular day at the location where you want to be.
Between the multitude of mobile apps, I can personally recommend PhotoPills and The Photographer’s Ephemeris: they are both available for Android and iOs and have all the most important features you may need, with plenty of extra features too!
The Photographer’s Ephemeris also has a website where you can insert the day or location and it will tell you at what time the blue hour will be, in case you can’t use the smartphone app for some reason. Apart from this specific website, try checking your local meteorology websites for sunrise and sunset times at the location where you want to shoot. By having these times handy, you can be sure to arrive at the location at least an hour and a half before (for sunrise) or after (for sunset). This way, you’ll have plenty of time to explore the location, scout for compositions and find the right settings that you'll need to get the perfect exposure.
Best Subjects to Shoot for Blue Hour Photography
Without the sunlight, sometimes it can be hard to find the right scene to shoot; of course there is not a general rule about which ones are the best subjects to capture during the blue hour but keep in mind that cityscapes, architecture or even landscapes with artificial lights are probably the best scenes that you can take pictures of during that time of day.
 There can be a lot of contrast between the highlights and shadows during the blue hour. Photo by: 'Leonardo Papèra'.
Why? Well, mainly due the colour contrast that is visible at that specific moment. The blue hour is the only time of the day where you can still capture a colourful sky, generally blue, with the contrast of warm artificial lights. The warm and cold contrasts in the frame will give your image a pleasant aesthetic. With some artificial lights, you can achieve a well lit foreground to balance the lack of sunlight in the scene.
Just to be clear, these are not the only scenes that you can shoot at the blue hour. Rather, this is a good place to start if you want to try out a blue hour shoot and get some nice results.
What to Pack for Blue Hour Photography
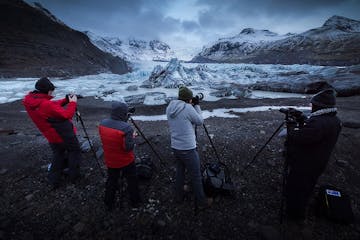
Planning for blue hour photography isn’t an easy thing. Even when we talk about gear, you’ll need a bit more than just your camera. To make things a little easier for you, I'll share some of my specific recommendations about what pieces of gear you'll need to bring along for a blue hour shoot, as well as what might end up being completely useless. So keep reading if you want to know what to put in your camera bag!
 Packing for blue hour photography is a lot more involved than it seems! Photo by: 'Leonardo Papèra'.
Tripod
A good, sturdy tripod is by far the most important piece of gear that you should bring with you when going out to shoot the blue hour. Keep in mind that you’ll be shooting in low-light and unless you like really noisy and grainy shots, a tripod is fundamental to achieving sharp and noise-free images.
Having a tripod will also enable you to get creative with multiple exposures, bracketed images and long exposures. I don't think there's much more to say here – take a tripod with you when you go to shoot the blue hour!
Camera
I guess there are no surprises here, right? You’ll obviously need a camera if you want to shoot anything but for blue hour photography, it’s a little bit trickier than that. Depending on what genre of photography you want to practice, you may need to have a camera with excellent high-ISO capabilities, otherwise you could end up with really noisy and barely usable shots. Unfortunately, cameras that perform well in low-light conditions (mirrorless or reflex) are the most expensive ones.
If you have the option of putting your camera on a tripod, then try capturing long exposures instead. This way, you won't have to deal with the high ISO issue and pretty much any camera will be able to do the job!
Lenses
There is not a specific kind of lens that works better during the blue hour. However, given that you'll be working in low-light conditions, my recommendation is that you choose one with a bright lens – usually with an aperture of at least f/2.8. That way, you can work with a faster shutter speed, which will be of benefit if you'll be shooting handheld. If you are shooting on a tripod, then you can step down your aperture to around f/8 to gain more depth of field, resulting in sharper images.
Needless to say, if you have a tripod, then a bright lens is not necessary to achieve good blue hour photography.
- See also: Best Lenses for Night Photography
Remote Shutter Release
Another important piece of equipment that you should bring with you is a remote shutter release. The reason why is that it will help you to avoid any camera movement in your shots.
When shooting on a tripod, even the slightest vibrations (such as when you press the camera shutter release button) can end up being visible in your images. To make sure that you don't have any camera shake, just use a remote shutter!
Torch / Flashlight / Headlamp
While a light is not exactly part of your camera equipment, I still recommend that you have at least one in your bag. Whether you decide to go out before sunrise or after sunset, you'll probably be on-location when it's really dark. A good light can help you to find the right subject and of course, to walk around easily!
After many years of experience, I have found that headlamps are the best option for a photographer. That way, you can keep your hands free to manipulate your camera gear. That's just my experience though; y may feel more comfortable using other lights, such as a torch or a flashlight.
Stopwatch
A stopwatch is another piece of non-photographic gear that can be really helpful when shooting during the blue hour, especially if you want to capture really long exposures using the Bulb mode of your camera. The stopwatch can help you to keep track of how many seconds have passed since you pressed the shutter release button.
Personally, I forget to bring my stopwatch every time that I shoot and end up using the one on my smartphone instead. However, if it's cold outside, then it can be a big pain to take your gloves off to use a smartphone. Your phone batteries can also drain quickly in cold conditions so while having your phone may be handy, sometimes it's better to bring a stopwatch with you.
Camera Settings for Blue Hour Photography
As always, we need to start by making a distinction between the shots taken with a tripod and the handheld shots.
 Use a tripod for the best blue hour images. Photo by: 'Leonardo Papèra'.
With a tripod, the only setting that I generally change is the shutter speed. I barely remember to have my ISO or aperture values in check! However, unless it's really dark, you should always keep your camera's ISO at 100 and use a closed aperture of around f/7.1 to f/11. You can then experiment with the exposure times. Things may be a little different if you need to maintain a specific exposure time, such as 4 seconds. In this case, you may want to start opening up the aperture a bit at first, then raise the ISO up to around 400 or 800.
If you'll be shooting handheld, then be aware that will need to increase your ISO and may end up with some noisy images. The main thing that you'll need to worry about is keeping the shutter speed fast enough to avoid camera shake in your images. As a general rule, you can use a shutter speed that is the opposite of your focal length (e.g. 80mm focal length → 1/80 sec shutter speed, 200mm → 1/200sec, 24mm → 1/25sec, etc) as a limit that you shouldn’t cross and go slower than that. Set up the ISO and the aperture according to the shutter speed to achieve a balanced exposure. You'll probably need to open up the aperture and raise the ISO quite a lot if it's dark.
Post-Processing for Blue Hour Photography
Even if each blue hour shot is different and will require different adjustments, I can tell you that there are a few things to follow during the post-production phase of your work to ensure that you end up with clean, beautiful images.
 Keep the blues under control during post processing. Photo by: 'Leonardo Papèra'.
First of all, keep the blue tones under control during your whole workflow. This may sound really easy at first but it actually isn't. If you've ever had a look for blue hour photos on the Internet, then you'll see a multitude of over-saturated images floating around. Don't get me wrong, most of the time, this can happen to anybody. The problem is that your eyes get used to the image saturation quite gradually as you are working on the computer. After a while of working on the image, you can barely distinguish if the shot has been over-processed or not, unless you have made some really off-the-chart adjustments.
What can you do to fix this issue? Well, my advice is to work on the image over multiple sittings. Let the shot rest for a while so that every time you pick it up again, you’ll notice whether you have gone too far with pushing the contrasts or colours during your previous edits.
Another important thing to check during the post-processing phase is that you have a well-balanced exposure. Many times, photographers may brighten up the scene to enhance the details, even in the darkest of the shadows. However, it's a better idea to think about what you could actually see while you were shooting on-location. In general, during the blue hour, many details are not visible to the naked eye. You may notice a soft faint light on the foreground but the parts that are in the shadows are usually very dark and barely visible. Try to maintain that atmosphere in post-production, so that you can convey a true representation of what being out there was really like.
My last piece of advice for post-processing your blue hour images is to avoid pushing too much on the contrasts. The typical blue hour light is really soft and delicate. As a consequence, the contrasts shouldn't be too harsh.
Tips for Blue Hour Photography
Blue hour photography isn't all that hard if you know what you should be doing. So let's take a look at some important tips that will hopefully help you to achieve some great blue hour images!
 Make sure you get to the location early so you can scout for good compositions before the light starts changing rapidly. Photo by: 'Leonardo Papèra'.
Tip #1. Arrive Early
I may have already mentioned this a few times throughout the article but arriving early on the location is seriously a crucial factor when you want to shoot blue hour pictures. Why?
-
To find the best composition: If you are shooting before sunrise, then you’ll struggle to see around you since it will be really dark. Arriving early on the location will give you more time to scout the place and find some nice foregrounds in the darkness. Instead, if you are planning to shoot after sunset, you might want to be on the spot when there is still light, so that you can find a good foreground way more easily than in the dark.
-
To set up your camera equipment: After you have found a composition that works, it’s time to open up the tripod and prepare your camera gear to finally shoot. It may sound easy but sometimes can be quite tricky to prepare the camera, lens, tripod, remote shutter and more. Doing so can take a few minutes, which will eat into your shooting time. The light can also change rapidly as you are getting ready, so take this into consideration.
-
To find the right settings: Okay, now that you have prepared all of your camera gear and you are finally ready to shoot, it’s time to make a few test shots to find the perfect exposure. Since there won’t be much light, consider that each shot could take up to one or two minutes to be ready, so you might spend as much as 10 to 15 minutes trying to find the correct exposure. During this time, the light may be changing really quickly, so you might need to adjust your settings as you go.
Tip #2. Use a Tripod
Just in case you skipped the part where I was talking about the tripod, here I am again with this suggestion! I’ll never stop recommending that you should use a good tripod to shoot in low light conditions such as the blue hour, it really is a fundamental piece of gear. Without a tripod, you won’t be able to take long exposures, multiple exposures, bracketed images or HDR images. Basically, you’ll be forced to use fast shutter speeds, wide apertures and really high ISOs, so your pictures will probably be very grainy and noisy. If you don't use fast enough exposure times, then they will be blurry too!
I could continue to list all the pros of having a tripod (or cons of NOT having one) for at least another 10 pages but I’ll stop here. Please, just take a tripod with you!
Tip #3. Shoot in RAW
This tip never gets old; if you plan to do ANY adjustment in post production, even the slightest one, then you should shoot in RAW while you're in-field, or at least on RAW + JPEG. Blue hour shots generally require a good amount of post production work since you’ll have strong highlights coming from the brightest parts of the sky in addition to some very dark shadows as a result of little to no sunlight. The RAW format will allow you to play more with the shadows and the highlights in post-production without creating bad artifacts in the final image. Of course, there will be many more details in the shot compared to one taken in JPEG format.
Tip #4. Take Multiple Exposures or HDRs
In many blue hour shots, you’ll have to deal with strong highlights in the sky coming from the rising or setting sun while at the same time, there may be dark shadows as a result of the lack of a strong light source. The best solution to dealing with this huge dynamic range is to work with multiple exposures (or the so-called HDRs).
 Multiple exposures or bracketed images can help you to achieve well balanced exposures. Photo by: 'Leonardo Papèra'.
You can take multiple shots with different exposures, starting from the brightest to the darkest (or the opposite), and then merge them together later in post production. It’s a really easy process, since most software (such as Adobe Lightroom or Photoshop) offer automatic features that will merge all the shots together with just one click.
- See also: Ultimate Guide to HDR Photography
Conclusion
 Blue hour images are some of the most beautiful and dramatic that you'll ever see. Photo by: 'Leonardo Papèra'.
Blue hour photos are probably some of the most beautiful and dramatic types of images that you'll see. Personally, I know many photographers who barely shoot during the golden hours, preferring instead to take out their cameras during the blue hour part of the day. This is when everything feels calmer, less busy and more cosy; the light is soft and you can clearly see it changing every minute. The atmosphere that you will find during the blue hour is not replicable during any other moment of the day. As such, you should do your best to convey that peculiar atmosphere to the viewer. If you can do that, then you can rest assured that you've got one great blue hour image!
About the author: Leonardo Papèra is a landscape photographer based in Italy. You can find more of his work on his website or by following him on Facebook and Instagram.
Do you like shooting in the blue hour? What do you enjoy most about it? Share your thoughts by leaving a comment below!


Other interesting articles

Understanding Histograms in Landscape Photography
A long, long time ago – that is, in the days of film photography – it was a rather difficult task to learn how to produce properly exposed pictures. There was no instant feedback with a digital disp...Read more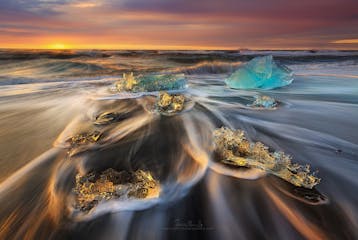
Photographing Waves in Iceland | In Field to Post Processing
Do you like seascapes? How about photographing the flow and motion of the waves? Yes? Read on to find out all about photographing the ocean's waves in Iceland. Join us on this 11 Day Iceland in Au...Read more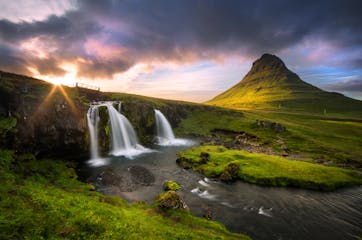
Understanding the HSL Sliders in Lightroom
As a photographer today in the digital world, you absolutely must have some post processing skills. The first step of a photographer is going out into the field to take your photos. You go to a loca...Read more


