Winter in Iceland is the most magical time of the year. It’s a season when fairytales come alive and the Northern Lights dance fervently across the night sky. The days are short and the nights are long. Stars glimmer in their millions above you – a diamond-like backdrop to one of the coldest and most remote places on Earth. With every step that you take, you will hear the crunching of crisp snow beneath your shoes.
- Join us on this 11 Day Iceland in Autumn Photography Workshop
- Learn these Recommended Camera Settings for Landscape Photography
There is so much to photograph during winter on this arctic island, from frozen waterfalls to chunks of ice washing ashore on the Diamond Beach from the sea, that it’s difficult to even know how to best capture it all when it’s covered in mounds of whiteness. At Iceland Photo Tours, we are constantly out and about in our beautiful country – rain, snow, or shine – so here are our top tips on photographing Iceland in winter!
#1 – Chasing the Light
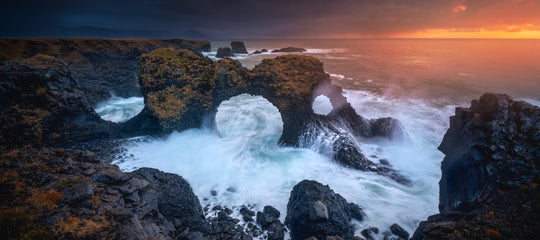
 Winter light can be surreal in Iceland. Photo by: 'Iurie Belegurschi'.
Due to the country’s high latitude, the daylight hours in winter are short, with an average of 5-7 hours of light. It may be difficult to get out of bed when it’s still dark but you will find that it is easy to achieve an adequate amount of sleep, even during the nights when you will be staying up late to photograph the Aurora. So there’s really nothing to stop you from waking up in time for sunrise!
Although the shorter days may feel strange, the benefit is that the lighting is dreamy and quite ethereal. During the winter months in Iceland, the sun doesn’t rise very high above the horizon. Rather, it hovers low for a long time, meaning that the light will remain extremely soft, warm and somewhat glowing throughout the day. However, sunrises and sunsets can still come and go in a blaze, lasting for a couple of hours at a time and creating the perfect setting for photography.
There is actually daylight in Iceland long before the sun rises and sets. These are moments that you won’t want to miss – in fact, to make the most of your trip, you should stay out to photograph for as long as there is light and partially into the night, retiring to bed only when the Aurora has finished her show!
#2 – Focus on an Interesting Foreground
 There are lots of foreground compositions to be found at Vestrahorn. Photo by: 'Iurie Belegurschi'.
When everything is white, you should look for detail in the landscape. There are plenty of opportunities during winter in Iceland, from delicate close-ups to snow-clad trees and frozen waterfalls complete with crystal clear blue skies. While it may be tempting to shoot wide so that you can fit the entire scene into the frame, utilising a longer lens such as a 70-200mm will enable you to focus on specific details, such as a mountain peak or even footprints left by wildlife in the snow.
Speaking of footprints, the last thing you’ll want is to have your own ruining the foreground. Try to visualise the composition before you enter the scene. When you do finally wander into it, watch where you decide to tread.
Oftentimes, it's best to stand back with snowscapes and take in the vastness of it before you focus in on a subject in the foreground, which could be anything from cracks in the ice on a lake to undulating patterns in the snow. Get creative... don't be afraid to take your tripod as low as it can go. By getting down and low with a wide angle lens, you'll really be able to exaggerate the dimensions of your foreground, bringing interest to something that might otherwise be mundane.
Once you've found an interesting foreground, consider what it leads into. Vast areas of whiteness do very little to engage the viewer. Luckily, the beauty of winter in Iceland is that it's often not difficult to find a snow-capped mountain with alpenglow, frosty trees swathed with fog or perhaps even a hazy sunrise to star as your backdrop. However, too much fog and haze can at times be problematic, so be sure to focus-stack if you want those gorgeous mountains in the back to stand out.
#3 – Working with Colour and Contrast
 Alpenglow is a beautiful phenomenon that can render some lovely colours during sunrise. Photo by: 'Iurie Belegurschi'.
In a snowy, icy, wintery environment such as Iceland, how do you make a photo more interesting? One way is by looking for contrasting subjects on which to focus, such as an electric blue lake or a stunning red cabin. This provides the perfect colourful focal point amidst a dazzling winter landscape.
Another way to work with colour is to utilise natural phenomena – for example, a sunrise or sunset, as well as the reddish glow that you see on the summits of mountains as a result of the sun rising or setting. Known as ‘alpenglow’, this effect can cause beautiful colours to be reflected onto the surrounding snow, from blushing pinks to warm corals and reds.
Oftentimes, colour in the arctic environment will be pastel in nature, as opposed to vivid. Rather than increasing your vibrancy, try instead to compose and process your shot in such a way that showcases the elegance and grace of the natural landscape.
Different levels of contrast can also impact the mood as well as the story of your photograph. Experiment by playing with contrast within different hues of the same colour. Darker contrasts can create drama, whereas pale contrasts can create a feeling of serenity. You can also use contrast to highlight curves and shapes within your environment, such as cracks or outlines within shards of ice or snow.
#4 – Find the Perfect White Balance
 Ice doesn't always have to be white. Photo by: 'Iurie Belegurschi'.
Some people are sticklers for pure white snow and balk at the sight of blue or grey tones. However, it is blue and grey toning that helps the viewer to experience the very nature of the coldness and the atmosphere of a wintery scene in Iceland.
Winter tones are best at the coldest parts of the day, particularly during sunrise and sunset. The reason for this is that there are often ice crystals in the air which cause the light to diffract, making for gorgeous delicate tones that will help you tell your story.
If you must have everything white though, then be sure to do an old-fashioned grey card test so that you can meter the light and expose the photo accordingly. An exposure compensation of +1/3 or +2/3 can also do wonders to bring out the whiteness of the snow.
#5 – Control Your Metering & Exposure
 Snow can make it difficult to meter correctly. Photo by: 'Iurie Belegurschi'.
So everything is white, light is bouncing off the snow in all directions and your camera is reading the scene as vastly overexposed. To capture the Icelandic winter landscape as you see it, set your metering to matrix mode and shoot in aperture-priority.
Most of the time, you won't need to dial in any exposure compensation and shadowy areas will be filled in by bouncing light. However, you should still pay attention to your histogram, as even walls of white snow can end up being underexposed in the vast scheme of things. To control the bouncing light, simply slightly overexpose for the snow.
Using filters will allow you to attempt longer exposures, which can make a dreamy winter shot seem even more fairytale-like.
#6 – Capturing the Movement of Snow
When it begins to snow in Iceland, and it most certainly will at some point whilst you are out and about, don’t put your camera away. Instead, try to capture the snow falling in the wintery landscape around you. Experiment with your shutter speed. A faster shutter speed such as 1/250th of a second will freeze the movement of the snow in the frame, whereas a slower shutter speed such as 1 or 2 seconds will blur the snowflakes, giving a sense of movement.
Another trick you might like to play with is to try out different apertures. A larger depth of field will mean that more snowflakes are defined, making your shot seem busier, such that the snow becomes the main focal point and the background is secondary. For example, f/18 will give you a very snowy image. On the other hand, using a smaller depth of field, such as f/2.8, will blur most of the snow and allow the background to remain as your focal point.
If the background is dark or shadowy, then try using an external light to illuminate the snowflakes. The more contrast you can introduce to differentiate the snowflakes from the surroundings, the better they will show up in your photo.
#7 – Protect Your Gear
The golden rule with photographing in Iceland during the winter is to keep your camera cold and your batteries warm. When transitioning from a frozen to warm environment, moisture can get trapped inside your camera and lens, causing ice crystals to form and making it impossible to shoot again when you decide to go back out into the cold. Although many D-SLRs these days are weatherproofed, you should still prepare carefully to prevent moisture from being trapped inside.
Whenever your camera gear is not in use, keep it in the camera bag. At the end of your shoot, when you move your gear from a cold environment into the warm confines of your car, home or hotel, you risk triggering the cycle of condensation. So as soon as you move inside, take the camera gear out of your bag, remove all the memory cards and batteries, sit it all on a bench and cover it with a towel. The towel should absorb any moisture from your equipment. Let it all come back to room temperature before reassembling and putting it back into the bag.
Above all else, make sure that your batteries are charged in advance. Batteries tend to lose power far more quickly in cold environments, particularly if you're standing in snowy landscapes for long periods of time. If you plan on spending the day shooting from morning into night, then take along at least two fully-charged batteries. A good system is to label your batteries with numbers according to the order in which they were charged and to cycle through them in the same sequence so as to preserve battery life. When your batteries aren't in use, store them in an inner pocket where your body heat will keep them warm and help to retain the charge.
#8 – Be Prepared
 Always be prepared for the Northern Lights! Photo by: 'Iurie Belegurschi'.
You may work up a bit of sweat getting to your destination in the snow but once you stop moving around, your extremities will really start to freeze up. Furthermore, you will most likely spend a bit of time standing around in the cold as you look for that perfect composition and prepare for the shot, particularly at night when you’ll be shooting the Northern Lights!
To keep winter landscape photography in Iceland fun, make sure that you're comfortable and above-all, warm. Look for insulated snow boots, layer your thermals beneath waterproof and windproof clothing, and keep your fingers toasty with ice-climbing gloves. Having insulated boots will also increase your opportunity for interesting compositions, as you’ll be able to do things like entering freezing waters to get that perfect waterfall shot. If you’re not sure what to wear during winter in Iceland, then follow our Complete Guide to Clothing to ensure that you’ll be perfectly prepared for your winter photography tour.
About the author: Serena Dzenis is a landscape photographer based in Iceland. You can find more of her work on her website or by following her on Facebook and Instagram.
Want more tips on how to shoot in Iceland during winter? Check out our Ultimate Guide to Photographing Ice Caves in Iceland!

Serena Dzenis is an award-winning photographer, author and journalist who is based in Iceland. She has written numerous articles for the Iceland Photo Tours website, both about photography in Iceland as well as the more general aspects of using a camera.
Well-known for her uniquely romantic photographic style and love for the winter season, Serena is not afraid of harsh conditions and in making the most of what this planet has to offer. Her open and friendly nature has seen her embracing challenges each and every day, teaching others to make their own future and to turn their dreams into reality.