Marvel over these breathtaking photos of the Geldingadalur volcano in Iceland, and find out how you can take similar pictures yourself when the next one erupts!
- Check out this Ultimate Guide to Landscape Photography
- Discover the other side of the Land of Ice and Fire with these Ice Cave Photography Tours
In 2021, Iceland once again gripped the world’s attention with its most recent volcanic event! On March 19th - for the first time since 2015 - the landscapes opened into a vast ravine of gleaming lava and a spectacular array of frothing, fiery craters.

However, Geldingadalur was unlike any recent eruption due to its proximity to Reykjavik. While Holuhraun went off in the middle of the Icelandic Highlands, and Grimsvotn and Eyjafjallajokull exploded beneath enormous glaciers, Geldingadalur happened on the Reykjanes Peninsula, the stretch of land that connects the capital with Keflavik International Airport.
As such, it was never easier to witness and photograph a volcano erupting in Iceland!

Many grabbed hold of this opportunity. Youtube quickly filled with breathtaking aerial footage from those with drones, and anyone that had friends in Iceland saw their Facebook feeds enlivened with images from their visits. Within this article, you’ll be presented with a range of photographs by Iurie Bergurschi that you’ll barely believe are real.
Some individuals, however, arrived with high hopes of a portfolio-defining opportunity, only to find their footage and images unable to capture the majesty of this incredible event.
So how do you get the best photographs of volcanos when they erupt? Are there any essential tips that will drastically improve your images, and what regulations must you follow when on your shoot? Furthermore, what equipment is recommended for volcano photography in Iceland? Continue reading for a comprehensive look at how to shoot eruptions in Iceland.
- See also: Top Tours and Activities in Iceland
Geldingadalur and Icelandic Landscape Photography

Before getting into the technical tips regarding photographing eruptions in Iceland, it is essential to look at volcanos in broader terms of the country’s landscape photography. After all, although it is a unique phenomenon, many of the tricks that apply to shooting other parts of the country’s nature still apply to volcanoes.
The first primary considerations for photographers before going on any shoot in Iceland are the time of the year and the day. This is due to the dramatic differences between the seasons here. Throughout summer, the nights are illuminated by the phenomenon of the Midnight Sun, meaning you will have plenty of light for 24 hours and a ‘Golden Hour’ of photography that runs from evening to morning.

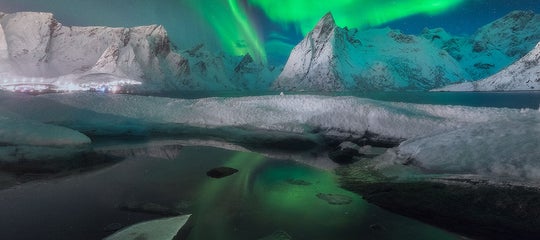
Meanwhile, the days are short and dim throughout winter, with the sun hovering just above the horizon; optimal shoots thus occur around noon. However, it is possible to get some incredible photographs at night due to the brilliance of the elusive aurora borealis.
Geldingadalur’s eruption occurred towards the end of winter, which meant the best of both worlds; however, the vivid light coming from the lava made it impossible to shoot with auroras as a backdrop as it completely outshone them. Luckily, the eruption continued through summer when it was much easier to access, and the opportunities to shoot it were extended for many more hours.
- See also: Summer Workshops in Iceland

A second thing photographers to Iceland must consider before going out on any volcano shoot is the weather. A local saying dictates that if you don’t like the weather in Iceland, wait five minutes. In the windswept, abandoned valleys of the Reykjanes Peninsula, this can be incredibly apparent.
As such, you’ll need to prepare for all eventualities. The cold of Iceland’s climate, for example, can quickly drain the life of even fully charged batteries, so be sure to bring spares. The rain can be torrential, so waterproof protective gear is highly recommended. The winds can be sudden and intense, so tripods should be used with caution and never left unattended.
- See also: Winter Workshops in Iceland

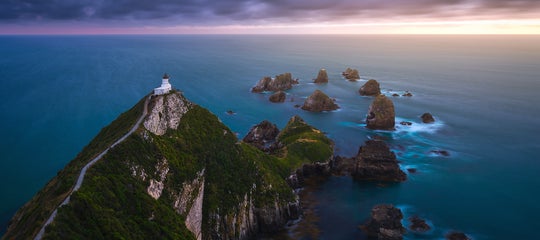
Finally, you must be aware of the landscapes you are going to, not just so you can dress accordingly, but so you can guarantee the best compositions in your images.
All of these considerations are essential when planning your photography trip to Geldingadalur.
What Camera Equipment Should you Bring to Volcano Photography in Iceland?

With a half-decent camera phone and a minimal knowledge of photography, you’ll be able to take images that encapsulate the beauty of Iceland’s eruptions that are certainly impressive enough for social media. With a quality DSLR/mirrorless camera, a drone, and a background in the art form, however, your images will seem much more worthy of a professional gallery than an Instagram post.
- See also: Best Camera for Beginners

When selecting which DSLR or mirrorless camera to bring for volcano photography in Iceland, you should prioritize the following:
- The camera should be lightweight: Because reaching many most overdue volcanos requires some hiking over rough terrain, the lighter your camera, the more comfortable you will be. Furthermore, this will allow more room in your bag for lenses, allowing for a range of very different images.
- The camera should be weather-sealed: This is not an issue if you have waterproofing for your camera. Those without, however, should have a weather-proof casing, as Iceland’s potential for rain and snow is too great to risk.
- The camera should have a minimum of 16 megapixels: This is the standard across most modern cameras, but still something to keep an eye on if searching for a budget option. Generally, the higher the megapixels a camera offers, the more detailed your shots will be, and the larger you can print your images.
- The camera should have a fast framerate. It is great to have a camera with a quick frame rate to capture the perfect action shot of lava thrust from an active crater. Though not essential, a frame rate of 8 fps is a great place to start.

Please note that choosing a classic DSLR or trendier mirrorless camera is entirely up to personal taste. Some prefer the former’s real-time viewfinder and larger form, and others like the sleekness and easiness of the latter.
Examples of great cameras for photographing volcanic eruptions are Nikon D3500, the Sony RX10 III, the Fujifilm X100V, and the Canon EOS 5DS R.
Aside from your camera, you will also want at least one suitable lens. A wide-angled option with a 24-35mm focal length is always the best for landscape photography, although a standard lens with a focal length of 50mm or less will do. However, if you are hoping for more unique and unusual images, you may want to go a little ‘off-book.’

An ultra-wide angle, fish-eye lens, for example, will allow you to reflect the scale of the lava fields. This is also a great option if you want more in your composition than the volcano itself, as you’ll be able to incorporate some of the surrounding landscapes and even the crowds in attendance.
Meanwhile, a telephoto lens will allow you to shoot the fires spurting from the craters as if you were mere meters away, whereas a macro lens will let you capture the fine details of the glowing rock on the edge of the lava field.
As many volcanos require a degree of hiking to reach, so you will want to travel lightly. As such, it is better to have just a few reliable lenses than your entire selection.

Other equipment you will want to bring with you includes the tripod mentioned above and spare batteries.
A tripod with adjustable legs will be able to balance on uneven terrain, helping to keep your camera still and level; keep in mind that high winds may make this unfeasible, however. Meanwhile, the spare batteries are essential due to Iceland’s cold; there are few situations more frustrating than hiking to such a photogenic location and finding your only battery already dead.
Can You Use Drones in Iceland?

Many of the most impressive photos and footage of the Fagradalsfjall volcano came from those lucky enough to possess a drone. After all, what better way is there to witness the scale and power of an eruption than from above?
There are, however, some rules and regulations you must adhere to if you plan on shooting this incredible phenomenon in such a way.
Firstly, all drones must be marked with the owner’s name, number, and address, so individuals can be held accountable if behaving recklessly; there are high fines for flouting this rule. Secondly, drones used in rural areas in Iceland must be below 25 kilograms in weight and stay under a height of 120 meters.
- See also: An Introduction to Drones
Thirdly, you must not fly your drone above any crowds in attendance of a volcano. As such, you must launch your craft on the edge of large groups and ensure it never hovers over them, even in passing.
Fourth, you must avoid all other aircraft with extreme care. Of course, you don’t want your drone jousting in the sky with another due to the damage it can cause to both, but this is even more important regarding crewed aircraft. Many helicopters and small plane tours start when eruptions begin, allowing guests to experience this marvel from above. A collision with their propellers could quickly end in disaster and tragedy.
Besides these essential criteria, it is highly recommended that you behave responsibly and within your skillset when using your drone. While some of the most impressive videos have come from crafts soaring within inches of a fountain of lava and skimming the molten rivers, these have been taken by highly experienced professionals.
One wrong sputter of lava could quickly destroy your equipment or cause you to lose it on the lava field irreversibly, so it is best to avoid the temptation to fly your drone right in the middle of the action.
What Camera Settings are Best for Shooting Volcanoes in Iceland?

When photographing volcanic eruptions in Iceland, the most important technical issue is the balance of light in your composition. The vivid brightness of the lava asks for a short exposure time, but if this is too short, the landscapes around the eruption will be darkened and unclear.
As such, you will want to experiment with different exposure times based on the amount of sunlight present. On a bright day, you should be able to attain some spectacular, balanced images with a quick shutter speed; if it is cloudy and gloomy, you may need to rely on the balance of your tripod for a longer exposure instead. Images created using the latter technique also tend to boast a unique beauty, as they reveal the movement and flow of the lava.

If visiting at night, you will almost certainly need a tripod and long exposure time, or else your photos will be a faint orange glow against a sea of pitch black.
Another recommendation, particularly for more experienced photographers, is to turn off your auto-focus. There are many moving parts in a volcanic eruption, with wisps of smoke, bubbling flecks of lava, and grains of ash, all of which can confuse your lens as it tries to hone in on one detail. The resulting pictures are thus often blurred where you don’t want them to be.

Aside from these details, however, your best course of action is to experiment with a range of settings on-site. Zoom in on a crater and take several frames per second for a flip-book effect of lava spurting from the eruption, take an intimate portrait of a fellow traveler with the Mordor-like landscapes unfurling behind them, or create a panorama to show what it is like the middle of a volcano.
Get creative, and who knows what incredible images of an eruption you will be able to add to your portfolio!
Safety at Geldingadalur Volcano

With a much more full understanding of how to photograph volcanoes, it is crucial to be aware of the local safety precautions before your visit.
The most important considerations are also the most obvious. Keep well back from the edge of the growing lava field, as there is a chance that a surge of magma from beneath could cause it to spill forth with sudden haste, mainly if you are focused on your camera. Similarly, if a crater is spewing molten rock, ensure you are well out of the blast zone.

On a similar note, you must try to stay upwind from the eruption. The most dangerous aspect of effusive volcanoes is the fumes they release into the atmosphere. Carbon dioxide, hydrogen sulfide, and sulfur dioxide are all very poisonous gases that, if inhaled for an extended period, can cause severe damage.
Due to the unpredictability of Iceland’sswinds, this can be somewhat hard to enforce, but if your stay is reasonably short and you do your best to avoid the smoke, you should be fine. The only exception to this is for those with respiratory conditions. Those guests should not get close to the volcano, but of course, it is up to the individual’s judgment.

By following these common-sense safety guidelines and the tips and tricks listed above, you will be able to successfully photograph a volcano in Iceland in all of its majesty when the next one erupts!
- See also: Interview with Iurie Belegurschi