Anyone can take deep-sky images and it’s definitely within reach for most daytime photographers. As you delve into this art and science, you will appreciate and learn a lot about the night sky. You will also become in-tune and connected to the nebulae, galaxies and stars that you photograph.
- Check out these articles on Photography Techniques
- See these Night Sky and Star Photography Tips for Beginners
- Discover the Best Lenses for Night Photography
In this article, you will begin to explore the most amazing type of photography. You will learn how to take pictures of objects in outer space that are barely visible to the unaided eye but are extremely beautiful in structure, detail and colour. All you need is a relatively small investment in some key accessories, patience and dedication to be on your way to a new lifetime passion.
- See also: Ultimate Guide to Milky Way Photography
What is Deep-Sky Photography?
Deep-sky astrophotography is a specialised branch of photography that involves photographing objects beyond our Solar System, such as stars, clusters, nebulae, dust and galaxies. This is different from nightscape photography, where you are capturing a landscape at night, oftentimes with stars, constellations or the Milky Way as a backdrop.
Deep-sky astrophotography is a very rewarding aspect of photography because you can really explore and get in touch with thousands of objects in the night sky at a more detailed level. Nontraditional photographic techniques need to be used because the objects are typically very faint. After going through the needed steps of acquiring and processing the frames that you have captured, you will begin to see the colour and detail that you aren't able to see with the unaided eye.
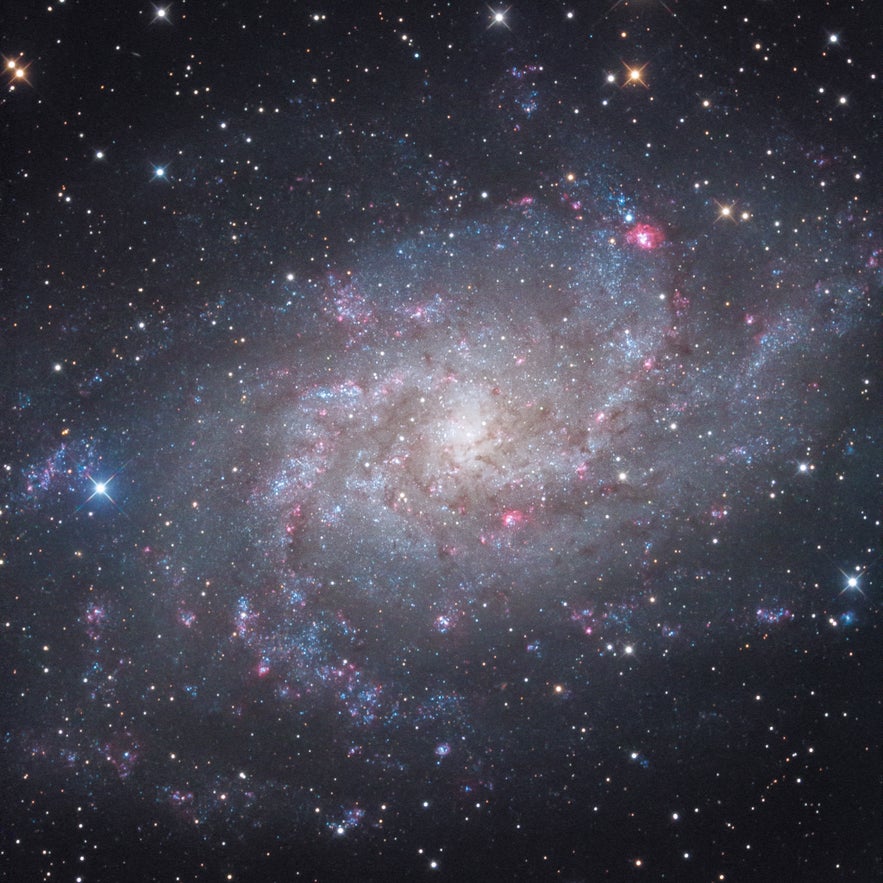
Here are a few examples of different types of deep-sky objects taken by me on my driveway in the suburbs: an emission nebula, dark reflection nebula, globular star cluster and galaxy.
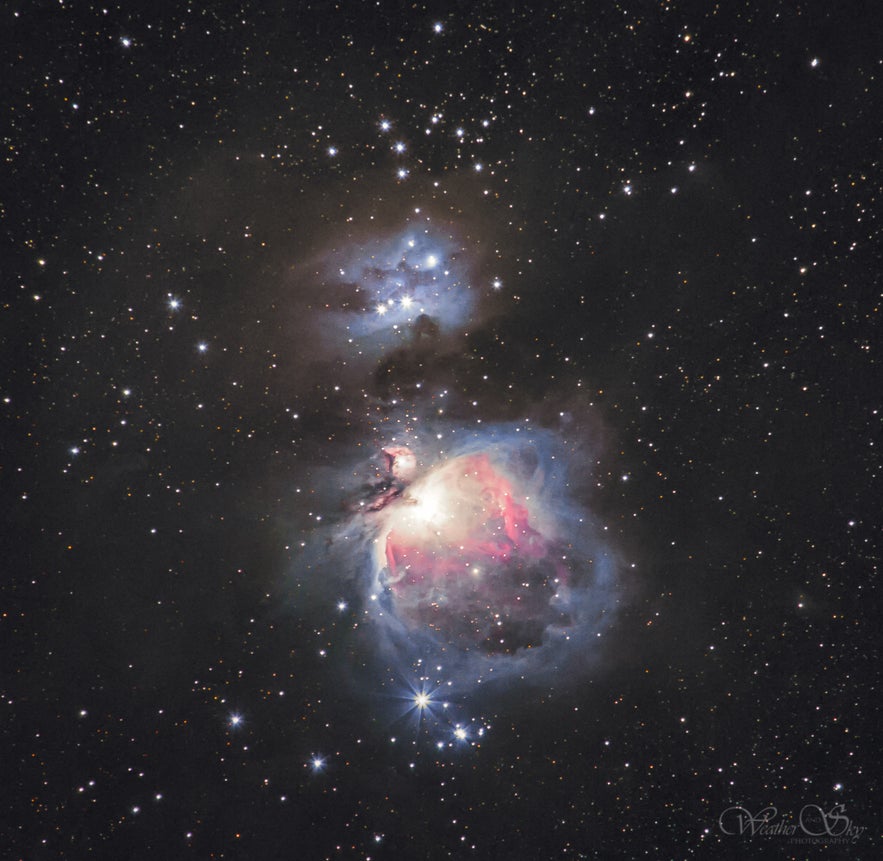 Orion Nebula. Photo by: 'Kerry-Ann Lecky Hepburn'.
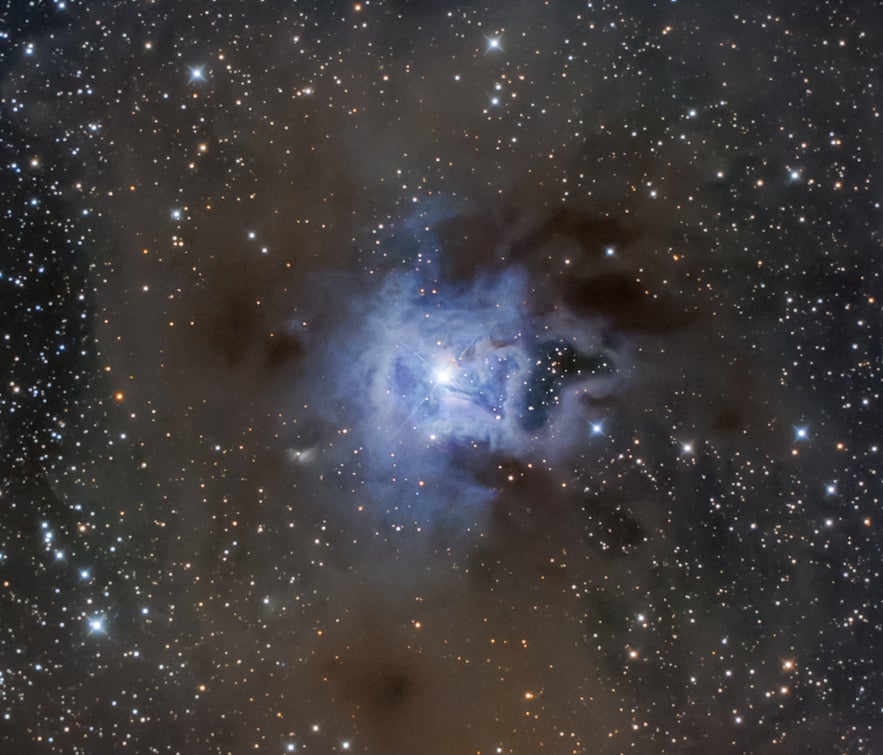 Iris Nebula. Photo by: 'Kerry-Ann Lecky Hepburn'.
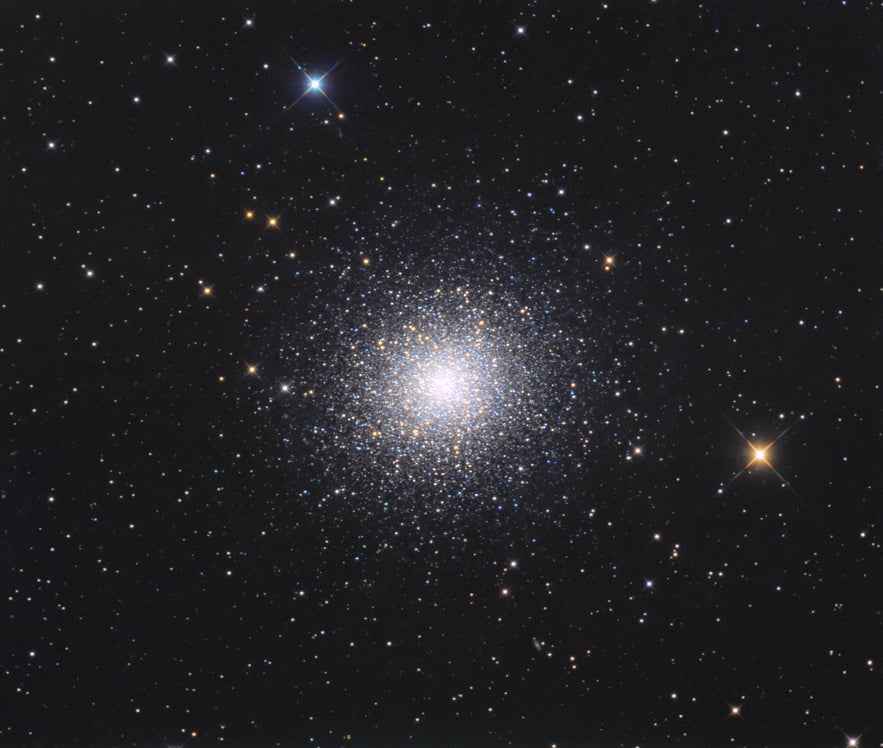 Hercules Cluster. Photo by: 'Kerry-Ann Lecky Hepburn'.
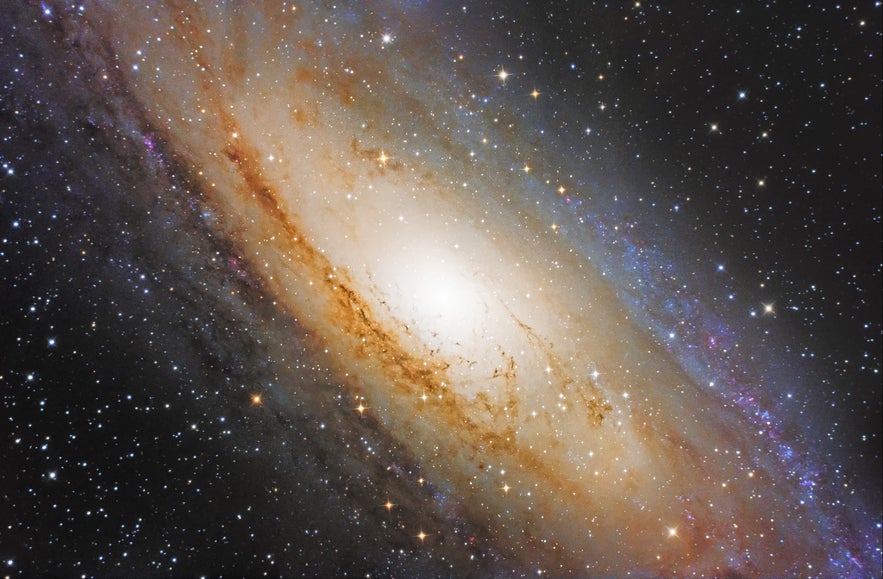 Andromeda Galaxy. Photo by: 'Kerry-Ann Lecky Hepburn'.
Equipment You'll Need for Deep-Sky Photography
Camera
Your camera doesn't need to be complex when you are just starting out. A simple DSLR, mirrorless or comparable camera capable of shooting long exposures in RAW mode will do a respectable job.
Full frame cameras with good noise handling, such as the Canon 6D (any version), Canon 5D, Nikon D810 and the D850, are a few examples. As you start to improve over time and begin to demand more out of your images, you may want something more specialised like a modified DSLR, where the infrared cut-off (IR) filter is replaced for better transmission of hydrogen gas (objects with red nebulosity). Some cameras which have already been modified, like the Canon 60Da and the Nikon D810a, are available for purchase. However, you can also modify your own existing camera.
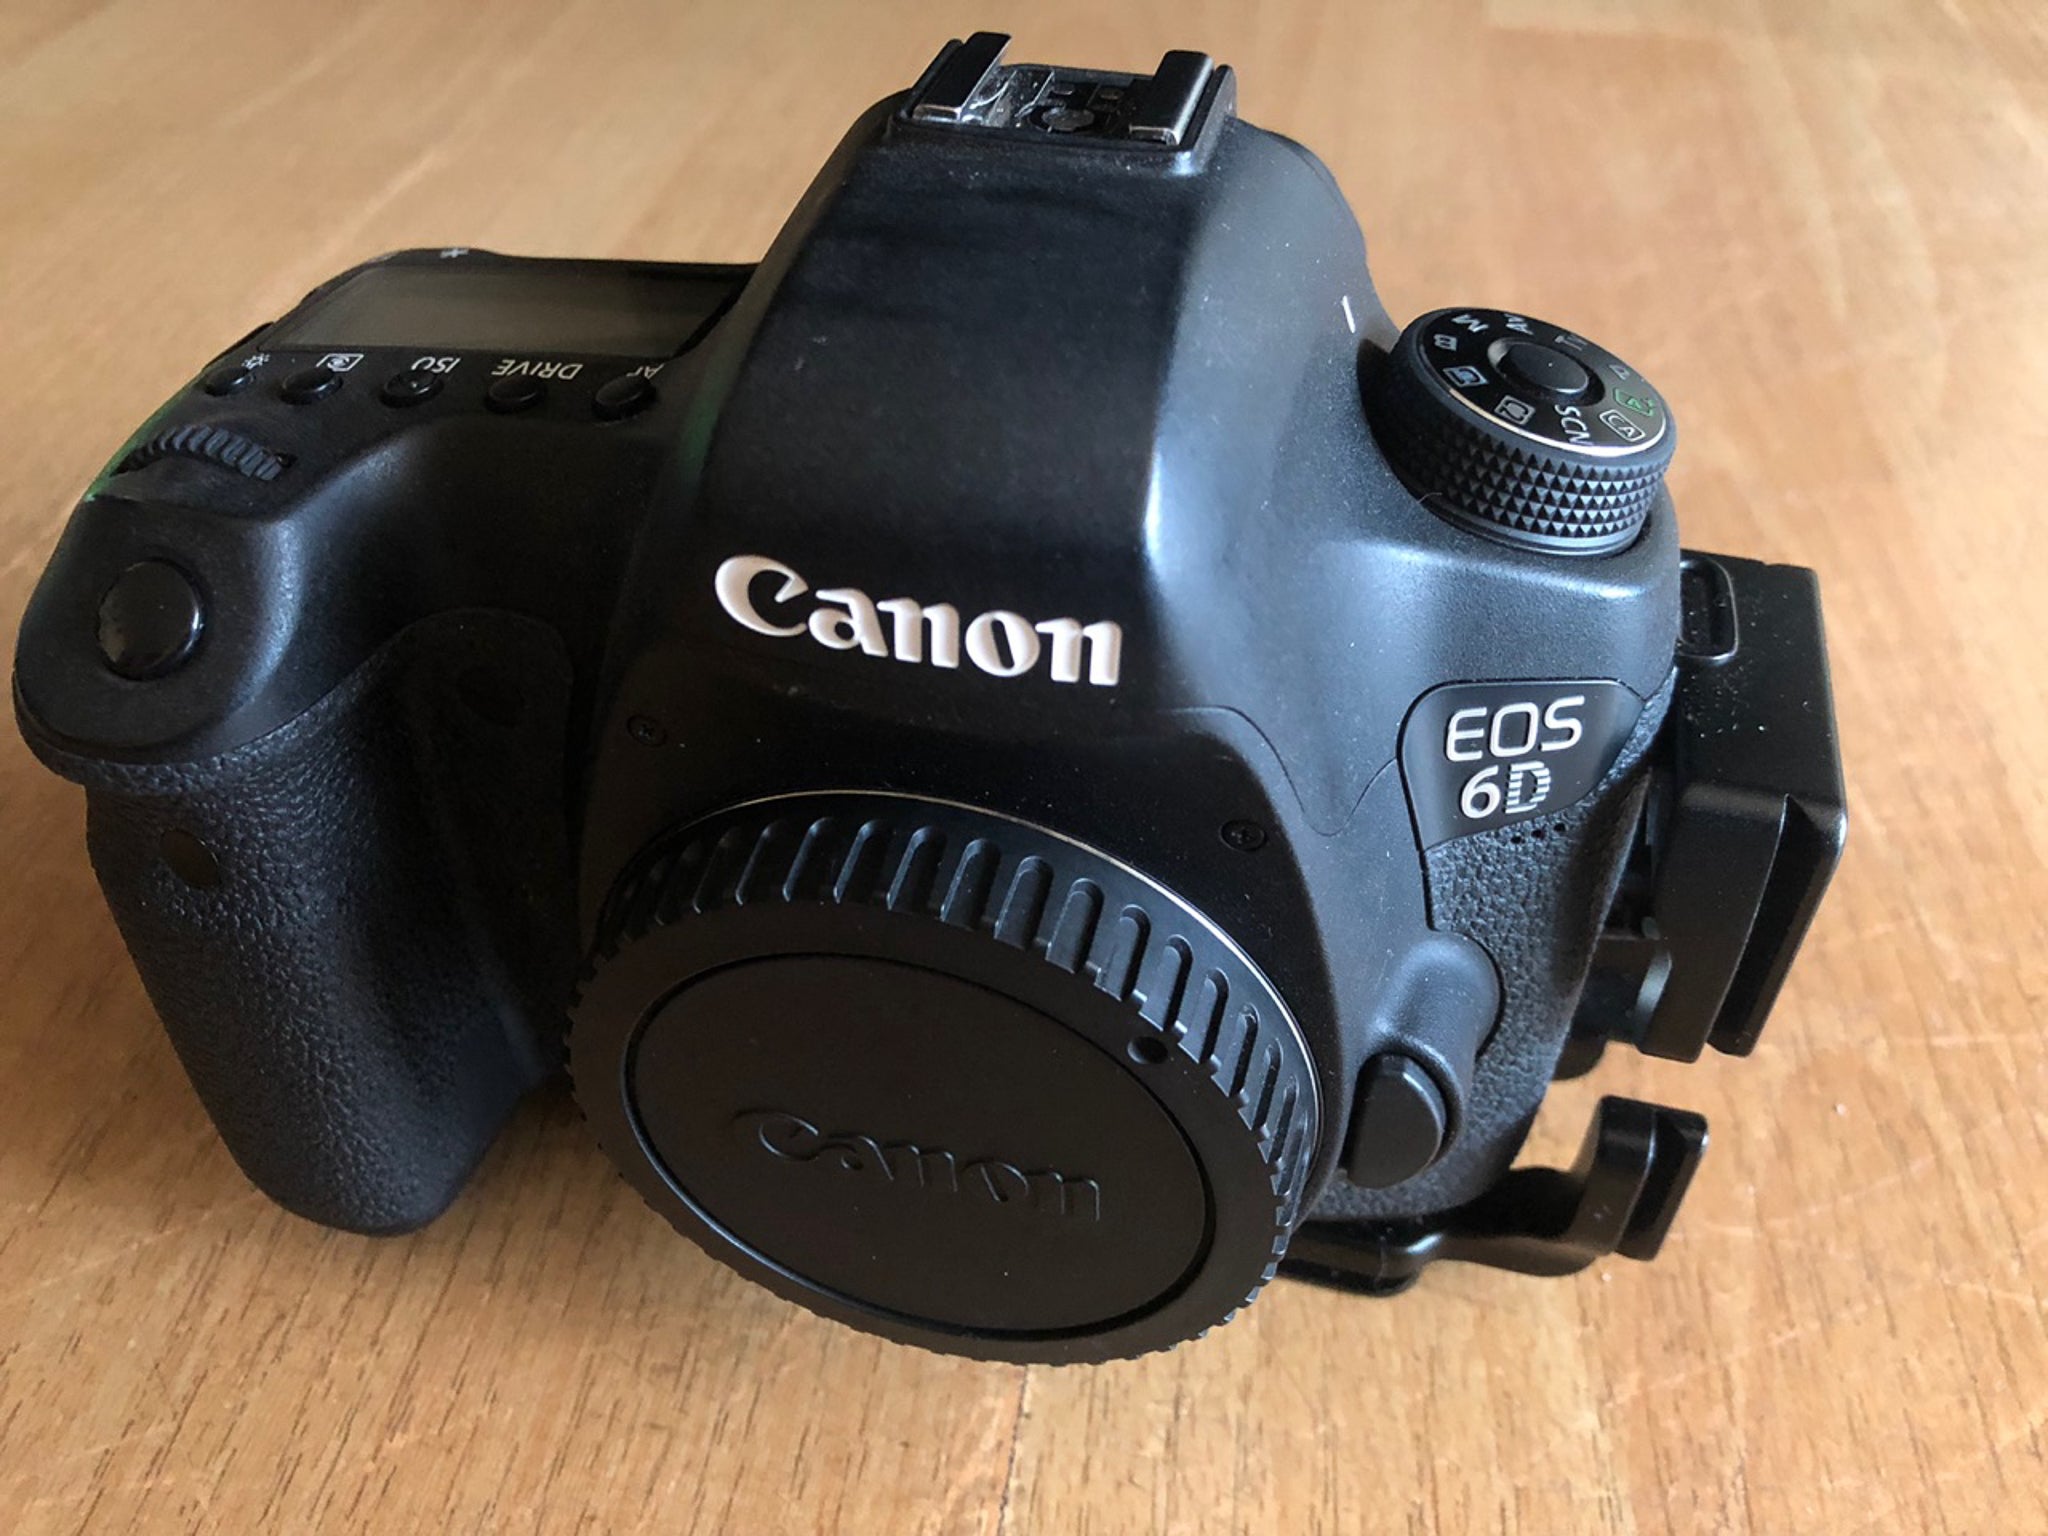 Canon 6D. Photo by: 'Kerry-Ann Lecky Hepburn'.
As you become more advanced, another option to consider is a dedicated cooled CCD astro camera like the SBIG 8300 or a QHY-8. These have the advantage of being sensitive to all wavelengths of light for astrophotography in addition to coming with a cooled sensor. We want a cooled sensor because heat results in noise.
Lenses and Telescopes
You can use a wide array of lenses for deep-sky astrophotography. The odds are that if you are a day time photographer, you will likely already have what you need.
The lens size that you use will depend on what type of object that you want to photograph. It’s a big misconception that you need a high-powered telescope to be able to take astrophotos of galaxies, nebulae and clusters in space. There are a great number of objects that are fairly large in apparent size.
Some commonly-used lenses and telescopes in deep-sky photography include:
-
Sigma 50mm f1.4
-
Canon 100mm macro f2.8
-
Canon 400 f5.6L
-
80mm refractor telescope (ranges from 400-600mm focal length)
Also note, that unlike with nightscapes, having a fast lens is not imperative for deep-sky photography because we will be taking long tracked exposures.
Here are a few examples of different night sky objects taken with different lenses and focal lengths.
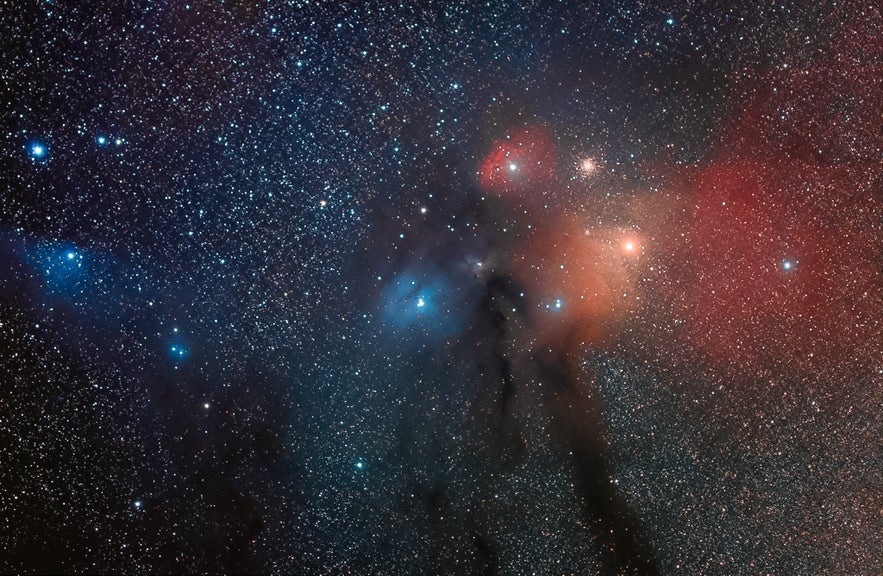 Rho Ophiuchus and Antares, Canon 100mm f2.8. Photo by: 'Kerry-Ann Lecky Hepburn'.
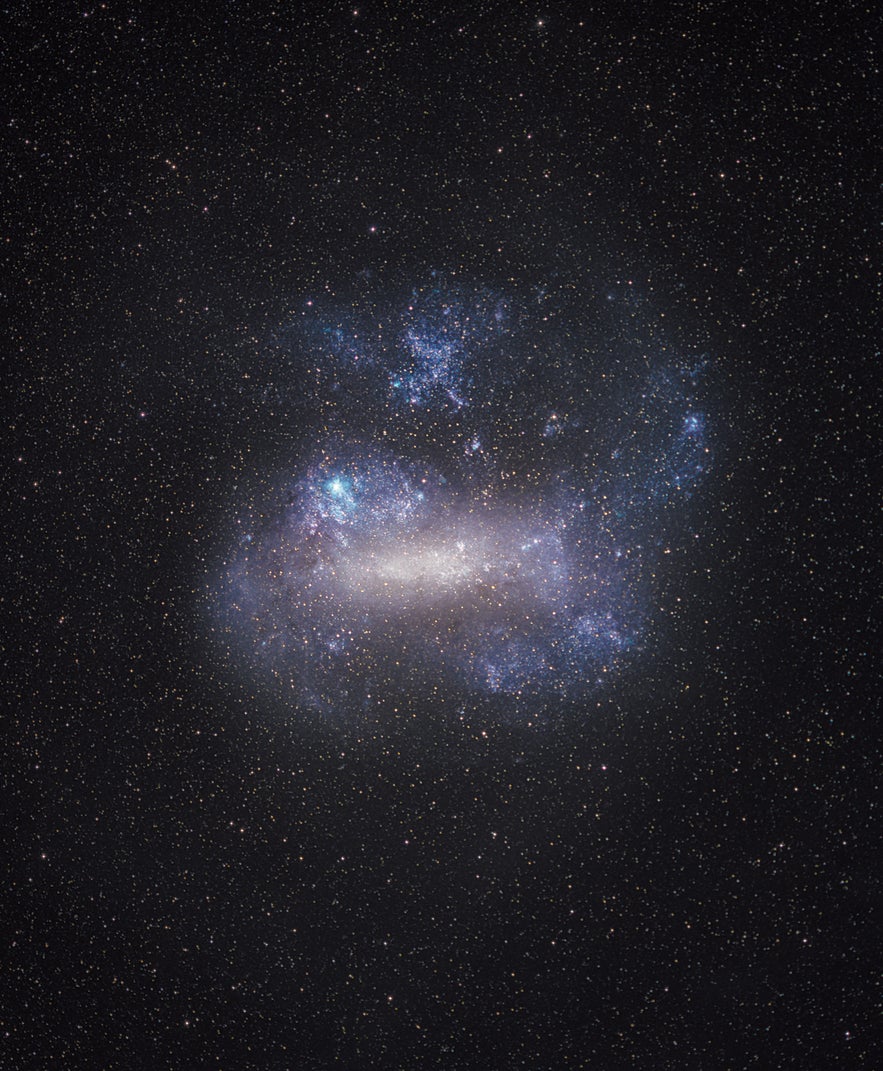 The Large Magellanic Clouds, Canon 100mm f2.8. Photo by: 'Kerry-Ann Lecky Hepburn'.
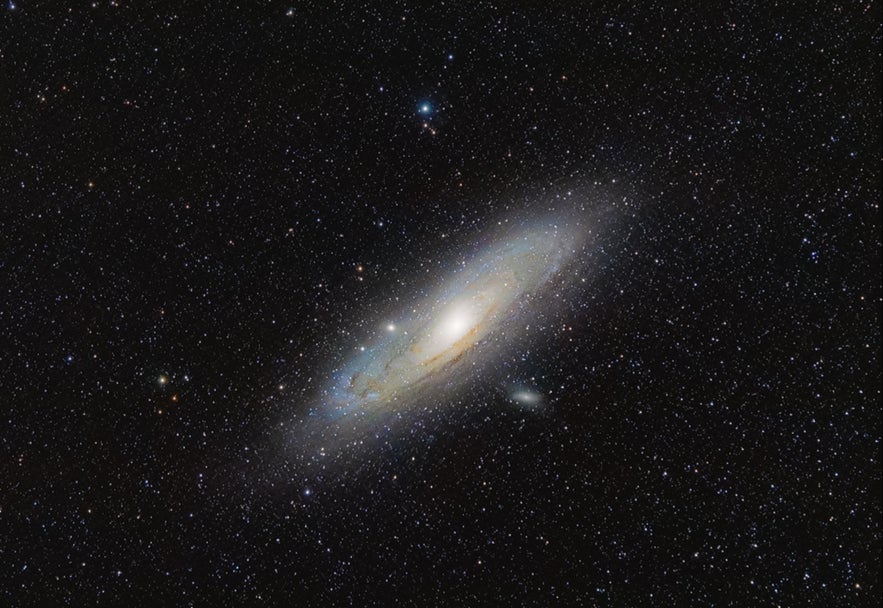 Andromeda Galaxy, Canon 100-400 mm f5.6 @ 200mm. Photo by: 'Kerry-Ann Lecky Hepburn'.
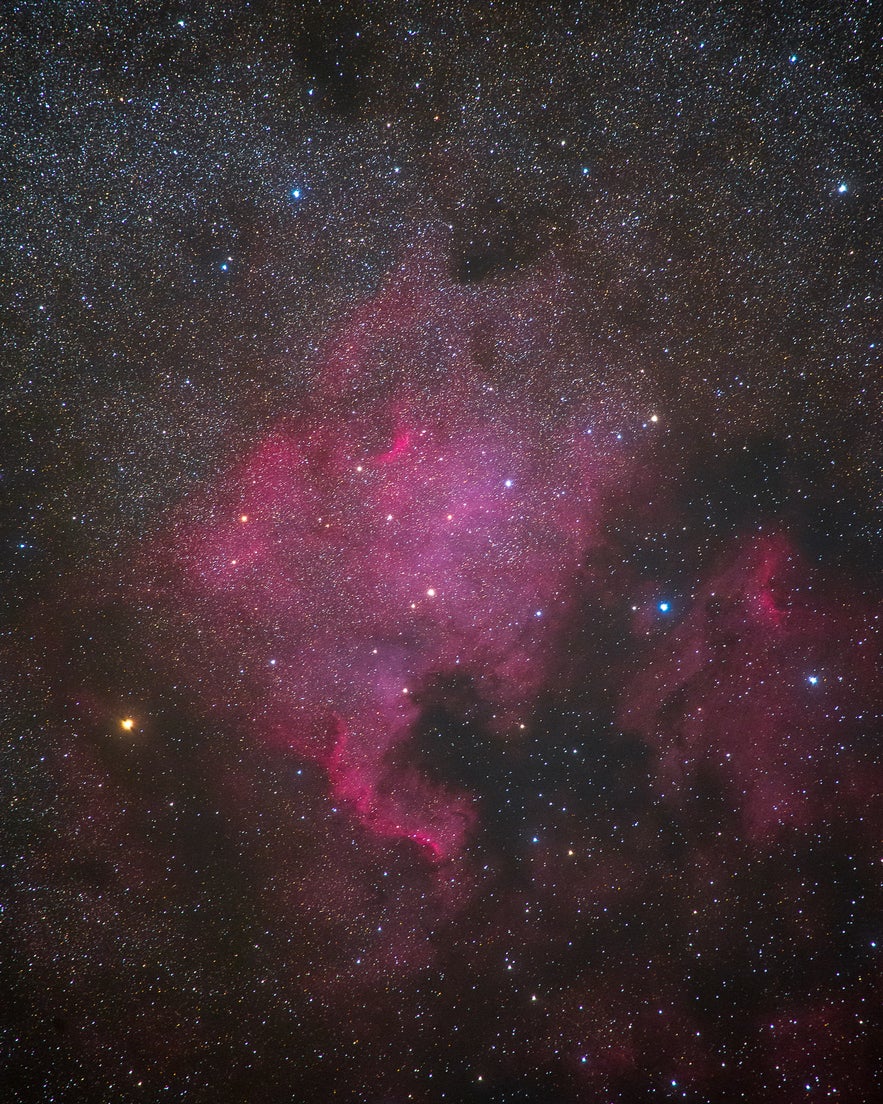 North America Nebula, Canon 100-400mm f5.6 @400mm. Photo by: 'Kerry-Ann Lecky Hepburn'.
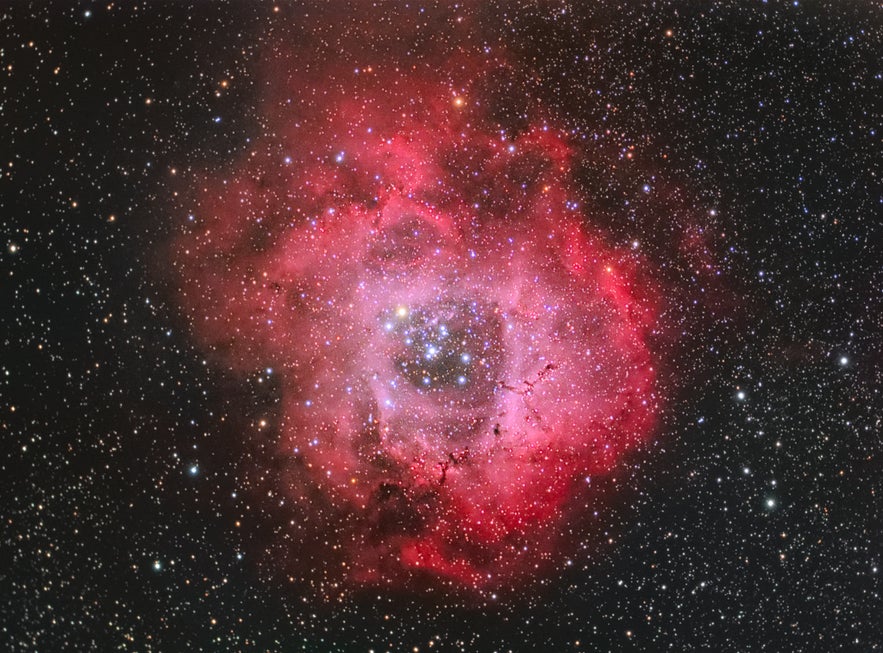 Rosette Nebula, Skywatcher 80mm telescope f6 500mm. Photo by: 'Kerry-Ann Lecky Hepburn'.
 M51 Whirlpool Galaxy. Photo by: 'Kerry-Ann Lecky Hepburn'.
Tracking Mount
Due to the fact that many of the objects in the night sky are faint, you will need to take fairly long exposures. The Earth rotates, so you will be limited by how long you can expose before you will see the apparent motion of the sky in your pictures. The motion will appear in the form of trailing streaks of lights (stars) and blurred objects.
When shooting Milky Way scenes, you will normally use wide angle lenses and take exposures no more than around 30 seconds on a tripod. For deep-sky photography, we need longer exposures and typically longer focal lengths. The longer the focal length, the more evident this sky motion will appear on a single frame. This is why you'll need an equatorial tracking mount. There are many types available on the market and many of the lightweight ones can simply screw on the base plate of a stable tripod. A mount like this is a relatively small investment which will end up being one of the most important parts of your setup.
Below are some examples of equatorial tracking mounts. Before making your final decision, you should consider the total weight of your camera and heaviest lens that you plan on using, as well as your budget. For a listing of mounts ranging in price and capabilities, you can visit B&H Photo.
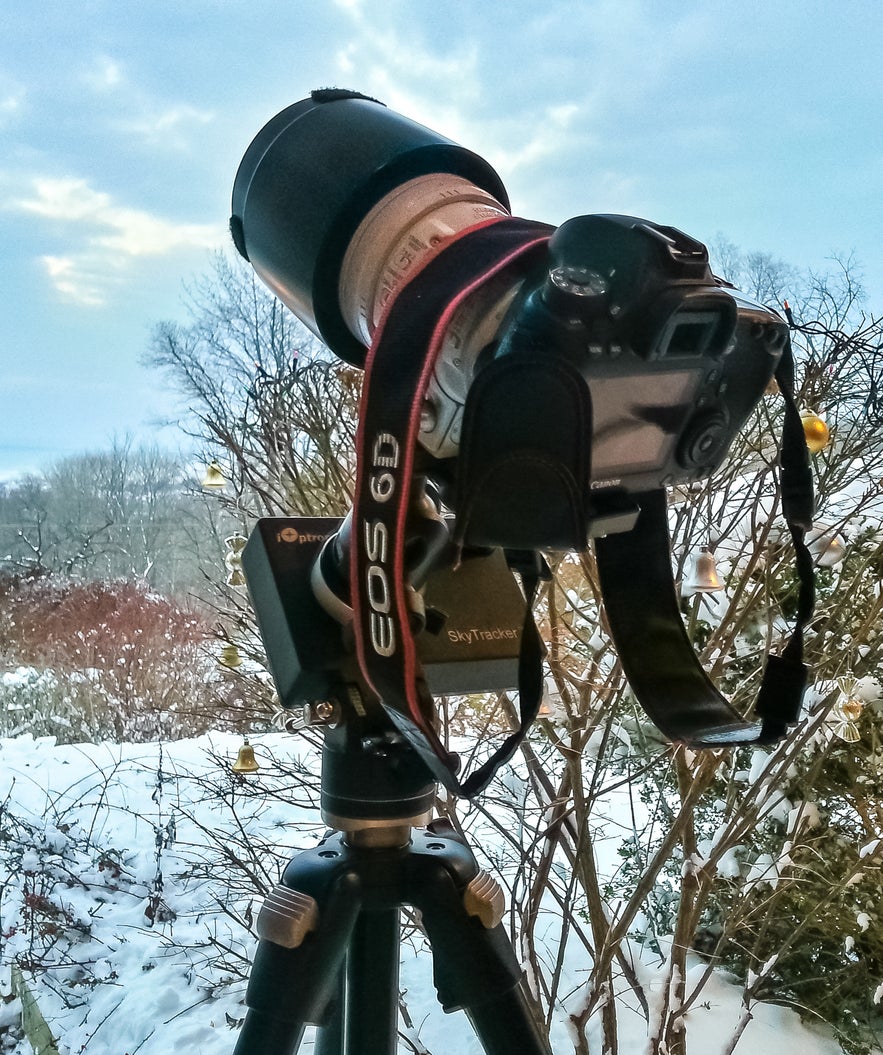 Ioptron SkyTracker 7.7lb payload capacity. Photo by: 'Kerry-Ann Lecky Hepburn'.
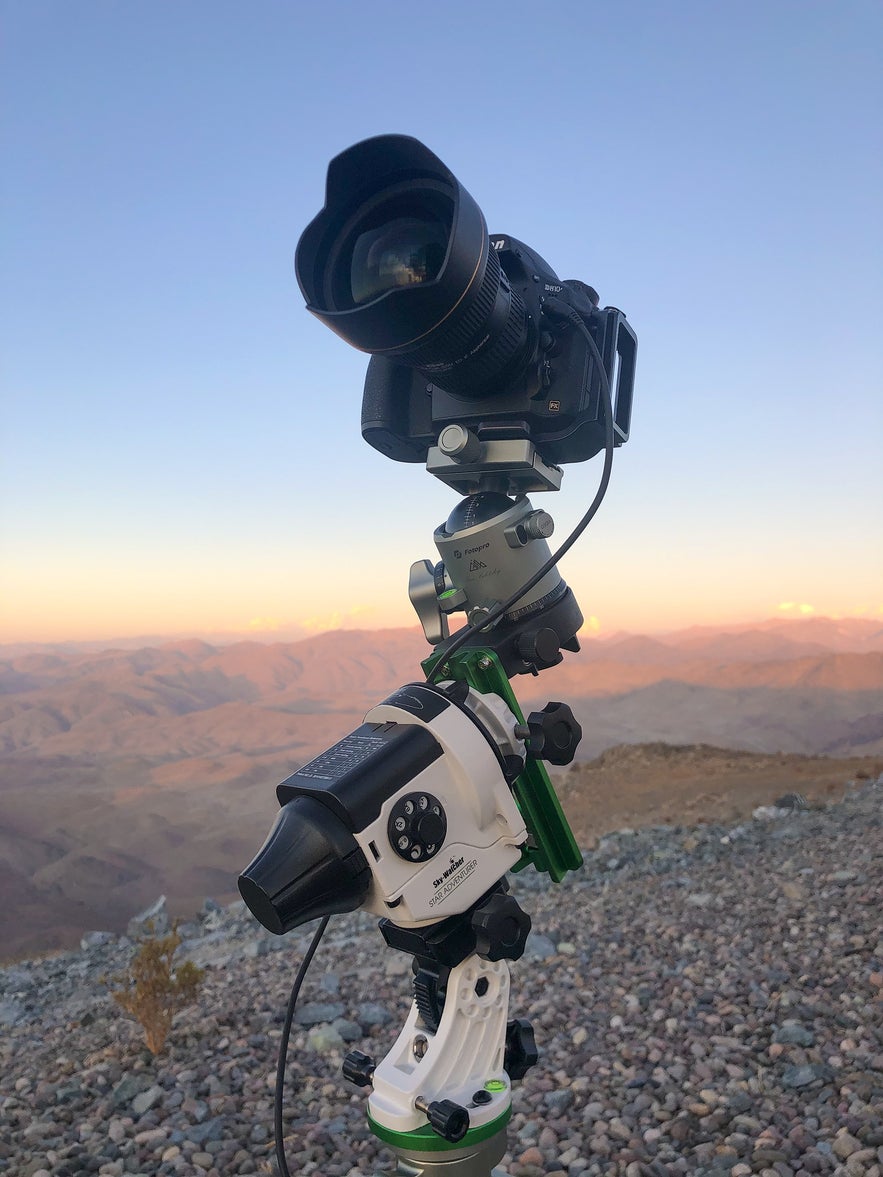 Sky Watcher Star Adventurer 11lb payload capacity. Photo by: 'Kerry-Ann Lecky Hepburn'.
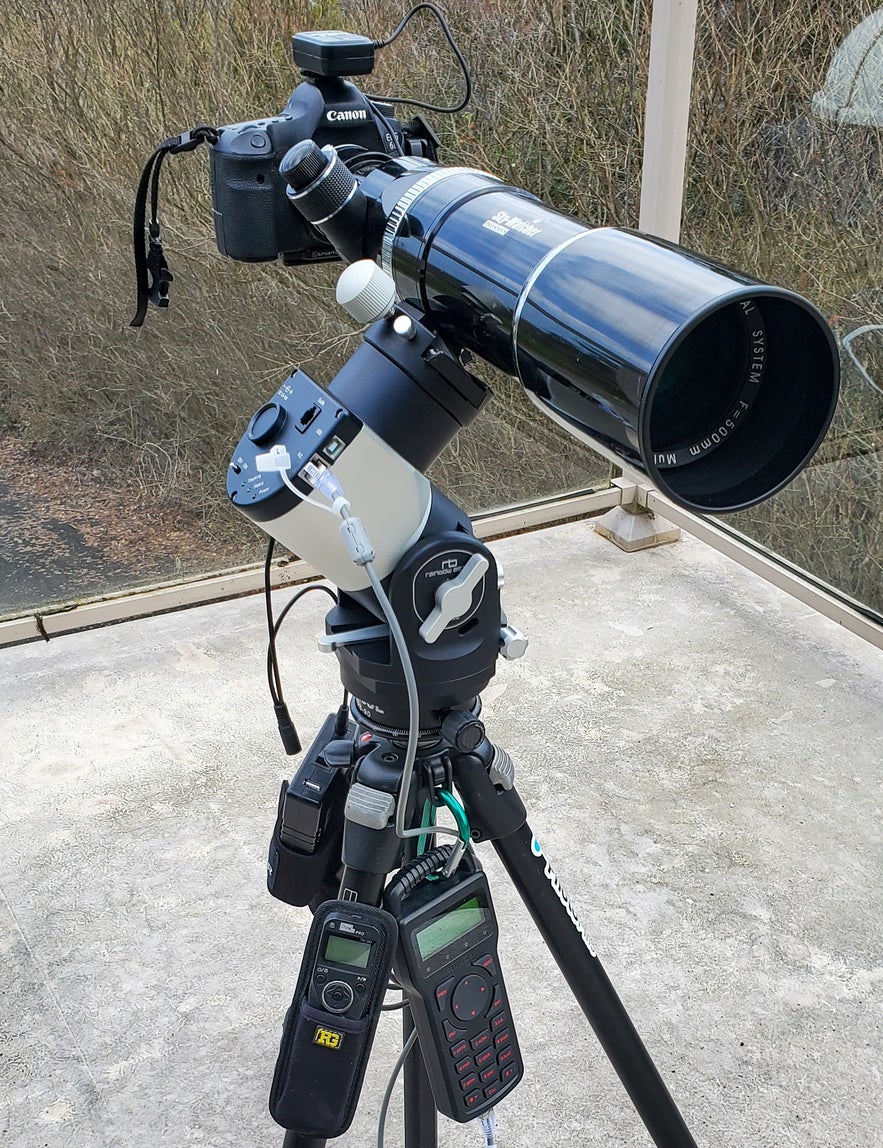 Rainbow Astro RST-135 30lb payload capacity. Photo by: 'Kerry-Ann Lecky Hepburn'.
Tripod
The tripod that you choose will be highly dependent on what gear you mount on it. For deep-sky photography, you will need to put a tracking mount, camera and lens or telescope on top of it, so it is essential to choose something that will be solid and stable enough to hold the weight. A carbon fibre tripod is preferable for good vibration dampening and strength, plus a load capacity that is greater than the total weight of the gear that you will be mounting. Sometimes, the tracking mount manufacturer will recommend a specific tripod for use.
- See also: The Best Tripods for Photography in 2020
Filters
There are many different filters to use for deep-sky astrophotography with your camera. When you are just starting out, you might be better off not using them as they may add another level of complication. If you really want to delve into filters for astrophotography, then read on.
Filters can be very useful in particular situations, such as when you don’t have access to dark skies, when you want to increase the amount of contrast from nebulae or if you want to try out narrowband imaging. Astro filters have their specific purposes and can come in different sizes (clip-in, various diameters to screw on front of lens, 1"1/4 and 2" screw-in), all depending on the type of camera that you own and how you would like to adapt it (in front of the sensor, in front of the camera lens or within the telescope adapter). We will touch on the more common filters used with DSLRs but I encourage you to do further research on each type in order to get something that is most suitable for your needs. You can get a more in-depth look at the different filters for astrophotography here.
-
Red Intensifier: Used to enhance red, orange and brown tones in your images. Also helps to increase the saturation in those tones. It can increase the contrast in the night sky under light pollution that is caused by sodium lights. This type of filter is also called a didymium filter and is fairly inexpensive.
-
UHC (Ultra High Contrast) Filter: Reduces light pollution in addition to airglow. This has a very high contrast on emission nebulae. It is recommended that you use this with modified cameras. It is not out of the question for unmodified cameras but exposure times will have to be much longer. One side-effect of this filter is that proper colour balance may be a challenge to achieve. As such, it is not recommended to use on broadband targets like galaxies.
-
CLS (City Light Suppression Filter): Has a wider pass band than the UHC filter. Therefore, it can be easier to colour balance and work with, especially with an unmodified DSLR. This is a very popular light pollution filter on the market. It is not known for suppressing airglow.
-
LPro: A broad band filter for suppressing light pollution whilst maintaining a reasonably good colour balance. This is done by being very selective with filtering out specific light pollution frequencies. It is also supposed to help with filtering out or reducing airglow. This filter is known for being good for use on nebulae and galaxies.
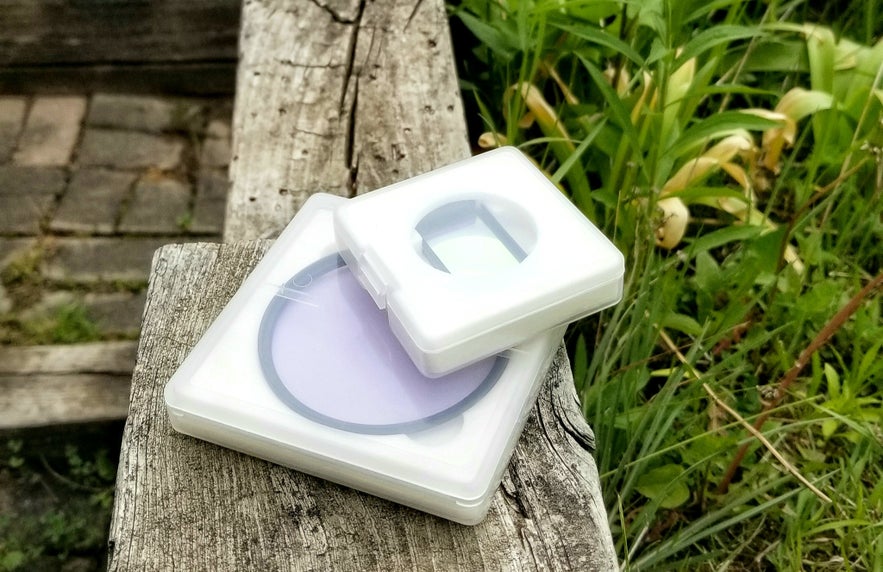 Clip-in and screw in filter. Photo by: 'Kerry-Ann Lecky Hepburn'.
Accessories
In addition to your DSLR, lens, tripod and tracking mount, you will also need the following:
-
Ball Head: This is one of the accessories used to attach your camera to the mount. It’s also helpful in getting more flexibility in framing of your target of choice. You may already have something like this in your photography setup.
-
Remote Timer: Required for taking multiple exposures at various lengths exceeding 30 seconds. Some cameras have remote timer capabilities built in. If not, then you will certainly need this.
-
Dew Heater: This prevents your lens from getting dewy when taking pictures on windless humid nights. It’s easy to find one of these online but make sure to choose the correct fit for the lens or telescope that you plan on using. This type of product is under-utilised and if you don’t have one, it can quickly ruin a wonderful clear night of imaging.
-
Dew Shield: This helps for protecting your camera from capturing stray light and also does provide a little protection from dew.
-
Extra Batteries or a USB Powered Camera Battery: Having extra batteries means that you won't have to keep changing them through the night while taking long exposures. If you don’t have something that can provide continuous power to the camera, then make sure that you a few fully-charged spare batteries on hand.
-
12V Power Bank: This will power the mount, your dew heater and possibly your camera battery in the field.
-
Red Light Headlamp: To preserve night vision while you set up your gear and when you check your exposures in the dark.
-
T-Ring Adapter (for attaching to a 2" adapter): This is an adapter needed to attach your specific camera body mount to an adapter that will then attach to the telescope. You can find this online or in telescope and camera stores.
-
2" Adapter for T-Ring (for attaching to telescopes): Needed for many small telescopes.
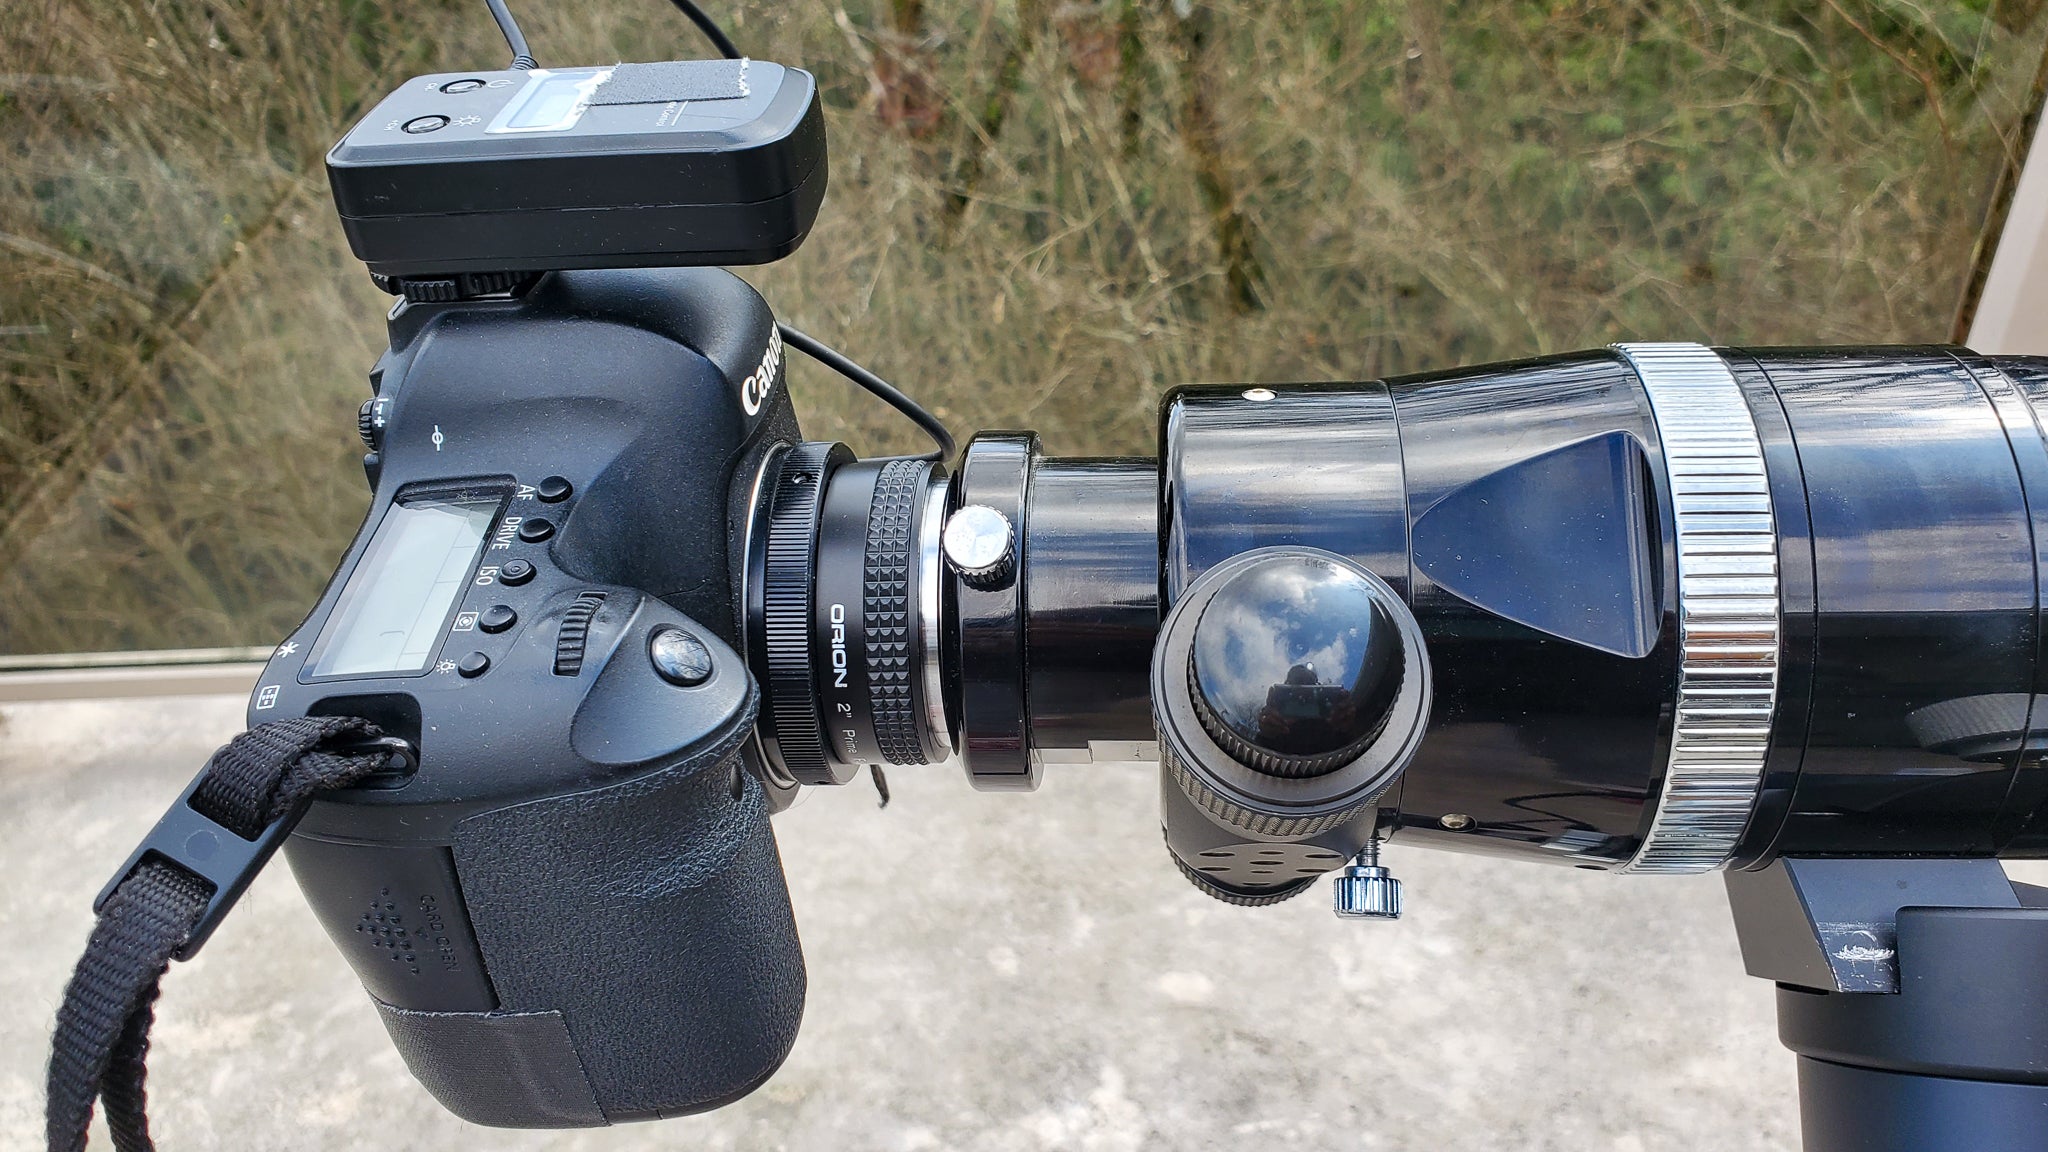 Canon6D T-ring and 2in adapter attachments for a telescope. Photo by: 'Kerry-Ann Lecky Hepburn'.
A Few Tips Before You Get Started
There are many known challenges when it comes to deep-sky astrophotography. Some things will take practice and there will be other things that you simply just won't have control over. Knowing in advance what you could be up against will greatly improve your overall experience and success on any given night.
Getting Organised and Setting Up in Low Light
One of the best things you can do is practice setting up and packing down your gear at home a few times before heading out into the field. In addition to that, try to arrive and set up on location before it gets dark. Navigating your gear under low light can be very challenging, even with your head lamp on.
Before heading out, get familiar with how to align your mount for tracking because this can sometimes take a lengthy amount of time. You don't want to waste precious clear skies fumbling around for too long. Read your mount’s instructions and search astro-related forums that discuss your particular brand in order to get a jump start on any bugs or problems that might arise.
- See also: Beginner's Guide to Camera Settings
Changing Weather and Dark Skies
It is imperative that you have the proper weather and sky conditions to be successful in deep-sky imaging. Clear skies are most important as you cannot take an image through the clouds. Checking the forecast for the area in which you will be photographing and keeping up-to-date with it is a must as the weather can change fairly frequently.
It’s also recommended to have a few sources for satellite and radar handy to keep an eye on things. If you are not taking an image through narrowband filters, then it’s also important to have a night sky that is free from the Moon. Ideally, you also want dark skies free of light pollution to achieve the best results. However, sometimes this will not be possible. It just means that you'll have to work harder to capture more images and ‘process your heart out’. Most of my deep-sky images were taken in areas of suburban light pollution.
- See also: How to Take Great Photos in Bad Weather
Choosing a Target
This is actually a good and fun challenge. The objects in the night sky will change depending on the time of night, as well as from season to season. You want to find an object that will be an appropriate size for your lens or telescope of choice. You also want to start out by choosing something relatively bright.
The position of the object in the sky is important. Choosing a target that is high up in the sky for the start and end of your photography session will give you the best success. Get comfortable with an app or software that will give you a detailed view of the night sky and its objects, based on time and location. Stellarium is a good free app for your PC and Sky Safari is an example of one for your smartphone. Both of those apps and software also allow you to overlay the field of view for your camera and lens choice.
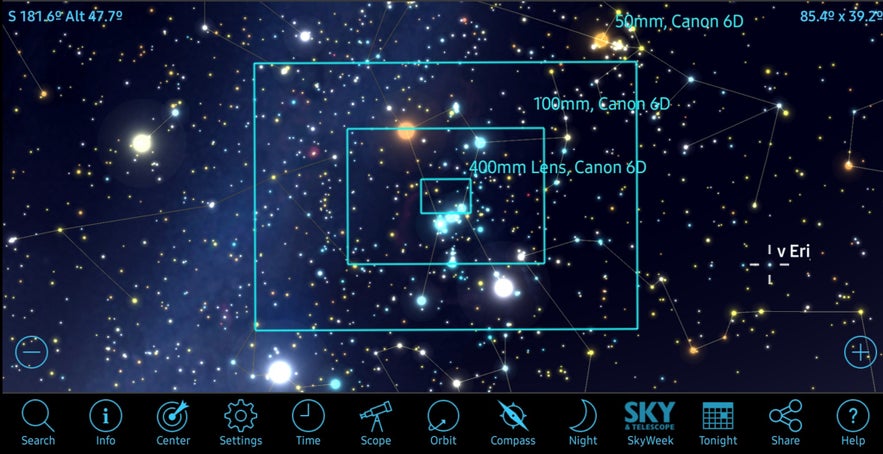 An example of Sky Safari App. Photo by: 'Kerry-Ann Lecky Hepburn'.
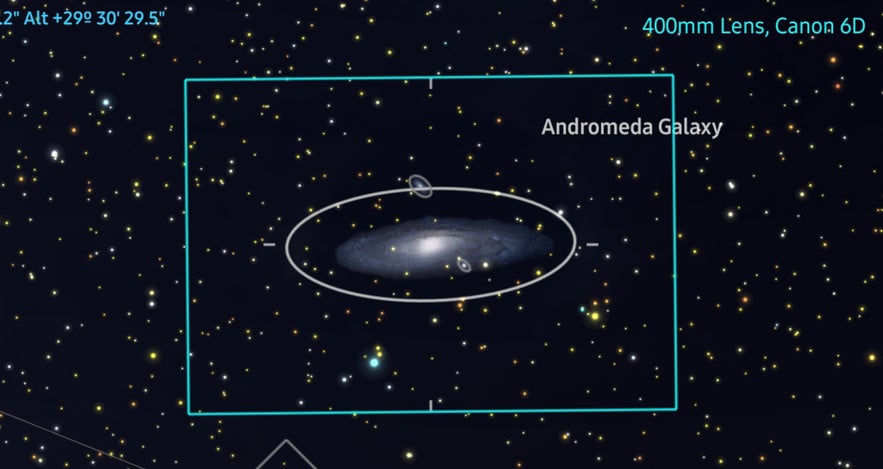 Overlay of field of view boxes. Photo by: 'Kerry-Ann Lecky Hepburn'.
Here are several great targets to start with for your hemisphere but be sure to check when they are visible.
-
Northern Hemisphere: Pleiades star cluster (M45), Orion Nebula (M42), Andromeda Galaxy (M31), Rho Ophiuchi and Antares, Lagoon Nebula.
-
Southern Hemisphere: Large Magellanic Clouds, Small Magellanic Clouds, Omega Centauri (globular star cluster), Carina Nebula, Tarantula Nebula.
Polar Aligning and Tracking
In order to get your tracking mount to track the night sky properly, an accurate polar alignment is imperative. The longer the focal length of your lens or telescope, the more accuracy you will need in order to make sure that you do not get trailing stars in your long exposure images as a result of the Earth’s rotation. Getting familiar with your particular mount and reading the instructions for polar alignment before heading out is also important.
With deep-sky photography, it pays to familiarise yourself with the night sky in your hemisphere. Go out at night and get comfortable with locating where the North or South Celestial Pole is. Learn how to use the polar scope that comes with your mount in order to achieve this accuracy.
Once you reach your photography location, set up your tripod, mount, camera and lens in a spot that is on solid and level ground. You want to position yourself in such a way that you'll have a clear view of the North or South Celestial pole (NCP or SCP). Make sure that your target will be visible for the duration of the planned photography session. Level your mount, pointing in the direction of the NCP or SCP. Once the stars appear, you can begin aligning. Don’t forget to switch the tracking setting to ‘ON’ and make sure that all the screws and clamps are secure once you are finished. Check out this quick guide on polar alignment to get yourself started.
A popular way to achieve fast and easy accuracy for alignment is to use a device called a Polemaster. Before you invest in one, it is important to check whether it is adaptable to your particular tracking mount.
Focusing
Focusing can sometimes prove to be a little difficult at first because you will be doing it on a star that is a small pinpoint of light. In addition, you need the focus to be as accurate as possible, or else you will be defeating the purpose of trying to achieve detail in the target that you are planning to shoot.
Here are some rough steps to achieve a good focus:
-
Set your lens or telescope to a roughly focused position for distant objects before you start. This will make it much easier to stumble across any stars in the field as you move the camera and lens around. They may appear initially as large fuzzy balls but that’s ok.
-
Once you find a bright enough star, centre it and try to get closer to focus. Use your Live View display on your camera and zoom in further on the star. You may find it more comfortable if you view the display with a magnifying glass or reading glasses, depending on how good your nearsighted vision is.
-
Focus to a point where the star appears to be the smallest diameter or smallest size. Use a Bahtinov mask to achieve very accurate focus. If you are using a lens or telescope that is very fast (low f-stop number), then you may need to refocus a few times through the night, as slight temperature changes can also change your focus.
Framing
With the help of a star chart or mount object database (some tracking mounts have go-to features), slew to your target of choice. When doing this manually, it’s good to get familiar with the most common stars and constellations in the night sky beforehand. Those associated stars can help you point your way to your target object by a technique called 'star hopping'. Under some dark skies, you may be able to find your object with your unaided eye. This will make framing much easier and is also another reason why it’s good to start out shooting brighter objects.
Once you think you are close to your target of choice, try to get it centred. Take a test shot of several seconds at a high ISO just to make sure that the target is in the field of view. Make fine adjustments as necessary to get it positioned to your liking. If you are using a light lens or camera setup on a ball head mount, then you can further orientate the object for desired framing. If you are using a telescope, you can simply rotate the 2" adapter. Afterwards, don’t forget to clamp everything back down.
Camera Settings and Image Acquisition
To create a deep-sky image, we need to acquire multiple images of what we call lights, flats and darks.
Light Frames
Lights are the frames of the actual object. We need as many as possible of these to combine so we can have high signal and low noise. Most deep-sky images are faint and we need to eventually extract as much detail, depth and colour as possible through post-processing.
Here are some DSLR camera settings that will assist you with taking your light frames:
-
Bulb mode with a remote timer attached. Unless you have some sort of internal settings in your camera to allow you to take multiple exposures greater than 30 seconds.
-
RAW mode. Make sure your camera is set up to take RAW images. This is very important for stacking and processing. RAW files contain uncompressed image data from the camera sensor unlike JPEGs, which are compressed and altered in-camera.
-
ISO 800. This is the best compromise when doing deep-sky photography. You will be taking multiple images of your target and combining them, so you want a setting that will give you enough light but which also doesn’t sacrifice dynamic range and colour dynamics. It is a nice compromise for most cameras, though there is nothing to stop you from experimenting.
-
60 seconds to 5 minute exposure times. Check the histogram on your camera. You want a setting that is optimal for your tracking mount and light pollution levels. Sometimes, the brightness of the target will have an impact on this as well. I try to make sure the peak of the histogram curve does not pass the halfway mark to the right side.
-
Largest aperture or smallest f-stop. Whatever works best for your type of lens. Some lenses perform better if stopped down, so keep that in mind.
When it is officially astronomical night and your target is at a reasonable height in the sky, this is when you should begin exposing for your target object. Start with a one-minute exposure to do an initial check of the tracking, focus, and histogram. Make sure to zoom in on the frame to see if the stars are round. If all looks good and you can safely go with a longer exposure, then continue increasing your exposure time until you get to the point that is optimal.
If you can’t achieve exposures of at least one minute, then you may want to fine-tune your polar alignment. There can be so many variables as to why you may have problems with tracking but first, try to eliminate the most obvious potential issue which is polar alignment. Fine-tune it. For a reasonably light camera set-up under dark skies with good tracking, you should be able to achieve a few minutes of exposure.
In some cases, when you are using a heavy lens on a light mount or a longer focal length, you may have no choice but to go with shorter exposures. Once you find your exposure time, start setting up the sequence of exposures. The number of exposures will be based on how bright the object is and how much time you have. The more exposures that you take, the better the object's data will be and the more you can extract before running into problems of noise. For a first night out under dark skies, achieving a total of one or two hours on a single target can be good to get you started. For example, one hour of total time spent shooting a single target is equal to 60 frames of one-minute exposures or 30 frames of two-minute exposures.
As you gain more experience, you will want to build on this. The longer the integrated time on an object, the better it will become overall. That’s the short answer!
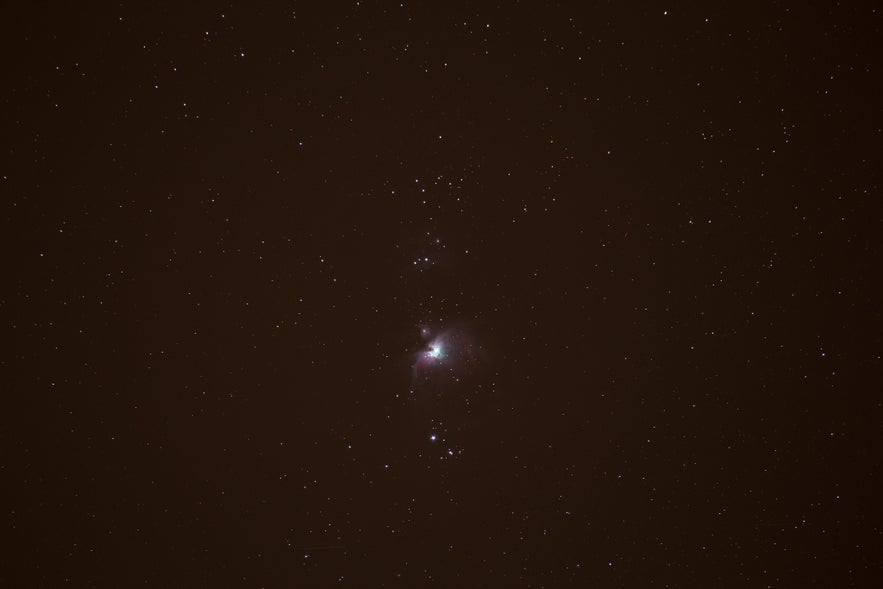 This is a single 60 second unadjusted ‘Light’ frame of M42 taken with the Canon 6D at 400mm, ISO800, f7.1 and 60 seconds exposure length. Photo by: 'Kerry-Ann Lecky Hepburn'.
Flat Frames
When you are processing images to get depth and detail, the lens vignette and the dust will show up and be exaggerated to a point where it will be very difficult to correct. Your final image will not reach its potential and you will regret it. To get around this, flats are needed. These help to correct vignetting and also to take care of any dust motes that are on the sensor.
 This is a sample picture of what a typical flat frame looks like. Photo by: 'Kerry-Ann Lecky Hepburn'.
You will need to take 15 to 20 of these images that will be later incorporated into your combined shot within your stacking program. You can take these the next day, providing that you do not change the focus position of your camera from when you were imaging. You will need to create a flat field where there is even lighting across your lens (put a white shirt or plastic bag over the lens, ensuring that there are no ripples to cause uneven lighting). Now set the camera to ISO 100 and the f-stop that you used for your imaging session. The shutter speed should be set to a value that will give you a properly exposed image (Aperture priority mode in conjunction with an electronic lens should automatically choose a proper exposure speed). Check out this guide for more detailed information on creating flats.
Dark Frames
Dark frames are essential for many DSLRs and cameras that do not have a low noise sensor. These frames are essentially an image of the random electronic thermal noise of your camera’s sensor. They are easy to take by simply covering your camera or lens with a cap and taking 15-20 exposures using the same settings as what you were using to take your ‘light’ frames.
 This is a sample picture of what a typical dark frame looks like. Photo by: 'Kerry-Ann Lecky Hepburn'.
You can do your dark frames at any time, provided that you do so at the appropriate temperature. The temperature that you take these frames should be within 5 degrees Celsius of the frames that you took during your imaging session, so take note of the temperature that night.
Stacking (Pre-Processing)
Once you have acquired your light, flat and dark frames, it is time to input them into a stacking software. There are many software options out there but one of the more popular ones is called Deep-Sky Stacker, which is free to download.
I usually load my lights, flats and darks into Deep-Sky Stacker, then register the images, uncheck poor quality frames and click to stack them. Most of the time, I follow the recommended settings that the software provides.
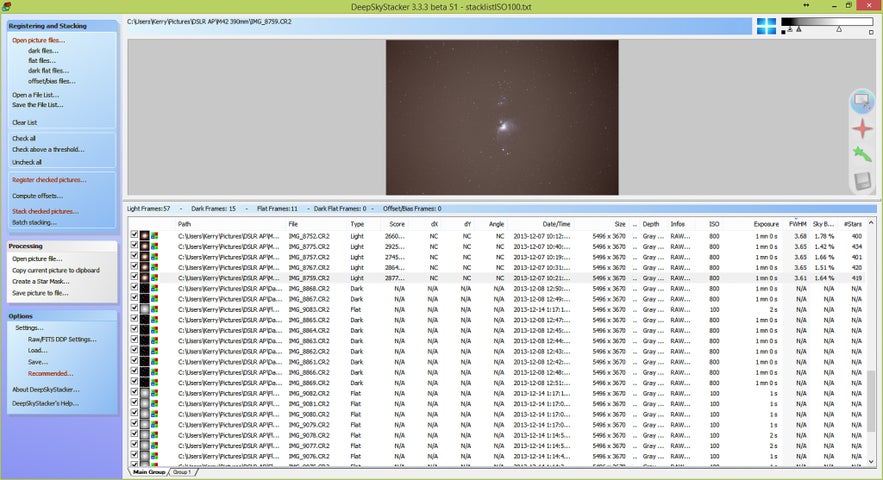 Deep-Sky Stacker files ingested. Photo by: 'Kerry-Ann Lecky Hepburn'.
The stacking process can take several minutes, depending on your computer's speed. The resulting stacked file will be a 32-bit TIFF file. I do not make any adjustments to the final file in Deep-Sky Stacker. When you see this final TIFF file, it will appear dark and look like nothing is there. Do not fear because the data is all there. Now let's take it into Photoshop.
Post-Processing
Once you have your 32-bit TIFF file from the stacking software, open it into Photoshop and convert it into a 16-bit TIFF. Stretching the image (spreading out the histogram) is a process that we do with multiple curve layers. This is what you need to do in order to get the object to show up with all the colours and details.
The first stretch is just a simple curve brightening. It's good to work with layer adjustments.
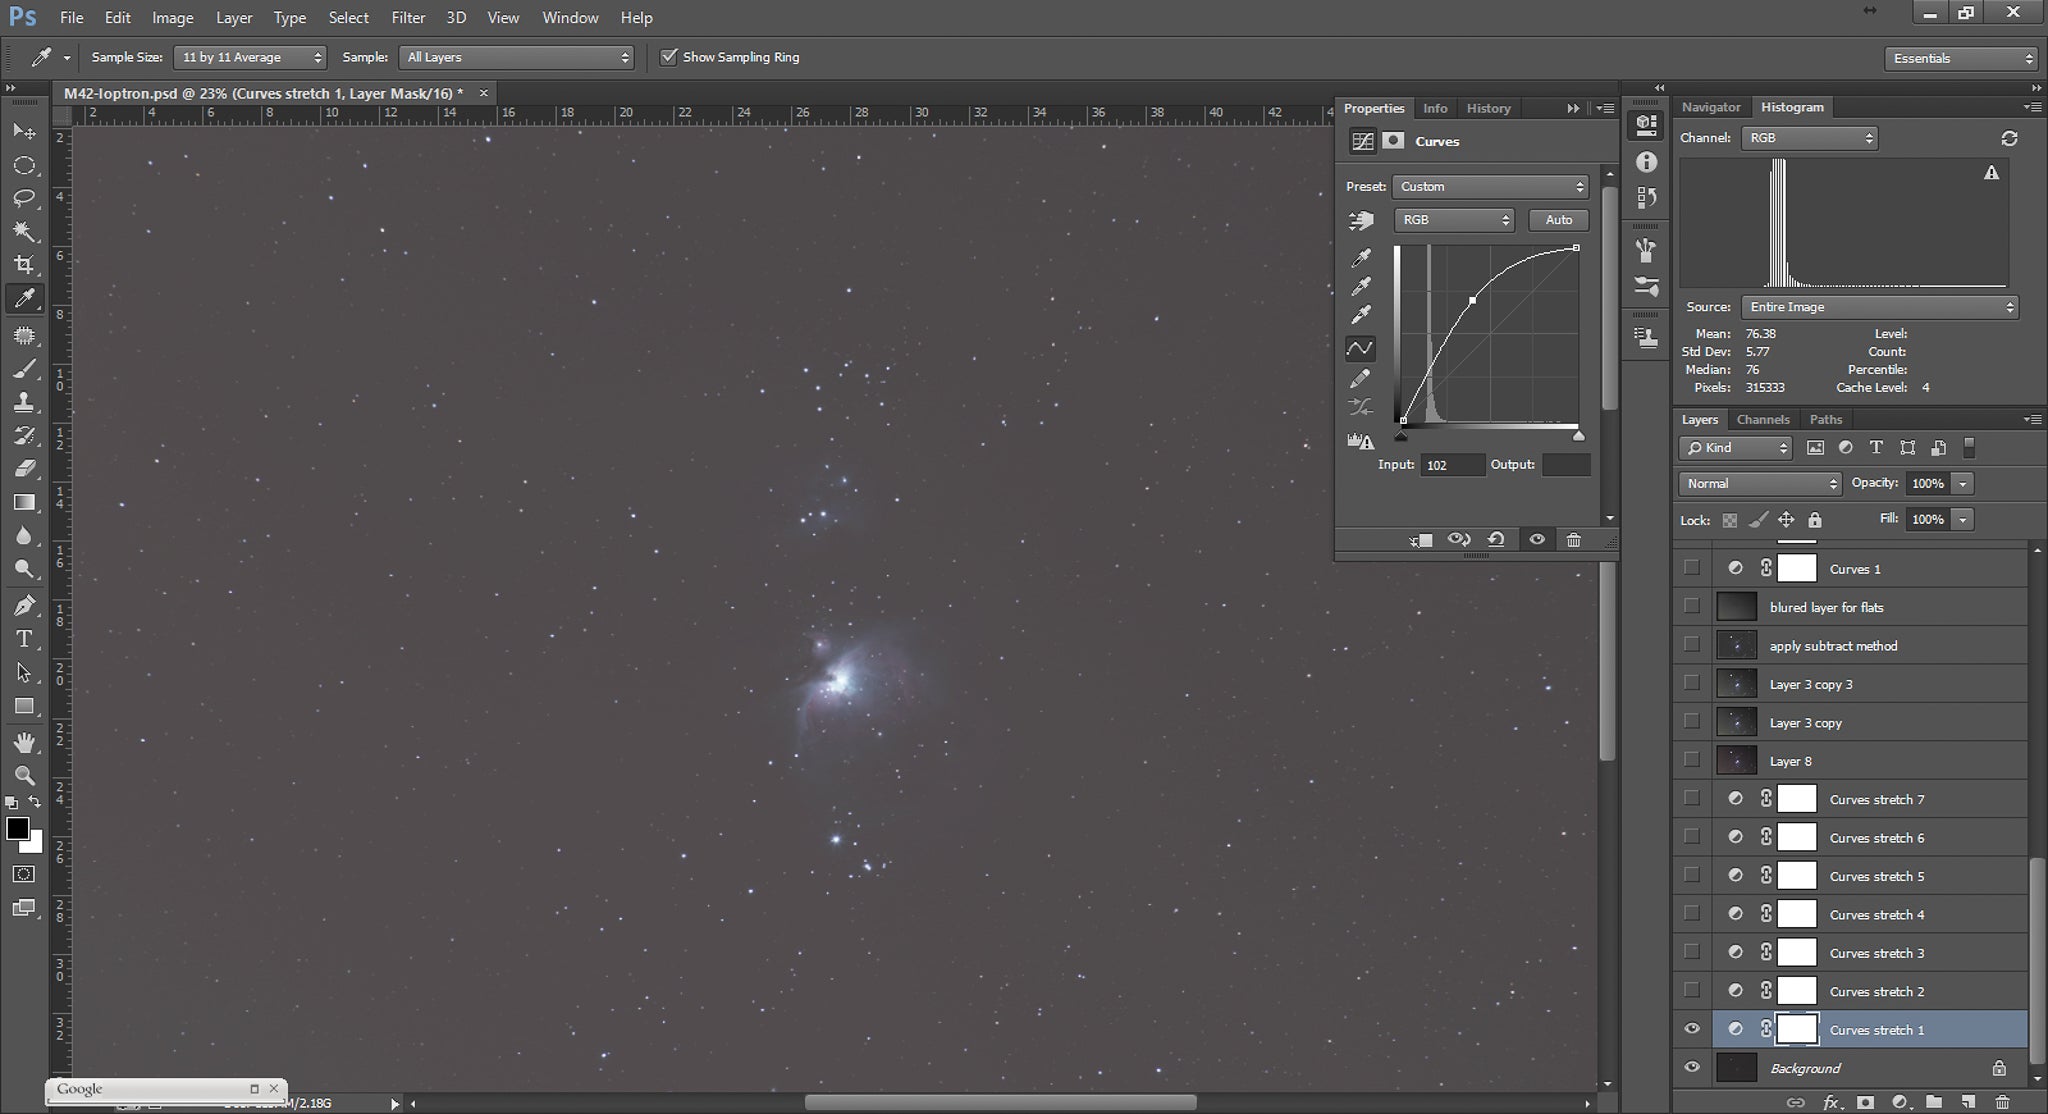 Curve brightening. Photo by: 'Kerry-Ann Lecky Hepburn'.
The second curve will darken the background by bringing in the lower left-hand corner of the histogram. You don't want to make the background black, otherwise it might clip dark details. Try to leave at least 20 points on the left side of the histogram.
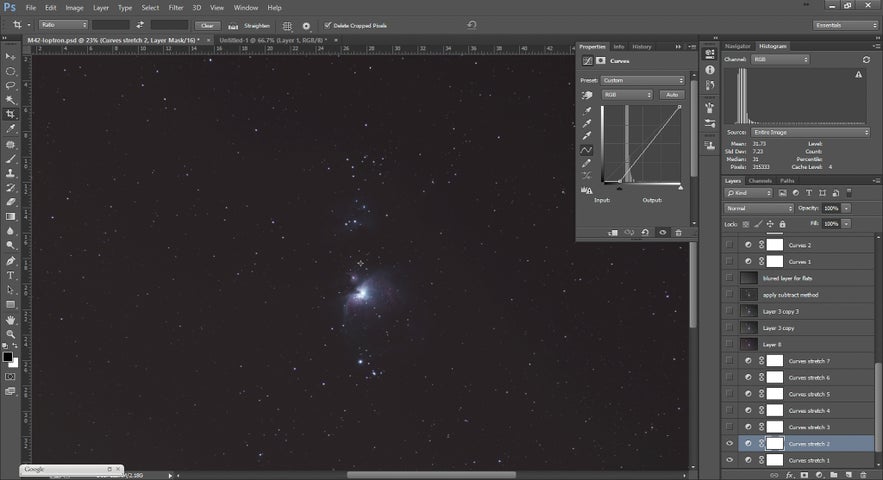 Darken the background. Photo by: 'Kerry-Ann Lecky Hepburn'.
After multiple iterations of curve adjustment layers of brightening and darkening, you will end up with something like this. Create a new layer using the CTRL-ALT NE command. This will consolidate everything that you have done with the curves.
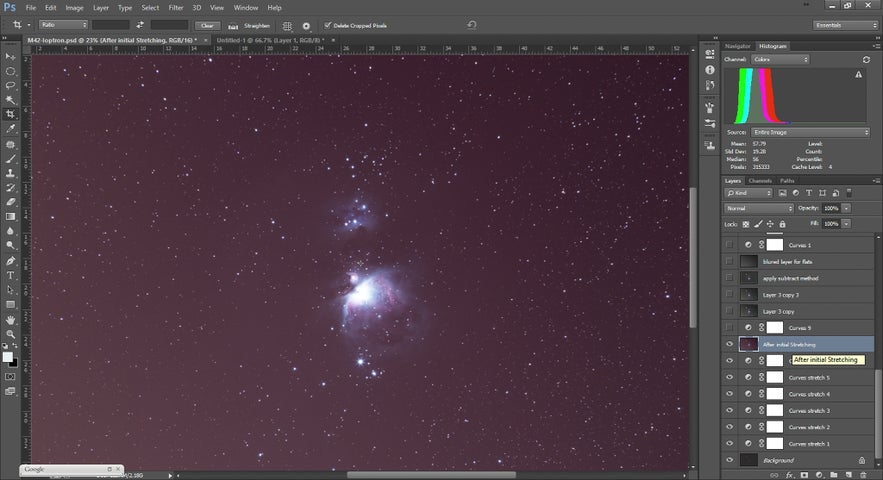 Consolidate the curves. Photo by: 'Kerry-Ann Lecky Hepburn'.
If your colour balance is looking imbalanced like in this picture, open up another curve adjustment layer and set the mode to colour. Then click on the black eye dropper in the curve layer window and select an area on the image that has no stars or nebulosity. Now click on the white eye dropper and select the centre of a white star. In my case, I selected the bright blown-out core on the nebula. You can see now that the left side of the histogram has aligned RGB colour. The background is neutralised.
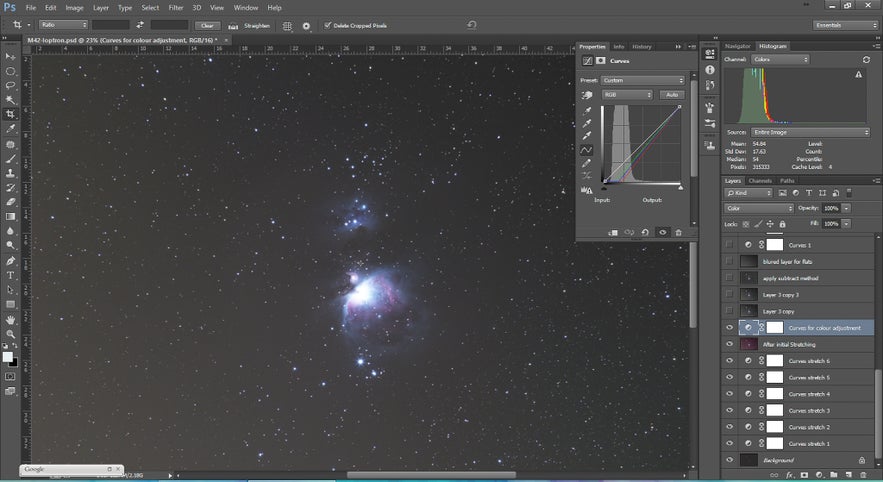 The background is neutralised. Photo by: 'Kerry-Ann Lecky Hepburn'.
You can then continue to stretch the image further before doing a sky gradient removal. I chose to do this because as you can see, light pollution is starting to appear from the bottom left of the frame.
There are manual techniques that can be performed in Photoshop which will help you to remove light pollution gradients from astro images. However, this can be a time-consuming process. There is a much easier and fool-proof way to do this by using a plug in called GradientXTerminator.
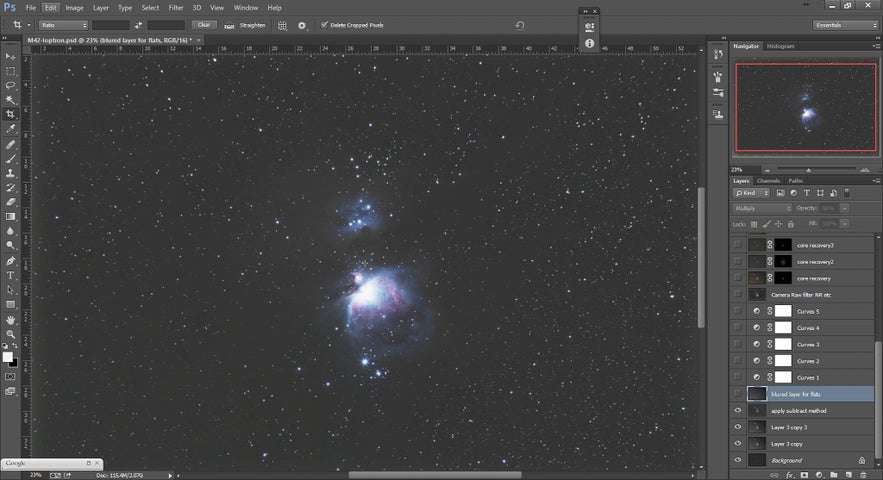 Remove light pollution gradients. Photo by: 'Kerry-Ann Lecky Hepburn'.
After this point ,you can choose to do further stretching and colour balancing. You will now start to see the extended dust and nebulosity.
With M42 being an object with a very bright core and faint outer nebulosity, it is usually encouraged to add a layer mask or two on the core to bring back the details that have been blown-out by the stretching process. To do that, simply grab a layer from below that hasn't been stretched and added a blurred mask over the non blown-out core. You can do some further noise reduction with the help of the Camera RAW filter in Photoshop. Make any additional final tweaks that you like and save the file. I like to save it with all its layers using the PSD or PSB format and then import it to Lightroom for final adjustments before I export it to web or social media.
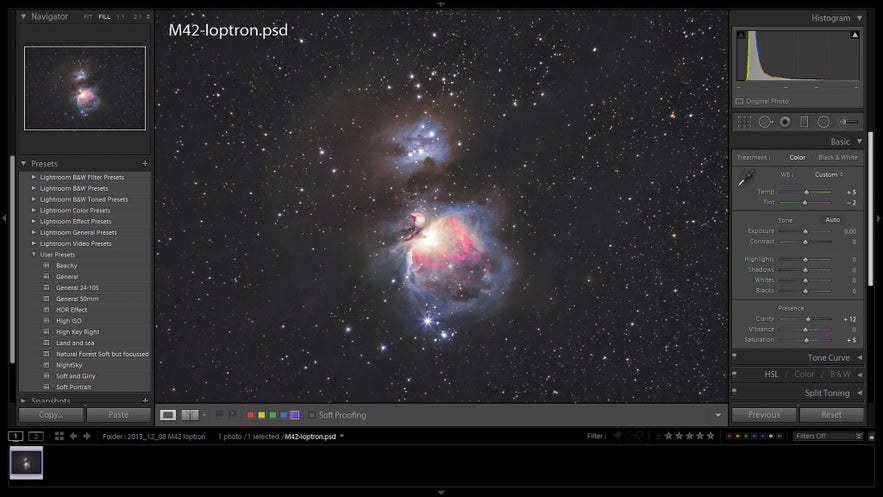 Save your image with all the layers. Photo by: 'Kerry-Ann Lecky Hepburn'.
For a video demonstration on the post processing, have a look at this Google Hangouts video that I was a part of on “The Photoshop Show”.
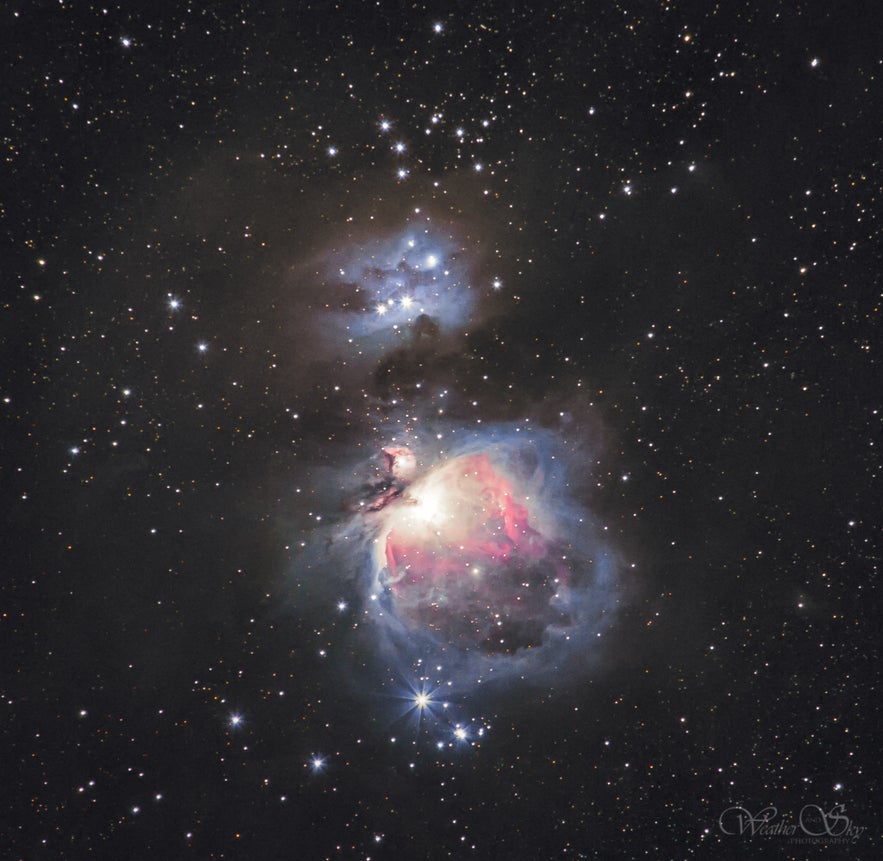 Final Image of M42 taken with the Canon 6D, Canon 100-400mm lens @400mm, ISO 800, f7.1, 57x60 second exposures under light polluted skies. Photo by: 'Kerry-Ann Lecky Hepburn'.
Extra Tips
There are many online forums and websites that will help. Having some connections in the astronomy community can also be helpful, as they will usually be talking about the more popular objects in the sky for a given month.
The techniques above can be applied to all deep-sky objects, such as star clusters, galaxies and nebulae. You may just need to make small adjustments to your exposure times depending on how diffuse they are. Your processing techniques may need to adapt to the scale and brightness of the structures within these objects.
It's a good idea to make checklists while you're shooting because there are so many things that can go wrong. Try making an equipment checklist, set-up checklist, image acquisition checklist and even a pack down checklist to make sure that you won't leave anything out in-field.
- See also: Ultimate Guide to Focus Stacking
Conclusion
There you have it, a beginner's crash course in deep-sky astrophotography. There is a lot to take in and you might run into some stumbling blocks along the way but don’t be discouraged, this will all be part of the journey that every deep-sky astrophotographer goes through. Practice and continue learning online or by connecting with others in the field. Over time, you will be able to capture the most amazing objects in the night sky. Astrophotography is probably one of the most demanding forms of photography but it is also one of the most rewarding. You will be taking pictures of objects that sometimes can’t even be seen with your eyes and that is pretty amazing in itself. You will gain so much appreciation for what’s out there and be able to share it with others. Good luck and wishing you clear skies!
About the author: Kerry-Ann Lecky Hepburn is a senior meteorologist for The Weather Network who is based in Canada. You can find more of her work on her website or by following her on Facebook and Instagram.
Have you ever tried deep-sky photography? What were you able to capture? Which part of the process did you find to be the most challenging? Share your thoughts by leaving a comment below!


