The world can be an unpredictable place. One second, it’s completely calm, then the next there are storm and weather warnings issued by the local authorities for severe wind all over the place. Apart from making it difficult to keep your tripod steady while you’re shooting, these moments can also spell disaster for your camera sensor if you’re not careful. Why? Because wind kicks up dust and dirt, which can end up inside your camera and sticking to the sensor.
- Explore these articles on Landscape and Nature Photography
- Discover this 11 Day Iceland in Autumn Photography Workshop
Sensor dust is one of the prime enemies of photographers, not just those who specialise in landscapes. Once it lands on your sensor, it prevents light from reaching the pixels in that region, thereby resulting in that portion of the image recording as grey. This can result in black spots in the photos that you take with your digital camera, leading to hours of painstaking time spent in post-processing for you to be able to produce a clean photo.
You may not be able to see the dust at first, particularly if you often shoot at wide open apertures, such as f/2.8. That kind of depth of field is wide enough to render the dust out of focus. However, most landscape photographers shoot at the ‘sweet spot’ of their lens, which is often between f/8-16. At these narrower apertures, the dust on your sensor will result in darker spots that will definitely be visible… not just in a single image, but in all of your images in roughly the same places.
Not only this, but dust and other debris may cause scratches to the sensor. A scratched sensor cannot be repaired and the only way to fix it is to get it replaced.
The sensor is the most important part of your camera, not to mention the most expensive component to replace if it becomes damaged. In most cases, it may even be more economical to buy a new camera rather than to replace the sensor.
As such, it’s best to take care of your camera’s sensor by minimising the risk of getting dust on it while you’re shooting the landscape. This will ensure that your camera continues to perform at its optimum level for years to come, while reducing the amount of post-processing work that you’ll have to do once you get home from your photography trip. In this guide, we'll look at ways that you can minimise sensor dust, as well as tips on what to do to clean it if you do happen to get dust onto your camera's sensor.
How Does Dust Get on the Camera Sensor?
It’s not hard to end up with dust on your sensor, particularly when you are out and about doing landscape photography. It’s especially easy to sustain sensor dust on a mirrorless camera, such as the Sony Alpha A7 III, the Nikon Z7 or the Fujifilm X-T3, as the sensor becomes exposed during any lens changes.
With regular DSLR cameras, the mirror provides some form of protection, though you can still end up getting dust on the sensor. However, one of the main causes of dust is actually the camera itself, which explains why photographers who rarely change their lenses still struggle with dust getting on the sensor.
Apart from getting dust and other debris from the surrounding environment blown onto your sensor by wind during lens changes, there are two other significant ways that dust may be generated:
-
Every time that you take a photo, the shutter fires. When it does, the friction between the components of the shutter can create dust.
-
The other way that dust is generated is during the moments that you attach or remove the plastic body cap. When you do so, friction between the metal mounts and the plastic cap may generate dust. This is also true for when you change your lens.
How to Minimise Dust on your Camera Sensor
It’s impossible to stop dust from ending up on your camera’s sensor, though there are a few simple steps that you can take to reduce the risk of this occurring.
Minimising Dust During Lens Changes
First of all, you should switch your camera off before every lens change. This reduces the amount of static charge on your sensor, which in turn stops it from attracting dust.
Next, you should never leave your camera with the lens mount open. Every time that you remove a lens, make sure to replace it immediately with another lens or attach a body cap to your camera. This will prevent dust from getting in, as well as the risk of any miscellaneous damage.
 Reduce lens changes to minimise dust on your camera sensor. Photo by: 'allupinc, Pixabay'.
Try also to keep the body cap free from dust while it is not attached to your camera. You can do so by attaching the body cap and lens cap together while your camera and lens are both in use.
It may be impossible to avoid completely, but try not to change your lens in dusty situations, such as when it is windy and you are shooting in vast desert-like areas or on a beach. Whenever you change a lens, the sensor becomes exposed to exterior dust and dirt.
If you must change lenses to be able to get the shot that you want, then be mindful of the conditions and hold your camera so that the lens mount faces downwards and away from the direction of the wind, to reduce the risk of dust falling or flying into the opening and onto your sensor.
Keep Your Camera Bag Clean
Apart from that, you can also try to prevent external dust and debris from entering your camera by keeping your camera bag clean. Dust and dirt can and will enter your bag whenever it is open, particularly if you leave it unzipped and exposed to the elements while you are out shooting in-field. This dust may then end up getting inside your camera if you’re not careful. Wipe the inside of your camera bag with a damp cloth every now and then, to ensure that the inside remains dust and dirt free.
Ziplock Bags
This next step may sound a little wild but if you’ve ever looked in a professional photographer’s bag, then you may notice a lot of plastic or ziplock bags. Keeping these in your camera bag is handy for managing situations when your camera might end up getting dirty.
You can place your camera or lenses into ziplock bags when you’re not using them, or even keep equipment such as a rocket blower or lens brush clean by sealing them into ziplock bags. That way, when you pull them out to use, you’ll be minimising the risk of dust transference, which in turn reduces the chance of getting dust onto your camera’s sensor.
Check for Sensor Dust Regularly
Whatever you decide to do, at some point or another while you’re shooting landscapes, you may end up getting dust inside your camera and onto the sensor. Therefore, it’s a good idea to check your sensor for dust at the end of every shooting day. That way, you’ll be able to clean it before the next time you go out to shoot.
How to Check for Camera Sensor Dust
To check for sensor dust, set your camera to Aperture Priority mode, then select a narrow aperture, such as f/16 or f/22. Using a telephoto lens or a zoom lens set to the longest focal length, take a photo against a white wall at the minimum focusing distance from your subject. Don’t worry about using a tripod, as movement won’t interfere with the results. In fact, some amount of blur can even make the dust more visible. You can then inspect the image on your camera’s LCD magnified to 100%, or transfer the image to your computer for better viewing. If you see any grey marks or spots, then it’s most probably sensor dust.
How to Clean the Camera Sensor
Before cleaning the sensor, make sure that you have a fully-charged battery.
Next, clean the outside of your camera body so that dust doesn't travel from the exterior to the interior during the cleaning process.
Set yourself up in a clean area that is dust-free, such as the bathroom of your house.
Before you start, make sure that you have all of the tools that you'll need on-hand in your camera cleaning kit, so that you can clean the camera efficiently.
Self-Cleaning Mode & Rocket Blower Technique
If you’re travelling for photography, then chances are that you may not be carrying any sensor cleaning fluid or swabs with you. Even if you have these supplies, you may not be confident using them, for fear of damaging the sensor or shutter. In this case, you can wait until you’re home to send your camera to the manufacturer for a professional sensor cleaning. In the meantime, you can try the camera’s self-cleaning mode or use the rocket blower technique.
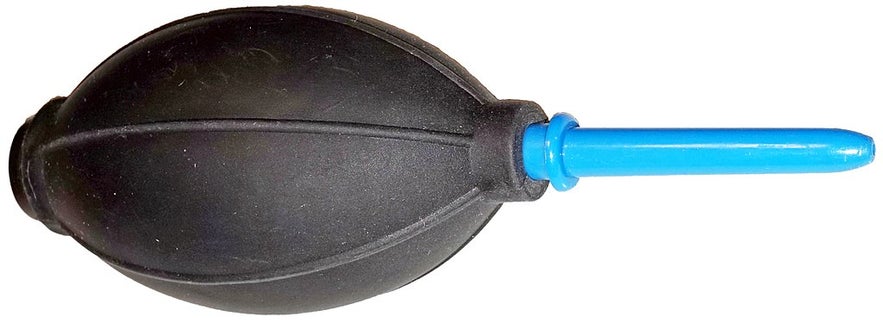
 An air blower for sensor cleaning. Photo by: 'Tiia Monto, Wikimedia Commons'.
Most cameras these days have self-cleaning modes which you may access from the menu. Some are better at cleaning themselves than others. Give it a try and if it doesn’t work, then move onto the rocket blower technique.
To use the rocket blower technique, make sure that your camera battery is fully charged so that it doesn’t turn off while you’re in the middle of this process.
Next, select the sensor-cleaning mode from the menu and hold your camera upside down, before using the rocket blower to gently introduce air into the area with a sharp squeeze. The aim is to dislodge any dust or debris that may be on or near the sensor, allowing it to fall out of your camera.
While you’re doing this, make sure not to touch the sensor and definitely do not shake your camera, in case the dust gets even further entrenched. Also, try not to keep the sensor exposed for too long, as doing so may allow more dust to enter.
DIY Sensor Cleaning
If you are feeling brave enough to clean the camera sensor on your own, then there are a few steps that you should follow to make it a safe process and to reduce risk of damage to your camera.
Equipment You'll Need
-
Lint-free cleaning swabs for your camera's sensor size.
-
Camera sensor cleaning fluid.
-
Rocket blower.
-
A light.
Steps for Wet Camera Sensor Cleaning
-
Remove the lens from your camera and place your camera so that the LCD is facing downwards to the floor, so that you can see inside it.
-
Switch the camera on and select the manual sensor cleaning mode, which will lock up the mirror.
-
Take a sensor swab out of the packet and use the rocket blower to blow air at it a couple of times in order to remove any dust that may be stuck to it.
-
Add 2-3 drops of camera sensor cleaning solution to the swab.
-
Carefully place the swab onto one side of the sensor.
-
Without using too much force, move the swab gently from one side of the sensor to the other side.
-
Turn the swab over and gently move it from the other side back to the side where you began, in one smooth motion.
-
The dust should now be removed. If there is any residual dust on the camera sensor, then start again with a new swab.
Finally, do not use compressed air or water on your sensor, as these may result in damage.
By regularly checking your camera sensor for dust and cleaning it using the methods that we've listed above, you should be able to reduce the little black spots on your photos, leading to much cleaner images and reduced time spent post-processing.
What methods have you tried to clean your camera sensor and did they work? Have you ever tried DIY wet sensor cleaning? Leave a comment below!


