White balance is one of the most important yet less-considered settings of a camera when it comes to producing compelling images. A slight change towards a warmer or a cooler colour temperature can make all the difference between a dull image and one that is impressive.
- Explore these Photography Tutorials
- Discover the Ultimate Guide to Black and White Photography
- Check out this Practical Guide to Golden Hour Photography in Iceland
Many photographers don't put much effort into learning how to deal with the white balance and its associated settings, so when they find themselves with weird colours in their images, they don’t really know how to fix the problem, even if it’s much easier than everyone might think.
In this article, we’ll take a step-by-step look at how to master the white balance, both in-field and during post production, starting with acknowledging what white balance actually is and ending with studying the various presets available on all digital cameras that will allow you to change the colour temperature of your pictures.
What is White Balance?
In the simplest possible words, white balance is the setting that allows you to choose the most accurate colours for that scene. Your next question might be: why we need to choose the colours? Isn’t the camera doing its job by selecting the best colours for our pictures already?
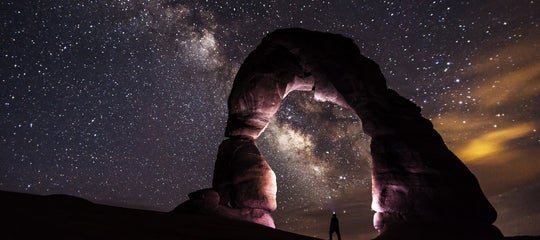
 Two different types of colour temperature – cooler on the left and warmer on the right – naturally occurring in nature! Photo by: 'Leonardo Papèra'.
Our eyes, together with our brain, have already incorporated a complex system of white balance. That's why we are able to see the correct colours in pretty much every situation. On the other hand, cameras don’t implement the same complex system of white balance. Rather, they have to settle with electronic sensors to try to understand what the correct colour temperature is in every particular situation.
This means that the auto white-balance function of a camera is not infallible. Sometimes, the camera will read the information coming from outside incorrectly and consequently capture the wrong colours. That’s why you need the white balance setting, so that you will be able to change the colours as you prefer in order to make the scene appear as you wish.
- See also: Canon vs Nikon - DSLR Comparison
Colour Temperature and Measurement
Now that you know what the white balance is, it’s time to understand how it works. First of all, in order to measure the colour temperature of a picture, we have to use Kelvin degrees.
In terms of photography, the range we are most interested in is between 2000 and 10000 Kelvin degrees. The higher the temperature number, the warmer your shot will be. But what does that mean?
If you are shooting in the presence of a strong warm light, then you might want to balance the colours of the picture by selecting a white balance between 2500K and 4500K, otherwise everything may look red or orange. Conversely, if you are shooting in an environment with cooler light (such as overcast skies, blue hour or twilight), then you should select a white balance between 6500K and 9000K in order to avoid filling up the entire frame with blueish tones.
When shooting outside during the day without any strong colour cast, you can opt for a temperature of around 5000 to 6000K.
Basically, each camera on the market has an automatic white balance mode, whereby the camera will try to select the best white balance setting all by itself. Every camera also has a bunch of pre-programmed modes, with fixed Kelvin temperatures; we’ll explore all of these modes a little later!
How Does Light Affect Colour?
While for many of you it may seem a weird question, you should know that light comes in different colours. Well, actually that is incorrect. Pure light is white; period. The point is that most of the light sources you’ll be using when shooting (e.g. the sun, lamps and flash) don’t emit pure white light but instead come with different colour casts. Even if you don't notice it, they will have an effect on the colours in the scene.
With a bit of experience, you’ll quickly learn which sources of light emanate with warmer colours and which are cooler, so you can set up the white balance on your camera accordingly!
- See also: Beginner's Guide to Camera Settings
Why You Should Adjust the White Balance
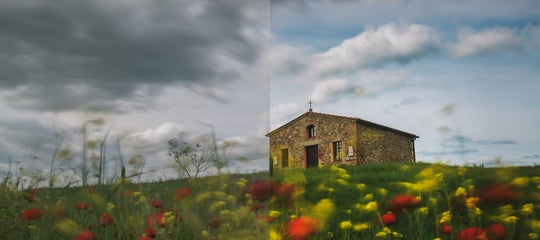
As some people say – sometimes an example is worth more than a thousand words. Check out the image below. On the right side, you can see the picture as it came straight out of the camera. On the left side, you can see how it looks with the right white balance after I changed it with post-processing software.
 Left: Adjusted white balance in post-production. Right: Original white balance in camera. Photo by: 'Leonardo Papèra'.
I would gladly have a chat with “purists” about the fact that post production is evil and camera shots are the only ones that are showing reality but this is not the right place nor the right time, so let’s just skip that.
As you can see, the base file presents with a warmer colour cast that is spread all over the image. This is because the camera read the tones of the image as cold and tried to correct them with a warmer white balance.
During editing, I changed it in favour of a more natural, cooler colour cast to recreate an atmosphere similar to the one that I witnessed when I was shooting in-field. As you can see, just a minor change to the white balance can result in an enormous improvement to your pictures.
White Balance In-Camera vs. Post-Processing
So far, I’ve been very specific about the fact that I changed the white balance of the picture during the post-processing phase, rather than when shooting in-field. You might be wondering why I chose to do it in this fashion. After all, it's much more satisfying to take an image with the correct colours without having to post-process it, right?
While I support that opinion, the problem is that sometimes, you won't have enough time for regulating and changing the white balance according to every shot that you take. This is where setting the white balance can become tricky. Whenever you change your composition or course of light, you will have to find the right white balance again and that can be time-consuming. So, how should you proceed?
Well, that will depend a lot upon which image format you are recording in. Let me explain.
RAW Format
If you are shooting in RAW, that means that yo'll be post-processing your images anyway, so you may as well leave your white balance setting on "auto". This will allow your camera to deal with the colour temperature in-field. If the camera gets it wrong, then you can correct it with a slider in editing software later on. It's as easy as that.
RAW files record the white balance that the camera has chosen but they also record all of the other data available in-field. This means that if you change the white balance to be warmer or cooler during editing, then no information or detail will be lost. It won't degrade the image or lead to loss of quality at all. You'll only be affecting the colours.
JPEG Format
When you shoot in JPEG, things get a little bit more tricky. Since you won't be editing your images, you'll need to achieve the correct white balance at the moment that you take the shot.
Sometimes, the auto white balance setting on your camera will be accurate. Other times, you'll have to manually select the Kelvin (if your camera has that feature), otherwise you'll have to choose one of the available presets.
To regulate the white balance, you can also use white cards like many photographers did back in the golden days of film photography. For that, you'll need to place a white card in front of the lens to help the camera understand what is white and what isn't. It can then figure out what the best colour temperature will be for the rest of the scene.
Whether you choose to regulate the white balance with white cards or manually in the camera, it will take you way more time to get it right than shooting in RAW format and fixing it later on in post production.
Auto White Balance & Camera Presets
I've mentioned several times now that on many camera models, you will have a series of white balance presets that you can use in addition to automatic white balance. We'll run through each of these now so that you can gain a better understanding of when they should be used.
Automatic Mode
Let’s start with the easiest one. The automatic mode will basically try to guess what the correct white balance is for the scene. You won’t have to do anything except select the auto white balance setting and you'll be good to go!
After you take the shot, there will be two possible outcomes:
-
The white balance will be perfect. In this case, you can keep shooting.
-
The white balance will be off, in which case you should go into the settings and try some of the other presets.
Tungsten
The tungsten mode will set your white balance around 3000K degrees, which means you should only use it in cases where there are really warm sources of light, such as tungsten light bulbs (hence the name), candles, etc.
Fluorescent
A slightly less extreme preset than the tungsten one, the fluorescent mode will set your white balance to 4200K degrees. It can be used to contrast strong warm lights if the scene appears to be too orange.
Daylight / Sunny
As I mentioned before, when shooting outside during the day with direct sunlight hitting the scene or your subject, the daylight mode will be the best setting to use for the occasion. It will set the white balance to around 5000K degrees.
Flash
Unsurprisingly, the flash preset is the best one to use when you have some type of flashlight on your subject. By choosing this mode, the camera will set the white balance at 5500K degrees.
Cloudy
When shooting during cloudy days, you’ll need a slightly different white balance than for sunny daylight shoots. The cloudy preset will set the colour temperature of your camera to 6000K, in order to give your images an extra pop of warmth.
Shade
The shade preset sets your camera’s white balance to 8000K. It is basically the opposite of tungsten. If you see strong cooler colour casts in your images, which are typical of blue hours or shaded areas, then this mode will help you to take out those unwanted blue tones and achieve a more natural look.
How to Set Custom White Balance
If you've tried all of the presets above but you still haven’t found the perfect white balance for your shot, don’t give up as there is still one more option available: the so-called “K” mode. When selecting this mode, you’ll be able to manually set the colour temperature of your picture by changing the Kelvin degrees to the specific amount that you need.
 Setting a custom colour temperature is the most accurate way of achieving correct white balance. Photo by: 'Leonardo Papèra'.
How will you know what amount you need for each situation? Well, after you've used it a few times, you'll get the hang of it. With a lot of practice, you won't need to do as many test shots as you would normally need to achieve the perfect white balance.
How to Change the White Balance in Post Processing
Post-processing allows you to physically change the colour temperature according to your own creative style with just a simple click. For the sake of this article, I’ll use the three most popular editing programs from Adobe to provide examples of how you can change the white balance in post-processing.
Adobe Lightroom
 The Temp slider in Adobe Lightroom is highlighted. Photo by: 'Leonardo Papèra'.
With Adobe Lightroom, changing the colour temperature couldn’t be easier. After you open a picture in the “Develop” section, the first slider you will see is the one named "Temp" in the develop panel. This is the one you should work with. As the name suggests, you can play with the temperature of the image by adjusting the slider. If you move it to the left, then you'll cool down the tones. Moving it to the right will give more warmth to the colours.
Adobe Camera RAW
 The Temperature slider in Adobe Camera RAW is highlighted. Photo by: 'Leonardo Papèra'.
As you can see from the screenshot, the procedure in Camera RAW is basically identical to the one we previously talked about for Lightroom – the only difference is that you won't need to enter the "Develop" panel. Instead, you'll see the sliders straight away. Just move the 'Temperature' slider to find the best white balance for your image. You can also play with the 'Tint' slider if you have some unwanted green or magenta colour casts.
Adobe Photoshop
 The colour balance layer in Adobe Photoshop. Photo by: 'Leonardo Papèra'.
Most of the time, things are a bit more complicated with Photoshop. On the bright side, they can also be more precise.
Here, you’ll find the “Colour Balance” adjustment layer under Layer → New Adjustment Layer → Colour Balance. With this powerful tool, you’ll be able to change the white balance within different areas of the image (such as the shadows, the midtones and the highlights) with the use of masking. Also, you won’t have just one single slider. For each area, you’ll be able to play with more colour casts in order to achieve the best possible white balance for every part of the image.
Creative Uses of White Balance
 White balance can be used to create drama. Photo by: 'Leonardo Papèra'.
White balance is not only a powerful tool that will give your images a more natural look. You can also use it to communicate drama or particular atmospheres to your pictures.
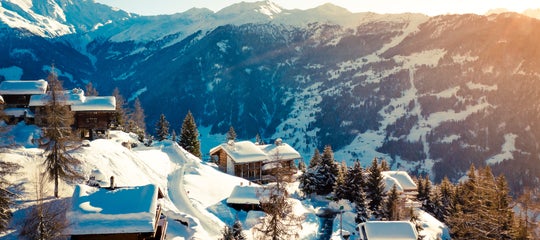
Above and below, you will see two different examples in which white balance has been used as a creative tool to express mood. In the first picture, you can clearly see that – given the stormy conditions – I decided to go for a “cold look” by using a cooler white balance. In the shot below, I gave the picture a more dramatic look by using an overall warmer white balance, since the sun was just peaking out from the clouds and the light was hitting the walls of the town.
 You can dramatically change the atmosphere of a scene simply by altering the white balance. Photo by: 'Leonardo Papèra'.
Conclusion
As you can see, white balance is an important tool for improving the quality of your images. It doesn't matter what style or genre of photography you prefer to practice; regulating the colour temperature of your images is crucial to communicate atmosphere and other visual aesthetics. By mastering the white balance in every situation, you'll take a big step towards creating more successful photographs. As with everything in life, it may take a bit of experience to fully understand how it works but you'll achieve outstanding results in no time!
About the author: Leonardo Papèra is a landscape photographer based in Italy. You can find more of his work on his website or by following him on Instagram.
Do you prefer to adjust the white balance in-camera or in post-processing and why? Share your thoughts by leaving a comment below!