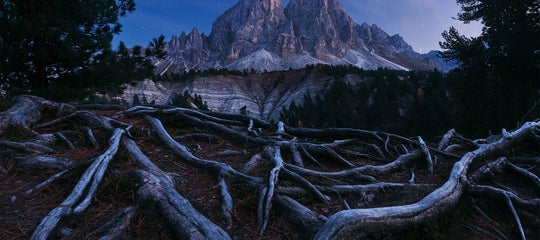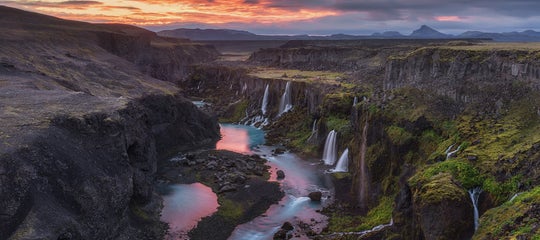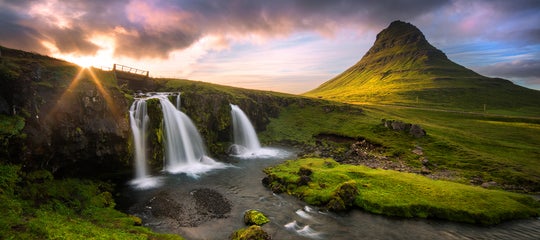
Whether you like it or not, photos need to be post-processed. I won’t even get into the fact that it’s always been like this, since analogue film cameras were in their heyday. Back then, there was just a different way to do it. The bottom line though is that post-production is a non-excludable, fundamental part of the creating process, which you’ll have to deal with if you want your images to stand out.
- Discover these 8 Awesome Tips for Landscape Photography Using a Smartphone
- Learn all about How to Become a Professional Landscape Photographer
- Check out this 7-Day Senja Summer Hiking Photo Tour
In this article, we’ll focus on post-processing in landscape photography, which generally has a very peculiar workflow. As a bonus, at the end of the article I’ll show you how I generally post-process my pictures, taking one of them from the beginning and editing it all the way until the end, so that you can see how to do it yourself, step by step.
What is Post Editing in Photography?
When we talk about post-production of an image, we refer to everything that happens (to the photo) after the shooting phase.
It’s a fact that many people, both photographers and non-photographers alike, actually refer to the words “post editing” as some kind of non-sensical wizardry that only computer nerds and “fake photographers” (is that even a thing?) use. Meanwhile, “real photographers” get the shot right in the field, without the help of editing software.
Let's take a look at an example of the "real" meaning of post-processing. Let’s say that you didn’t get the horizon straight in-field. This could have been because you were shooting in a hurry or from an uncomfortable position. A simple click (literally, it’s one click) in Adobe Lightroom will help you straighten the photo, which you can then proceed to crop a little if there are unwanted objects at the edges.
Now, would you call this wizardry? Would you consider that photo “fake” just because it’s been straighten and cropped? I don’t think so, right?
I think it’s very important that you understand that post-production is a natural act that follows once you capture a RAW image in-field; it’s not something optional that you can choose to do or not. The reason for that is because a RAW file is just recording all of the data in the scene, without any particular adjustments. You can read more about RAW vs JPEG files here. If you want to step up your photography level, then you’ll have to sit behind your computer and work on your pictures.
In this article, I'll spend a bit of time dismantling all the myths and legends that are out there about post-production, since your photos will only benefit from it if you learn how to do it properly.
However, one thing has to be said: there’s a thin, invisible line where post-production becomes digital manipulation and photography becomes digital art. It’s not possible to write down the criteria with which to “judge” what is one and what is the other, as each case should be considered separately.
Why Do We Need to Post-Process Our Images?
Try to make a cake and skip the part where you should bake it in the oven. The cake might turn out well but who will know if it's not cooked? If you leave it raw, I’m quite sure it won’t taste good.
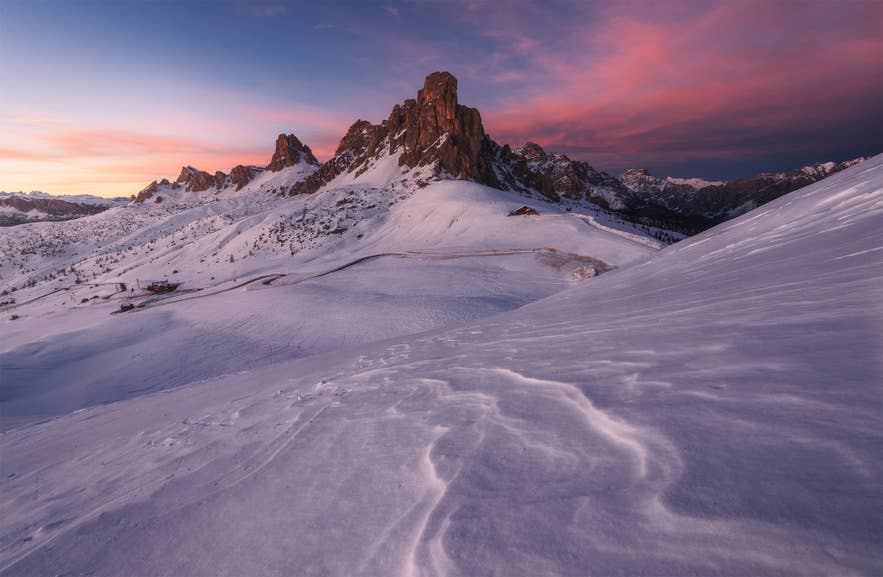 Leaving a RAW file unprocessed is like wanting to bake a cake but forgetting to put it in the oven. Photo by: 'Leonardo Papèra'.
Try also to cook spaghetti and skip the part where you add the sauce. The pasta might be a hundred times better with the right sauce but you’ll never know if you don’t use any. Instead, it will be bland and unfinished.
Let me apologise if the only two examples I have used are about food but you know, I’m Italian and we always think about food! I think you've pretty much understood what I’m trying to say here. The RAW files that you shoot in-field are spaghetti and post-production is the sauce.
As I've already mentioned in the introduction, post-production is a fundamental part of the creative process. Personally, I’d say it's at least a good 40% of what makes the final photo great.
Now, technically speaking, the RAW file that comes out of our cameras is NOT showing the real scene; let me be crystal clear about this, there’s no way you’ll be able to frame the real scene as it is in that precise moment. You can get really close but you won’t frame reality.
Let me explain why. If you decide to shoot in the RAW format, then the output will be an unprocessed image with no contrasts and barely any colour compared to what you are seeing with your own eyes in that moment. That's because the RAW picture needs post-production to come alive. All the information is contained in the file, you just have to bring it out with editing software.
If you decide instead to use the JPEG format instead of RAW, then you can't be proud of yourself because “you are not doing any post-production of your photos”. Technically, you won't be doing any post-processing yourself because your camera will do all the work for you.
In case you weren't aware, JPEG files are automatically edited by the processor of your camera with some very standard and basic parameters, such as “contrast” or “saturation”. The only time when JPEGs are useful is when you are on assignment and you can’t waste time editing your pictures or you have to send them to your agency right away; in all the other cases, shooting in RAW is always preferred.
So, let me sum this up: You can decide to edit the pictures you are taking by yourself or let the camera do all the work for you and settle with the final result. In the first case, you’ll have complete control over the adjustments that you’ll do on your image. In the latter, you can barely do anything apart from changing a few sliders in your camera’s menu.
Do I really need to tell you which one is the best option? There you go, that’s the answer to the question of this chapter.
Types of Post-Processing
Let’s venture a little bit further inside the world of post-production in landscape photography. In this chapter, we'll take a look at the main branches of post-production when it comes to landscapes: single exposures and multiple exposures.
It goes without saying single exposures are generally much easier to work on, since you can focus just on image adjustments such as colours and contrasts. With multiple exposures, you’ll have to deal with image stacking, bracketing, masking and precise selections.
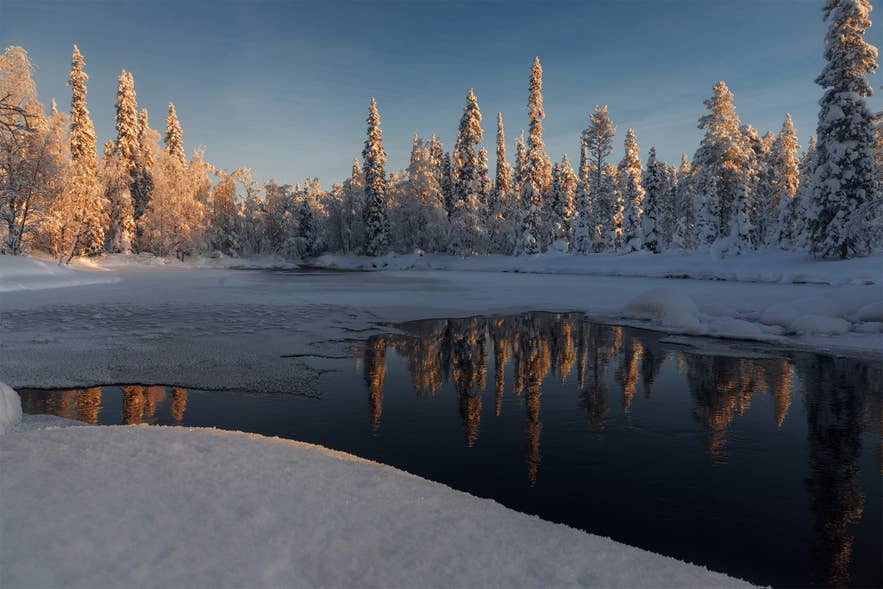 There are two types of post-processing: single images and multiple exposures. Photo by: 'Leonardo Papèra'.
For the sake of this article, I’ll use Adobe Camera RAW for editing the RAW files. I'll then use Adobe Photoshop for final adjustments and selective editing of particular parts of the image.
- See also: Ultimate Guide to Luminar by Skylum
Single Exposures
Let’s start with the easier one: single exposures. I’ll use the following image to guide you through the adjustments that I generally do in 90% of my pictures. This process will help you to achieve better results in post-production.
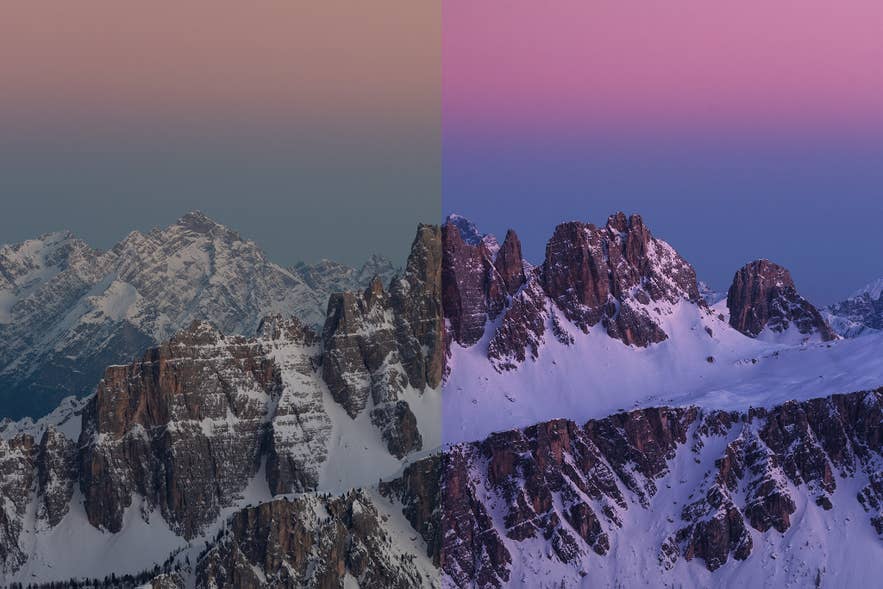 Before and after post-processing. Photo by: 'Leonardo Papèra'.
Raw Adjustments
In the screenshot below, you can see the RAW file before I touched anything, which will give you an idea of the starting point. The first step is to start with basic adjustments in Adobe Camera RAW (or Lightroom, if you prefer).
 Always look at the Temperature and Tint first. Photo by: 'Leonardo Papèra'.
The first things that you should always look at are the Temperature and the Tint. In this case, I was shooting with a Nikon D750, which generally has a strong magenta dominance, though this time it got the auto white balance wrong. It was already the blue hour, with loads of blue-ish hues in the shadowy areas of the frame and a strong magenta cast on the peaks and the sky. The camera pretty much read everything as reddish.
To fix a problem like this, you just need to adjust the Temperature. I moved the Temperature slider a bit towards colder tones and the Tint slider towards magenta. In the screenshot below, you can see how this simple adjustment has already improved the image, with tones that fit better for that time of the day. I also flattened the image a bit more by raising the blacks/shadows and lowering the highlights. This technique will give you more flexibility when working with contrasts later in Photoshop.
The next step in Adobe Camera RAW is to add a bit of clarity to enhance micro-contrasts and give a sharper overall look to the image. For the amount, never go over +20, otherwise you might get a grainy and unpleasant look.
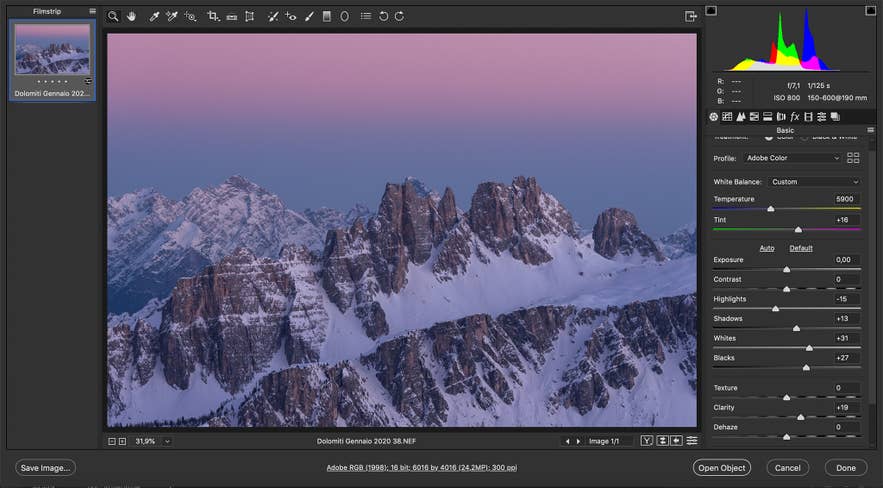 Add a bit of clarity. Photo by: 'Leonardo Papèra'.
The final step is to switch to the Lens Corrections section (between the icons just below the EXIF data) and check the two buttons “Remove Chromatic Aberration” and “Enable Profile Corrections”, just like you see in the screenshot below. It will automatically remove colour aberration (if there is any) and will correct lens “problems” (distortion, for example).
 Remove chromatic aberration and lens distortions. Photo by: 'Leonardo Papèra'.
Photoshop Adjustments
It's now time to “pass the ball” to the mighty Adobe Photoshop. I know that many photographers get intimidated by the plethora of functionalities that this software contains. However, the truth is that we need just a bunch of them to make our images pop out a bit more.
One of the main concepts you should understand when working with Photoshop is how the “Layers” work. Imagine your base image as one white sheet. Each layer that you create will be a new sheet, where you will do things that will affect the base one. How much the base image will be affected by those other layers will be up to you to decide with tools like brushes, gradients or layer opacity.
This is a very brief and incomplete description of what Photoshop layers are but once you get the drill about how they work, it’s going to be easier than you think.
 The curves adjustment layer. Photo by: 'Leonardo Papèra'.
Let’s start with the adjustment that you see in the window above, the one called “Curves”. To create this layer, just go into the top menu bar. Under the Layer section, select “New Adjustment Layer” and then “Curves”.
The most classic curve is the “S curve”. It's called this because it's shaped like the letter 'S'. This technique basically adds contrast by lowering the curve in the shadow section and raising it in the highlights section. If you want to be sure you are not losing any details in the shadows, then be sure to slightly raise the lowest point of the curve.
 The colour balance adjustment layer. Photo by: 'Leonardo Papèra'.
The second layer that we are going to create is a Colour Balance layer. You'lll find it right where you found the Curves adjustment – under “Layer” in the top bar and then by selecting “New Adjustment Layer” and then “Colour Balance”.
With this adjustment, you’ll get the chance to change the colour casts within specific areas of the image. As you can see in the small window, “Midtones” are selected but you can also switch to “Highlights” or “Shadows”. What you choose will depend on which area of the frame you want to work on.
In this specific case, I decided just to work on the midtones. I added a bit of red, magenta and yellow whilst taking out a bit of cyan, green and blue.
Don’t push too much on the sliders, as you can make noticeable changes with low variations in amount. As you can see, I made adjustments by +3/-2/-2, so it takes almost nothing to see a moderate difference.
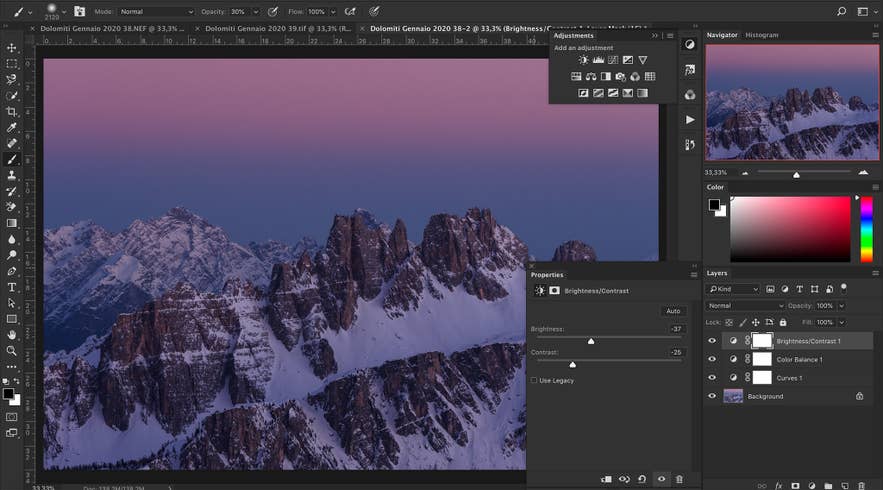 I only tweaked the sliders a little bit for a large effect. Photo by: 'Leonardo Papèra'.
Now you'll enter the most complex part of this Photoshop tutorial: masking. You've got a basic understanding of how layers work, so now it's time to understand the concept of masks. Put simply, layer masks give you the ability to hide (or reveal) parts of the image to the adjustment that you apply.
Do you see those white rectangles in the lower right part of the screenshot, in the Layers window? Those are white masks, which are created automatically when you create a new adjustment layer.
In this image, I created a third layer for the Brightness/Contrast adjustments. I lowered both the brightness and the contrast of the image by quite a significant amount. However, I didn't want the whole image to be affected by this adjustment – I just wanted to enhance the light coming from the right by darkening a little the left part of the frame.
In order to achieve this, I had to mask (hide, in this case) the right side of the image to the brightness/contrast adjustment. As you can see in the screenshot below, the right part of the white rectangle next to the brightness/contrast layer is black. That’s because I used a black, radial gradient (which you’ll find in the left-hand menu bar) and “painted” on the mask to hide that area of the image from the adjustment. This way, only the left part would be affected.
 Painting on a mask. Photo by: 'Leonardo Papèra'.
After these adjustments, I returned to the top menu bar in the Layer section and selected “New Adjustment Layer”. This time, I chose “Selective Colour”, which is an incredibly useful and powerful tool when it comes to working on colours.
Once you’ve opened this adjustment layer in the “colours” section, you’ll be able to select the specific colour you want to work on (Reds, Yellows, Blues, Greens, etc) and change the amount of cyan, magenta, yellow and black.
What does this mean? Well, as you can see in the screenshot below, I decided only to work on magenta tones. I was able to remove a bit of cyan and add a bit of magenta and a bit of yellow. Taking out cyan actually means adding red, since it’s the complementary colour of cyan. Adding magenta actually means removing green. Similarly, adding yellow means removing blue. All these colour adjustments were relative to magenta only, so the only areas where you’ll see these changes applied are where the software locates magenta tones and nowhere else.
I won’t lie: it may be confusing at first and it will take a while for you to get used to this tool. The only way to learn how to work properly with all these sliders is by testing and trying it a thousand times.
 Adjusting the magentas only. Photo by: 'Leonardo Papèra'.
Below is a screenshot where I decided to work only on the whites, pretty much applying the same variations that I made to the magentas.
 Working on the whites only. Photo by: 'Leonardo Papèra'.
And that’s it! These are the tools that you will likely use the most when working in Adobe Camera RAW and Photoshop.
As you probably will have noticed, the adjustments that made the most difference were the very basic variations in Camera RAW, such as colour temperature and tint. You should start by mastering these tools, which are fairly simple to use. That’s where you will really develop the eye for what kind of adjustments an image is asking for.
 The final result. Photo by: 'Leonardo Papèra'.
It’s not about the tools in particular, it’s more about how you use them!
Multiple Exposures
In this section, we'll take a look at the two most common types of multiple exposures in landscape photography: focus stacking and HDR. We'll go through the steps that you need to follow in order to arrive at the point where you can merge all the exposures together for a single base image to work on. From thereon, you can follow the same steps in the previous section to post-process a single exposure.
Focus Stacking
This incredibly useful technique has become quite popular amongst landscape photographers over the past few years. Focus stacking helps to get everything in focus when you have really close subjects in the foreground of your image, which otherwise would be blurry.
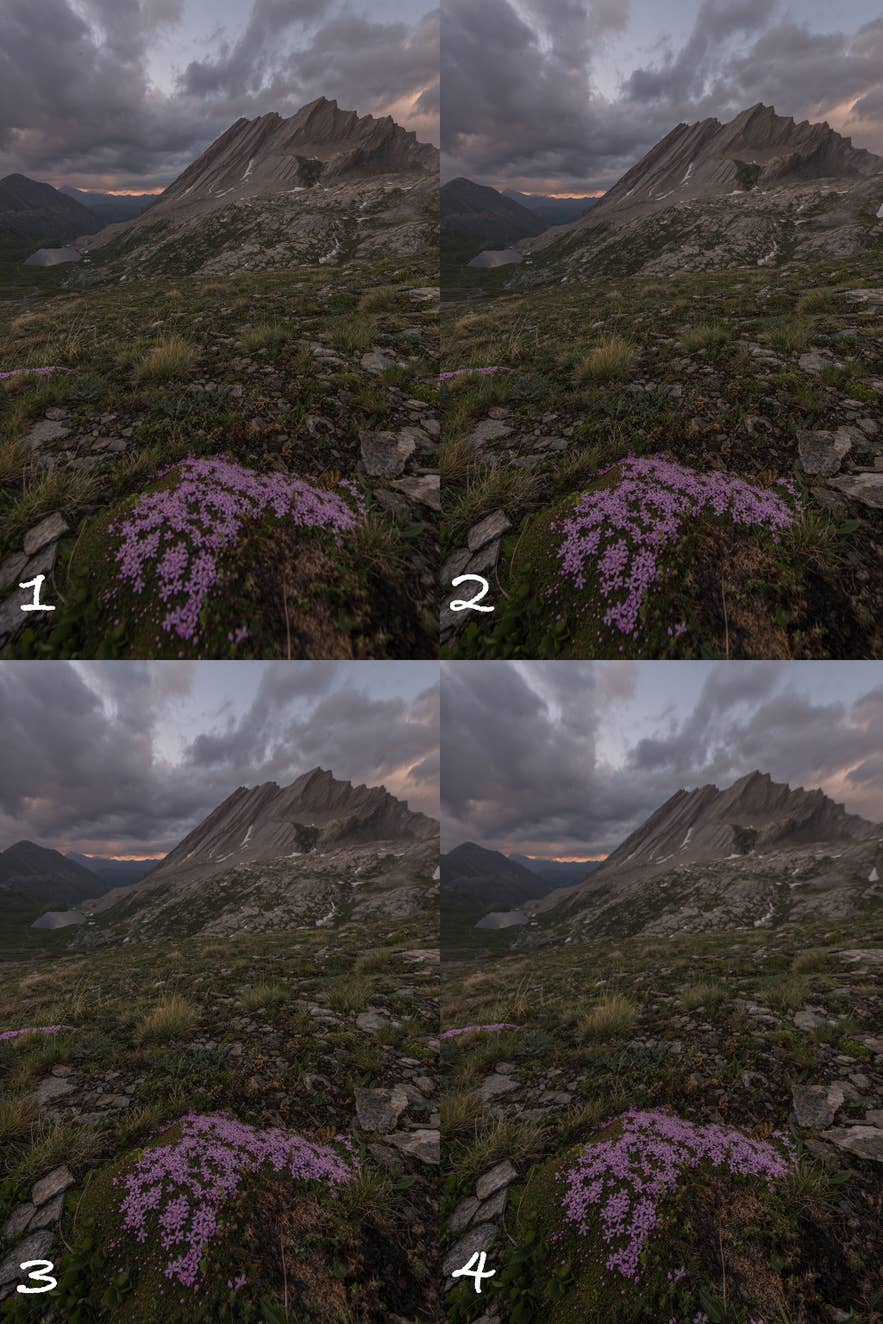 A sequence of four images with different areas of focus. Photo by: 'Leonardo Papèra'.
As you can see in the images above, the classical focus stacking sequence starts from getting the background in focus and slowly switches the focus to the foreground. For more information on how to take a series of focus-stacked images, check out our Ultimate Guide to Focus Stacking.
Let’s assume though that you've already taken your sequence of images. Now we'll go through how you can merge all of these shots into a single image with the help of Adobe Photoshop.
Step 1: Open the Sequence in Photoshop as Layers
The first step is to open all of the layers in one single image, like you see in the screenshot below. To do this, you can open each one of them separately and then go to the “Layer” section of the menu → “Duplicate Layer” → select your base image. You can also select them in Lightroom and with the right click, choose to open them “As Layers” in Photoshop (which is much easier).
 Open the sequence in Photoshop as layers. Photo by: 'Leonardo Papèra'.
Step 2: Align the Images
A very easy yet fundamental step is to select all the layers and under the “Edit” section, click on “Auto-Align Layers”, so there won’t be any differences between each layer.
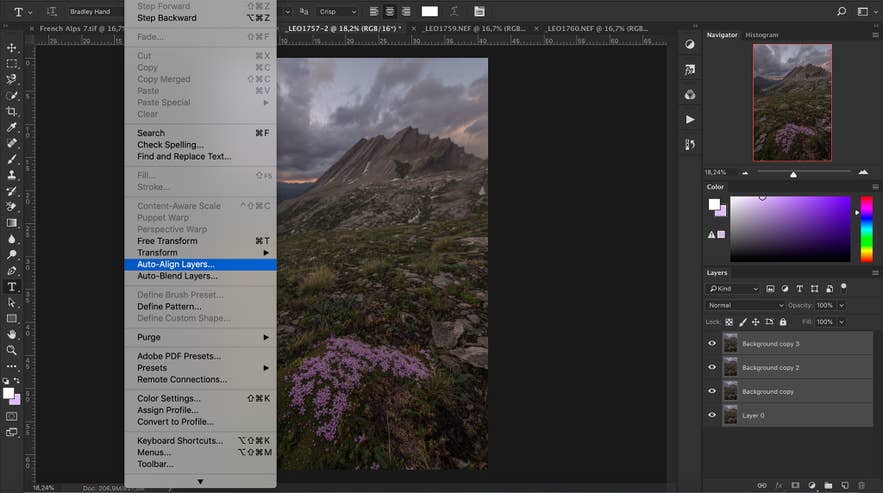 Auto-align the layers. Photo by: 'Leonardo Papèra'.
Step 3: Mask!
There’s no other way to work around this. You’ll have to deal with masking at this point. To do this, simply reveal the focus parts of each layer, until you achieve an image where everything is in focus. The brush tool (in the left bar) will help you during the masking.
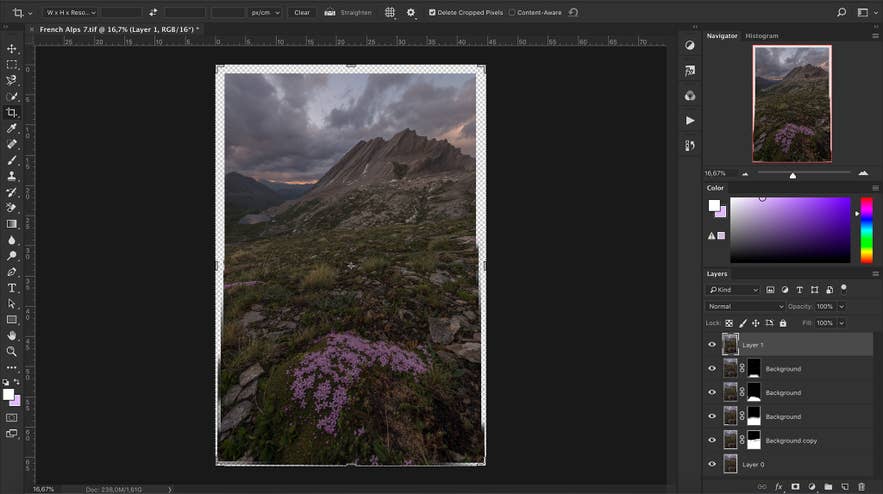 Mask out the unsharp parts and mask in the parts which are in focus. Photo by: 'Leonardo Papèra'.
The final result should look something like in the screenshot above. All the masks have some parts in white and some parts in black, which means that some parts of those layers are visible while other areas are hidden. It can require quite some time to nail the stacking and achieve a decent result, without halos or weird stuff going on somewhere in the frame. Your efforts will be worth it though as the outcome will be incredible!
HDR (High Dynamic Range) Images
Now that we have looked at focus stacking, working with HDR images will be easier than a walk in the park! We won’t even have to use Photoshop in this case, since Lightroom has the best algorithm when it comes to merging different exposures together. Follow these easy steps to achieve a single HDR image out of many exposures!
Step 1: Import the HDR sequence in Lightroom
After you’ve opened Lightroom, on the bottom left corner you’ll find “Import”. From there, you’ll be able to transfer the HDR sequence into your Lightroom library.
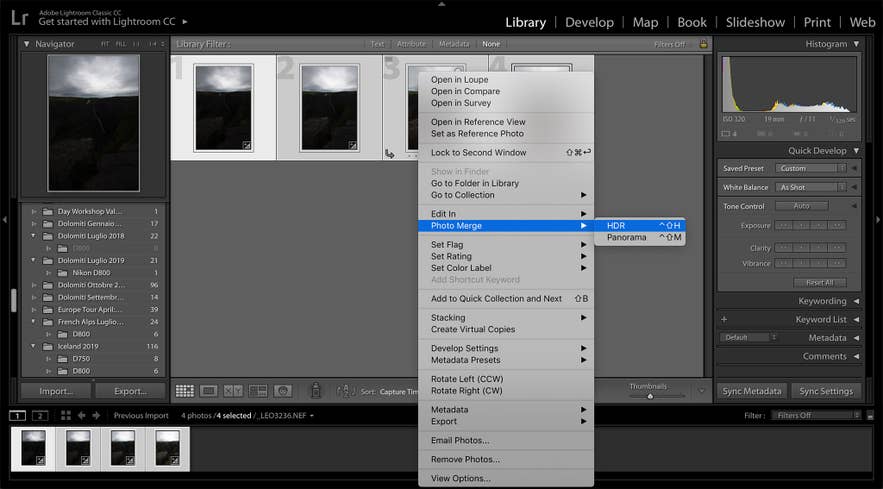 Import the HDR sequence in Lightroom. Photo by: 'Leonardo Papèra'.
Step 2: Create the HDR Image
Once you have all your shots imported, just use the right click and select “Photomerge → HDR”, as you can see in the window above.
Once you’ve clicked on HDR, a new window will appear: be sure to check the Auto Align feature and un-check the Auto Settings (it doesn’t do a great job honestly). Unless you have moved a bit when taking the sequence, don’t use the Deghost function, as it will create artifacts by looking for differences between the shots.
 Create the HDR image. Photo by: 'Leonardo Papèra'.
When you are done with the settings, click the “Merge” button and that’s it! Lightroom will create a workable DNG file, with which you can start making colour and contrast adjustments as you did in the single exposures chapter. Yes, it’s that easy!
- See also: Ultimate Guide to HDR Photography
How to Make a Landscape Picture More Interesting
In this chapter I’m going to share two useful techniques that almost every professional landscape photographer is using, which will help you to create much more interesting photos. These are the Dodge/Burn technique and the Orton effect.
 You can make a landscape image more interesting with two easy techniques. Photo by: 'Leonardo Papèra'.
Dodge & Burn
This powerful technique is really popular amongst landscape photographers and consists of painting over a grey layer with a brush, focusing on the colours (or light) that you want to enhance. Let’s take a look at how it works.
Step 1: Create a Grey Layer with 50% Opacity
Once you’ve opened your photo in Adobe Photoshop, the next thing you should do is to create a new grey layer, where you are going to paint later. To create it, go under the “Layer” section in the top bar and select “New → Layer”.
 Create a 50% grey layer. Photo by: 'Leonardo Papèra'.
At this point, the window above will show up. Change the Mode from “Normal” to “Soft Light” (as shown) and check the “Fill with Soft-Light-neutral colour (50% gray)” box.
Congratulations, you've just created your first dodge and burn layer!
 Dodge and burn layer. Photo by: 'Leonardo Papèra'.
Now, as you can see from the layer box in the bottom right corner of the image above, the dodge and burn layer is ready to be used.
Step 2: Paint!
Using a warm brush with 30% opacity, I've painted in the left side of the frame, right where the light is coming from. I used a very bright colour to enhance the warm colours of the sunrise and the luminance of that area.
 Paint on the layer to dodge and burn. Photo by: 'Leonardo Papèra'.
You can continue to paint in other parts of the image, maybe by darkening a bit of the sky with black to give more drama to the photo or choosing white to lighten areas that you want to emphasise. This is dodging and burning!
Orton Effect
Created by Michael Orton, this effect has taken many different names over the past few years. It's also been described as a “fairytale effect”, “dreamy look”, etc. Basically, the Orton effect involves adding a bit of blur to the image to create a soft, smooth look, which I assume can be called “dreamy”. Follow the next steps to achieve this look!
Step 1: Gaussian Blur
Applying the gaussian blur is a good 80% of the process. The first (and fundamental!) step you should follow is to create a duplicate layer, so that the original one won’t be affected by the blur. You’ll find the “Duplicate Layer” option under the “Layer” section in the top bar.
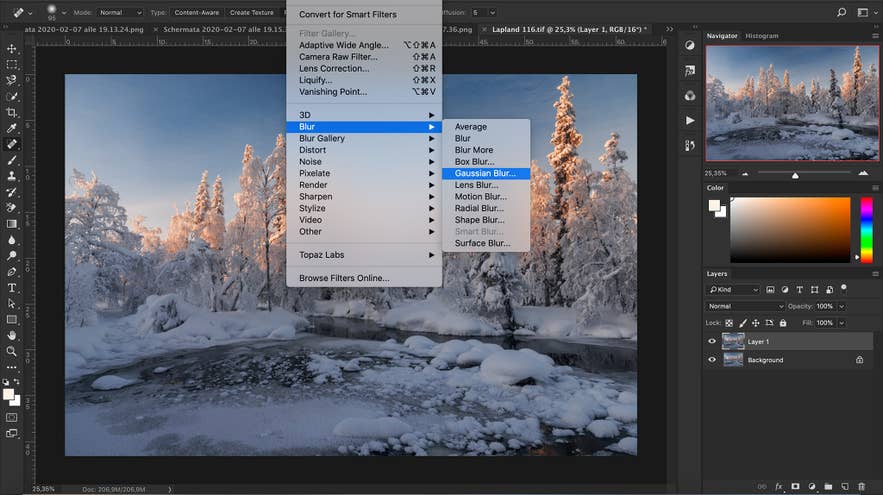 Create a gaussian blur layer. Photo by: 'Leonardo Papèra'.
After you have created a copy layer, go under the “Filter” section (still in the top bar) → “Blur” → “Gaussian Blur”.
 Apply the gaussian blur. Photo by: 'Leonardo Papèra'.
Now this small window will appear. To choose the Radius, there’s a general rule that says you should use the same amount as the megapixels of your camera. For example, this image was shot using a Nikon D800 which has 36 megapixels, so I went for a gaussian blur radius of 36 pixels.
The rule is sketchy, so don’t worry if you don’t precisely select the megapixel amount of your camera. When you’re done click on OK, and you’ve added the blur!
Step 2: Lower the Opacity and Change the Blending Mode
Now that you've applied the blur, you're probably wondering what the heck you’ve done wrong. Everything is blurry.
Don’t panic! If you check the layer window in the lower right side, you’ll see the “Opacity” slider where you can select the percentage of opacity you want to give to that specific layer. For the Orton effect, I recommend never going over 10-15%.
 Lower the opacity and change the blend mode. Photo by: 'Leonardo Papèra'.
After you set the opacity, it’s time to change the blending mode. To do that, just slightly move your mouse towards the left (in the window up here, where it says “Overlay”, right next to Opacity) and a long list of different blending modes will appear. To give a small “punch of contrast” to the image, I recommend using the Overlay mode. If you want to brighten up the frame, then the “Screen” mode is also a valid option.
Post-Processing Workflow
As you've probably seen by now, this is how my Photoshop interface looks. The order of all of my windows greatly improves my post-processing workflow.
 Set up your windows to improve your workflow. Photo by: 'Leonardo Papèra'.
The most important window is the Layers one by far, followed by the colour selection and then the Navigator/Histogram. The icons next to the Navigator on the left are actually shortcuts: the first one is for Adjustments layers (highly recommended!), while the other ones are for the history, the actions and the channels. I highly recommend you that you use the history if you do something wrong and want to return back over your steps!
While this order of windows works for me, you might find a different set-up that works for you. However you decide to arrange your windows, make sure that it fits your workflow and doesn't hinder you in any way. It's best to have easy access to all the tools that you use on a regular basis, so you won't slow yourself down unnecessarily.
Conclusion
Let me repeat myself one last time, before closing the article: post-production is vital to improving your photography level! Consequently, you need to spend a good amount of time learning how to properly create your workflow and how to develop your personal style with the experience.
 Post-processing will help you achieve your own style in landscape photography. Photo by: 'Leonardo Papèra'.
I hope with this article has given you (at least) an understanding of the very basics of post-production so that you will have a good idea of how to proceed when you open up your images at the computer.
About the author: Leonardo Papèra is a landscape and nature photographer based in Italy. You can find more of his work on his website or by following him on Instagram.
What's your workflow for post-processing your images? Is there a particular program that you like to use? Leave a comment with your thoughts below!
