This guide is aimed at photographers seeking to process their photos in Luminar. Luminar also offers a library module and can be used as complete stand-alone software to both catalogue and edit your photos. In this guide, we’ll only be discussing the processing part. This guide describes both basic and advanced editing in Luminar. As Luminar has a lot of tools to make it extremely simple to get quick decent results, it can also go very in depth and offers a lot of great tools for advanced editing. Basically, you can do everything.
- Check out these 15 Tips for Monochrome Photography
- Discover these 11 Tips to Help You Capture Stunning Landscape Photographs
The newest function that Luminar is ‘famous’ for is the sky replacement tool. It lets you replace the sky of your photo in just a few clicks and works incredibly well. But I want to emphasise the fact that Luminar is not about getting results in a few clicks, nor is it just about replacing a sky. Luminar offers a lot of powerful, in-depth tools that are also appealing for advanced users. You might know the Nik Effex bundle, especially Color Efex, previously owned by Google (now by DXO). Luminar is basically similar software and offers most functions and modules of the Nik bundle, but with more regular updates.
This guide is all about how to use the newest version of Luminar, which is Luminar 4. If you’re using Luminar 3, then this guide will still work for you but keep in mind that you might be missing some functions (like sky replacement and AI structure) that are discussed in this guide. Also, the layout looks different and more organised but most of the tools are the same.
If you want to try out Luminar, you can download a free trial. If you decide to buy Luminar, use the code DROSLUMINAR at checkout to receive a $10 USD discount.
Using Luminar as a Plugin
As mentioned above, Luminar can be used as standalone software or as a plugin for Photoshop and Lightroom. Using Luminar as a plugin is very convenient, as you can do very basic edits in Lightroom first (lens corrections, etc) and then simply right click -> edit in -> Luminar. After you do your edits in Luminar -> save and pop right back into Lightroom. This workflow is preferred by most photographers but Luminar also offers their own cataloguing tool which gets better with every update.
Basic Functions
Luminar’s basic interface is very straightforward and easy. When you import an image, you will see the following interface.
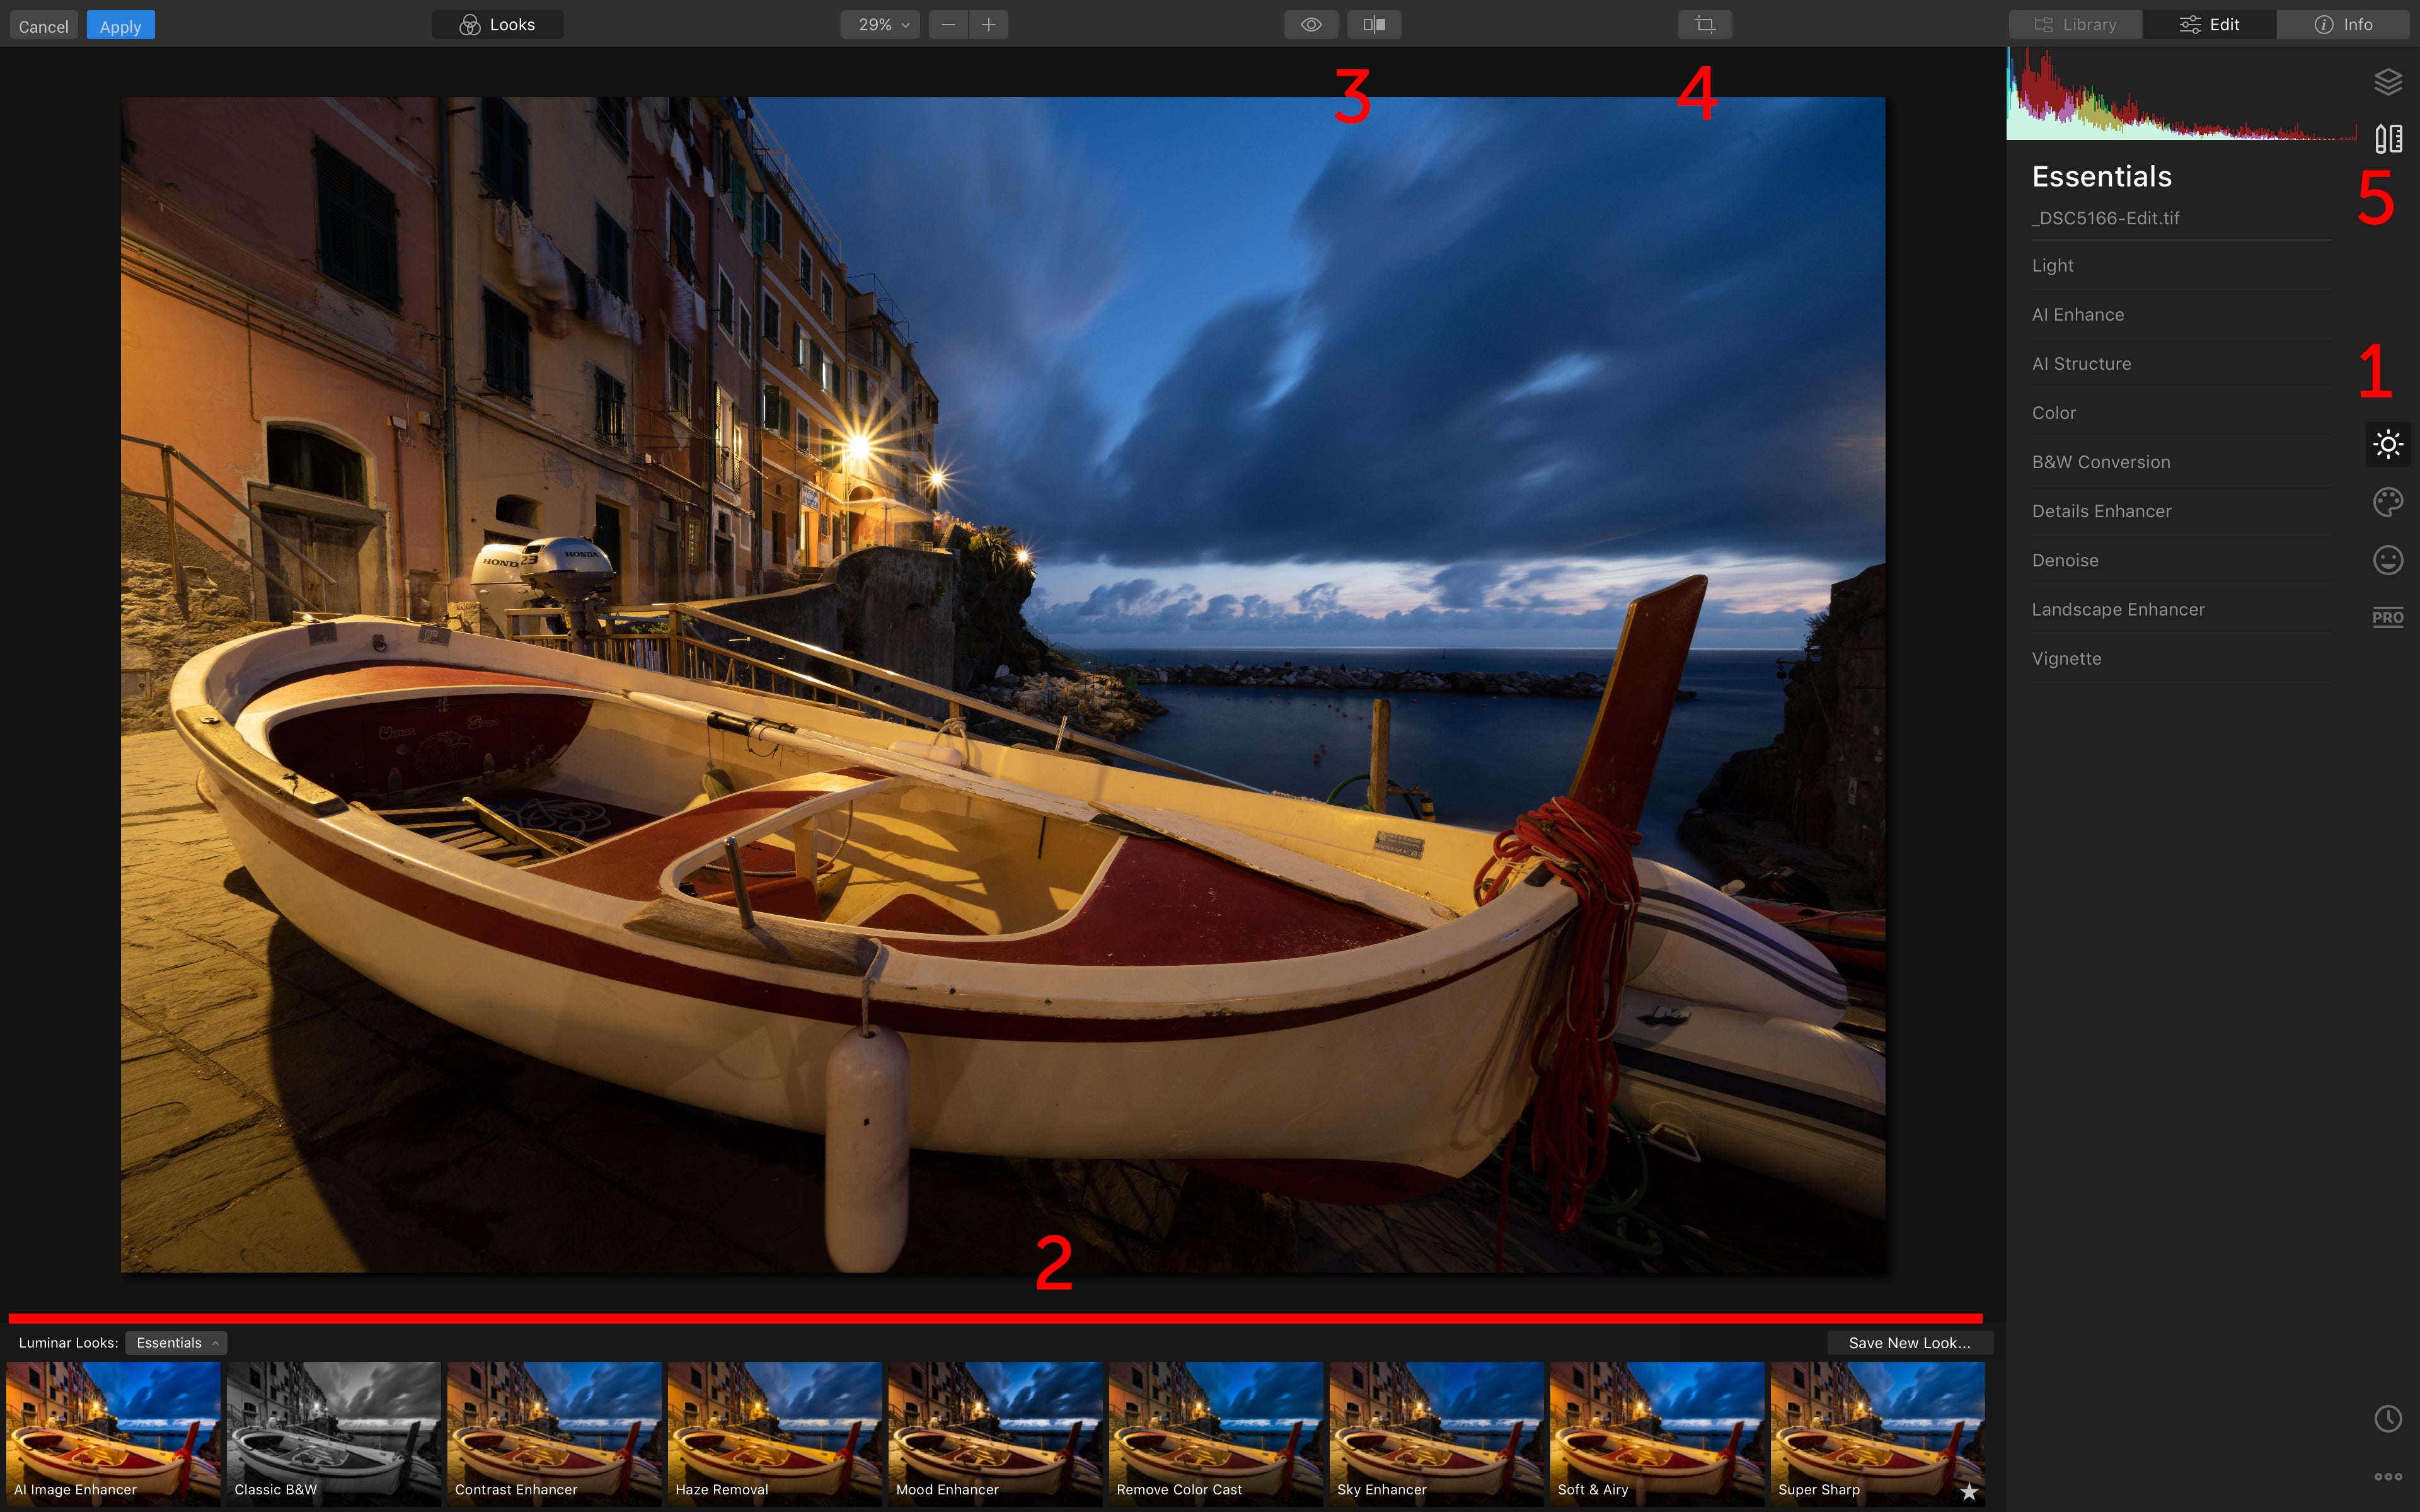 The Luminar interface. Photo by: 'Albert Dros'.
-
All the tools in Luminar are categorised in different categories. You see the essentials panel normally, and you can click the other buttons for the other panels: Essentials, Creative, Portraits and Professional.
-
You can find the so called ‘Luminar Looks’ here. They’re presets that you can use to apply a bunch of edits to your photos right away to get fast results. Luminar comes with a bunch of free looks. You can find more looks on Luminar’s website. Luminar looks can be great if you’re still a beginner at processing and want to see how different functions in Luminar are used to get certain results. I also created a Looks pack specifically designed for forests. You can find more info about it here. You can also save your own edits as a Look so you can apply the same edits to different photos. Simply click ‘save new look’ on the bottom right to save your own look.
-
Here you can find the before/after buttons. Use them to check your original file compared to your edits.
-
The crop tool for if you need to crop in your image a bit or slightly rotate it.
-
On the top right, you can see the Layers and Canvas buttons. Yes, Luminar can even use Layers, just like Photoshop. Layers are useful for when you want to stack multiple edits on top of each other. Think of multiple gradients on the same sky, etc. You can create multiple (adjustment) layers to put more edits. At the Canvas panel, you can remove distortion, straighten lines, de-vignette (some lenses standard have vignetting) and change the geometry of the image.
Editing
This guide will be mostly about processing your image. We’ll go over most of the editing tools in Luminar and explain how to use them in your image. This is why we’ll mostly talk about 1 in this guide.

Before we start discussing all of the interesting categories and panels, it’s essential to know that you can always mask out your adjustments with a mask. Almost every adjustment has an ‘edit mask’ button. With this, you can brush out parts that you don’t want to be included in the image, or simply add a gradient mask.

Another thing you should know is that every panel you’ve done edits to will light up white instead of grey, so you can easily see that you’ve modified these panels.
In this example, the Light, AI Enhance and Details Enhancers panels were modified. Their text is white compared to the rest (grey) which was not modified.
Essentials Catagory
The first Category ‘Essentials’ is very similar to the editing tools we can find in Lightroom or Adobe Camera RAW.
When we open ‘Light’ panel, the familiar sliders pop up to change white balance, contrast, exposure, highlights and shadows. Use this for basic adjustments on your photo.

On most panels, you can find the ‘advanced settings’ button. Click this for extra options. In the Light panel, you’ll see the contrast curve pop up when you click this button.
If you’re wondering where the Vibrance and saturation sliders are, they’re a little bit at the bottom when you open up the Colour panel. Here you can also find the HSL sliders (when you click on the advanced settings) to adjust separate colours.
There are a few interesting panels here that immediately show that Luminar can do much more than Lightroom. The features that jump out here are AI Enhance, AI Structure, the Details Enhancer and the Landscape enhancer.
Luminar is very good in automatic masking of parts of your image to apply local adjustments.
AI Enhance
The AI Enhance has 2 very simple sliders: the AI Accent and AI Sky enhancer. With the AI Accent slider, Luminar automatically adds contrast, brightness and some adjustments to basically make your image look ‘better’. Yes, there is not much control about the separate aspects with this slider but its results are often quite impressive.
With the AI Sky enhancer, Luminar automatically detects your sky and adds contrast and some clarity to it (depending on how the sky looks). This is again a very simple function that works incredibly well if you want to make your sky a bit dramatic. In general, Luminar does an amazing job in detecting your sky. This saves you time masking out the sky and doing all of this manually.
Here is an image before AI Enhance:

Here it is after AI Enhance has been applied:

With just 2 simple sliders, we added contrast, brightness, increased the shadows and added some punch. Basically, Luminar applies edits where it thinks it's needed to get you a quick result and a ‘better’ image.
AI Structure
This panel also has 2 sliders, which can be compared to Lightroom’s clarity and texture sliders. However, it does a much better job. Luminar has a better algorithm of detecting where it needs to apply more detail and where it shouldn’t. This way, it doesn’t easily create auras around edges, that you often see in Lightroom when you push clarity. The AI Structure sliders add more texture and clarity to your image.
Landscape Enhancer
In this panel, you’ll find some handy tools that can be nice to enhance your landscape shots. The Golden Hour tool adds some warmth to your image; it doesn’t just change the white balance. Rather, it makes light tones warmer but keeps the shadows in tact. In this panel, you’ll also find the Dehaze tool (that you might know from Lightroom) and a Foliage Enhancer slider. With this slider, you can enhance the greens or give them a different colour tint. This can be useful for forest images or images with a lot of plants in them.
These are the very basics of Luminar. Let’s take a look now at the Creative Category.
Creative Category

This is where it gets fun. In this panel, you can literally go crazy with your image. Panels that pop out immediately are AI Sky Replacement, Sun Rays, Glow and Fog.
AI Sky Replacement

One of the most controversial topics of photography online is replacing the sky of your photo. Love it or hate it, this tool works very well. It detects the sky and the light situation of your image and you’ll be able to replace the sky with a sky of your interest.
Luminar offers a bunch of ‘preset’ skies that you can use, but it is recommended to use a sky that you have photographed yourself, so you’ll not end up using the same sky as anyone else.
Note that this tool is also very handy for exposure blending. Imagine having 2 exposures, one with an overexposed sky and one with a properly exposed sky and a dark foreground. You can use the Sky Replacement tool to quickly identify the sky and replace it with the sky of your darker exposure.
Here is an example before I used the Sky Replacement tool:

Here it is again after sky replacement:

Luminar almost perfectly detects the edges of the sky and replaces it. It even automatically ‘relights’ the image and the result is almost perfect. There are a bunch of sliders to tweak your image. Make sure to check out the ‘advanced’ settings as usual. When you’re taking portraits and want to replace the sky in a portrait, the ‘Defocus’ slider is very useful to get the out of focus sky.
Sunrays
Another powerful tool in Luminar is the Sunrays function. With a few clicks, you can create sun rays in your image. This tool is recommended to be used in images that already have nice light as a base, and preferably even some sun rays. It works great to enhance the light that is already there. Use it with flat light and people will easily spot it’s fake.
An example before the Sunrays function was applied:

Here is the same image after the Sunrays function was applied:

By placing the sun in Luminar on the real position of the sun, the light rays get enhanced. You can control the colour, length and number of sun rays. Experiment but try to keep things natural.
Now let's quickly go over the rest of the panels in the creative module.
Matte Look
If you’re into that ‘Instagram’ look that you see a lot of people using, then this is the tool for you. You see a lot of faded tones and colours and crushed blacks. This is something you can achieve by using the Matte Look panel in Luminar. This panel consists of two simple sliders to give a quick result.
Mystical
Adds a certain glow and contrast to your image to make it look like it has come straight out of a horror movie. This also sometimes works well on foggy tree scenes.
Colour Styles (LUT)
LUTs are used in the movie industry to give the video a certain look. LUTs are nice if you want to simulate a film look. Luminar includes a lot of custom LUTs that you can try out. If you’re using certain LUTs in video, you can also apply your own custom LUTs.
Texture Overlay
To overlay a texture on your image. I personally never use this panel.
Glow
Adds glow to your image. You can control the colour of the glow. This glow can be used as the so called ‘Orton effect' in landscape photography. However, it is recommended to use the true Orton glow that you can find in the portrait category (more on that later).
Film Grain
A simple panel to add some grain to your image. This can work well if your image is already rather noisy to kind of hide the noise pattern behind the grain. A bit of grain can also help when you want your images to have kind of a ‘film look’ and they are too clean.
Fog
Puts a haze layer over your image. Use with extreme care because it often looks not great when you push the slider. If you want to give your image a dreamy look, you can use this slider with an extremely low amount.
Portrait Category

Below the Creative Category, you can find the Portrait Category with tools designed to enhance portraits.
Firstly, there is the AI Skin enhancer. You might particularly like this one as it smoothens the skin with a simple slider and has a tick box to remove any small pimples or dots on the skin. It works very well and you can create a super smooth skin effect within seconds. Beware to not push the slider too far, or it easily becomes fake looking. Also, if you use this slider on close-up portraits, people can quickly lose the fine structures on their skin. Using this on close-up portraits is therefore not recommended.
The Portrait Enhancer allows you to basically enhance and change everything in someone’s face. Luminar will automatically detect the different parts within the face and you can change them to your desire. You can even make the face slimmer, the eyes bigger, etc. Again: keep things subtle! Or it will easily look out of proportions.
Another great tool in this category is the Orton effect. With this tool, you can add different kinds of glow to your image. Though this tool may be found in the portraits category, it is not just for portraits. It’s often used in landscapes to create a bit of a dreamy image. At the top, you can select two types of Orton effect. Experiment with them in combination with the softness and the amount. You can also add contrast and saturation to the glow effect. If you want to give your images kind of a dreamy effect, the Orton effect can be useful. Think of images that have a fairytale look, like forests. In my Magic Forest Looks, I use different kind of glows to give a dreamy look to forest images.
Professional Category

Last, we have the professional category. It has kind of a ‘scary’ name as it might scare off people who think they’re not professionals. But I can assure you: these tools are nothing to be afraid of.
The most interesting tools in this category are the Advanced Contrast, Split Toning, Colour Enhancer and Adjustable Gradient.
Advanced Contrast
The advanced contrast tool is great for adding contrast in specific parts of the image. Think of it as luminosity masks. Luminar creates its own luminosity masks to separate the shadows, midtones and highlights and lets you add contrast in the with sliders separately . You can also change the balance of each of them. With balance, Luminar means brightness. You can make the separate tones of the images darker or lighter. You can already do this in most basic editing tools (like Lightroom) but you can’t add separate contrast to these areas, which is what makes Luminar stands out in this regard.
Split Toning
Split toning is used to give different colour tones to the dark and light tones of your image. This can work great in images with a lot of contrast. For example, in a contrasty image, you can give some warmth to your highlights, and cold tones to your shadows to simulate stronger sunlight. Split toning is also often used to get a similar look across different images. You can do this by slightly adjusting the colour of the shadows and highlights, without the viewer even noticing it.
Adjustable Gradient
If you’ve used Lightroom or Adobe Camera RAW for photo editing, this tool will sound familiar. You can basically use two gradients at once in the tool – one for the top of your image, and one for the bottom. You can change the gradient with the ‘set orientation’ button. Within the gradient, there are a bunch of options you can change, but it's mostly used to darken the sky (or bottom) of images.
Colour Enhancer
The colour enhancer is a very powerful tool to change intensity of colours in your image based on its luminosity. While the Advanced Contrast tool will let you add contrast on areas in your image based on luminosity, this tool will let you change the colour tones based on luminosity values.
With the simple ‘amount’ slider, you can intensify the contrast between the colour tones. Then try moving the ‘hue’ slider and it kind of gives you a polarisation effect. It dampens the strong tones, or makes them stronger. With the warm and cool sliders, you can change the saturation of the warm and cool tones separately. In the advanced settings, you can add very selective split toning to shadows, midtones and highlights of your image.
Here is an example of an image without the colour enhancer applied:

Here it is after colour enhancement:

With the colour enhancer, the contrast between the colours was enhanced and some saturation was added to the warm tones. With the Adjustable Gradient tool ,both gradients were added on top and bottom of the image to focus more on the waterfall in the centre.
Dodge & Burn
With the dodge & burn tool, you can selectively (with a brush) make certain parts of your image darker or lighter. This tool works fine in Luminar but if you do a lot of dodging and burning, then Photoshop is recommended. It offers much more control and is faster.
Examples of Images Edited in Luminar
This was a quick overview of most of the tools within Luminar. You’ve already seen some examples within this guide, but let’s take a quick look at some Luminar tools used in different images.
Forest
Before:

After:

Tools Used:
-
Orton glow (portrait category) to add glow to the image.
-
Advanced contrast (professional) to add microcontrast to the highlights to get the light rays out a bit more.
-
Split toning (professional) to add some coolness to the shadows and make the highlights warmer
-
Matte look to boost the blacks a bit.
-
Vignette to make the centre brighter.
- See also: Ultimate Guide to Forest Photography
Flower
Before:

After:

Tools Used:
-
Essentials: Slightly increase the exposure and add vibrance. Use AI Structure in the opposite way meaning all the strong structure gets removed and puts the focus on the tulip in the middle. Finally add a vignette to add even more focus.
-
Professional: Add a gradient to the bottom, use the Color Enhancer to add separation between the greens and the yellow/reds, and use split toning to get a slightly colder look.
-
Portrait: Finally add a touch of Orton Effect to give the image a bit more of a dreamy look.
Yosemite
Before:

After:

Tools Used:
-
Essentials: Light, to add exposure and balance the image out. AI Enhance to give some contrast to the sky. Color to add vibrance and desaturate the blues that came with it. Landscape Enhancer to add a tiny bit of dehaze. And finally a vignette.
-
Professional: Color enhancer to enhance the colours on the peaks. Split toning to add some blue/purple to the shadows and highlights of the image. Finally some Orton glow (in the portrait category) to add some glow to the image.
-
Finally some layers with gradients were added to get a bit of a darker sky and foreground.
City Shot in Dubai
Before:

After:

Tools Used:
-
Essentials: Light for increased exposure, decreased highlights and increased shadows. Made the white balance warmer. AI Enhance to make the sky darker. Colour to remove colour cast and added vibrance. Details enhancer to add small details for all the little details in the cityscape
-
Professional: Advanced contrast to add contrast in the highlights and reduced them in exposure. This is super powerful for cityscape images. Canvas panel to straighten the image.
- See also: Africa Photo Safaris and Workshops
Tools Used Mostly for Landscapes
As Luminar has lots of tools, it can sometimes be a bit confusing on what tools to use. Different images require different tools but some great tools for landscapes are:
-
AI Enhance (Essentials): Add contrast to your sky or make your sky a bit more dramatic.
-
Vignette (Essentials): Quickly add a vignette to your image. Make sure to place the centre at the correct position.
-
Sun Rays (Creative): Enhance light or sun rays in an image. Use with care but can create some beautiful results when used in the right way.
-
Colour Enhancer (Professional): To add colour separation. Takes some practise to use but is very powerful.
-
Gradient Tool (Professional): Quickly make your sky or foreground darker to put more emphasis on the middle of your image.
-
Orton Glow (Portrait): To add some glow to your image and make it a bit dreamy.
Summary
The trick to post processing is to be subtle and to keep things ‘believable’. You can quickly go overboard with Luminar but it offers very powerful tools that should be used with great care and subtlety. If you master this, then you can get the most out of the software and your image.
Luminar has a lot of tools but the trick is to find your favourites and the right tools for the right images. You'll often use different tools to edit your cityscape images compared to your landscape images or portraits. There are tools for every kind of image.
Luminar is a tool that can very quickly get you some nice results. It can even be used to edit your images entirely. However, for some things, you may need Photoshop. Advanced Photoshop users will probably never or rarely need to use Luminar. Luminar is great at what it does. It offers a simple interface with powerful tools that can be useful for basically everyone.
If you want to try out Luminar, you can download a free trial here. If you decide to buy Luminar, use the code DROSLUMINAR at checkout to receive a $10 USD discount.
About the author: Albert Dros is a landscape photographer based in the Netherlands. You can find more of his work on his website or by following him on Facebook and Instagram.
Learn photography in-field from the landscape photography professionals! Join one of our photography workshops and tours in Iceland!

Albert is a Dutch photographer with an extreme passion for landscape photography. He aims to capture places and certain moments in the best way possible by using his own vision and unique style. His style consists of strong vibrant, sometimes fairytale like images in which he expresses himself. Albert has a background in Design, Video and Animation. He has worked for himself his whole life and has as a Master Degree in Multimedia & Entertainment Technology.
Albert loves to travel. Next to photo tours and workshops he likes to explore the world on his own or with friends. He has a passion for visiting the most beautiful spots in the world, whether known or unknown. Challenging himself is what keeps him motivated. Albert loves planning his shots carefully.
He does this with great detail to make sure his efforts have the highest chances of success. He sometimes plans days, weeks, months or even years to get that particular shot he wants. Challenging himself combined with planning and writing a story of the whole process is Albert’s specialty. He is always looking for new challenges and adventures. He is able to find beauty anywhere in the world: from misty mornings in the forests minutes away from his home to rooftops of the highest buildings in Dubai to remote locations in Iceland or the US. Next to taking photos, Albert also likes to teach and write about photography.
He occasionally writes for the most well known Photography magazines both on - and offline. Along that he has worked with many brands in the photography industry and is an official Sony Ambassador of Imaging.
His work has been featured in some of the biggest news outlets & magazines worldwide, like TIME, National Geographic and Adobe.
