What is a photograph? That’s a profound question. Drilling down on the definition of the word itself begs us to look at the very origins of the morpheme (yes, morpheme).
- Learn Everything you Need to Know About Photography at Vestrahorn
- Discover these 15 Types of Photography to Challenge Your Creativity
The term “photograph” was born from the Greek root phōtos, meaning ‘light’... followed by graphé, which means ‘drawing’. A drawing made of light; that is a photograph, literally. I’ll admit this is a wholly fitting and poetic way to describe what we as photographers do. However, the characterisation itself leaves us with a few subjective holes. Namely, what do we mean by "light”?
More often than not, the human eye gathers the light that it can physically see and sends it along to our onboard computer, the brain. It’s upon this light that we each base our own personal perception in terms of colours and tonal range, highlights and shadows. This visible light is what we use to construct our photographs and in turn begs the question: what about the light that we CANNOT see? Can we manage to make photographs using the light that isn’t readily perceived by our eyes? The answer is yes and it’s easier than you might think.
Perhaps the most well known bit of the light spectrum that falls outside of our visible range is infrared light. Don’t worry, I promise this won’t be a science lesson but rather an introduction to the weirdly ethereal results that you can easily achieve through infrared photography. We’re going to briefly discuss the history of infrared photography and how you can go about making your own infrared photographs using either digital or film.
So sit back, relax, and let’s take a walk into the sometimes unearthly world of infrared photography.
- See also: Interview with Gary Arndt
What is Infrared Light?
Simply put, infrared light is electromagnetic radiation, just as all forms of light happen to be. The reason we can’t see infrared light with our naked eyes is because we are only capable of perceiving a relatively small portion of the light spectrum. Only light which sports a wavelength of around 400 nanometers to about 700 nanometers is what we know as “visible light”. Infrared light has a wavelength range of just over 700 nanometers to about 1 millimetre.
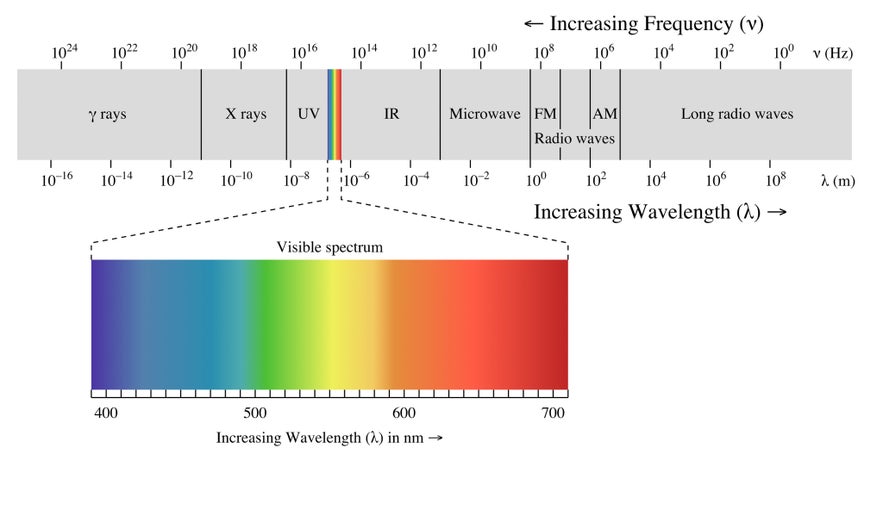 Electromagnetic light spectrum. Photo by: 'Philip Ronan, Wikimedia Commons'.
This is why we can’t see the infrared light that is emitted from our TV remotes and other devices. While it’s there, the light just isn’t visible to us due to its particular wavelength. The same is true for infrared photography. In order to make what is invisible become visible, we must use some special tools in order to capture this type of light as a photograph.
But before we dive in and talk about all the ways you can go about making infrared photos, let us first take a quick look at the history of infrared photography and it’s early pioneers.
A Brief History of Infrared Photography
American physicist and inventor, Robert William Wood, has been credited as the parent figure for infrared photography due to his extensive work in optical physics at the onset of the early 20th century.
 Robert W. Wood. Photo by: 'Vinograd19, Wikimedia Commons'.
While he was not the first individual to develop (pun intended) photographic emulsions capable of imaging infrared light, he was the first person we know of who intentionally went about making infrared photos. He devised a filter, aptly named “Wood’s glass” which allowed infrared and ultraviolet light rays to pass while limiting light rays which fell into the visible spectrum. We still use this filter today in modern “black lights”.
 A black light bulb based on “Wood’s Glass” Photo by: 'Kelly Sikkema, Unsplash'.
Since the days of Robert Wood, there have been many notable photographers who have worked with infrared photography, including Ansel Adams and Minor White. These photographers, of course, made their infrared photos using infrared sensitive black and white film but in more recent times, colour infrared photography has become even more common through the use of digital cameras and false-colour infrared film stocks.
 Infrared black and white film. Photo by: 'Adam Welch'.
This trend doesn’t seem to be showing and signs of slowing down, either.
Let’s have a look at all methods available today for you to start making your own infrared photos using both film and digital cameras. It’s a lot easier (and budget friendly) than you might think. We’ll discuss everything you need including filters and film. We’ll introduce you to how your own digital camera can be modified into a dedicated infrared photography camera and give you some suggestions for the best subjects for infrared photography.
- See also: How to Get Creative with a Fisheye Lens
How to Make Infrared Photos
It might be a bit surprising but there are many ways for you to go about making infrared photographs. As infrared photography becomes more and more well known, there have been a growing number of companies which strive to make infrared photo work more readily available to the masses. Are you looking for an infrared photography app for your smartphone? Or at least to simulate the infrared look. Well, there are quite a few of those out there.
 Infrared photography is even made possible with smartphones. Photo by: 'Adam Welch'.
Yep. Believe it or not, you can usually use your smartphone to take infrared photos and we’ll touch more on that later. For now, let’s look at the two main ways you can get started making infrared photos that are fantastic for beginners.
Infrared Film
If you’re looking for an easy way to begin making infrared photographs with very little upfront investment, then this is the route for you. While not as prevalent as it once was, there are still quite a few manufacturers out there who produce infrared sensitive film. By far, this is the most “meta” form of infrared photography if you are the type that likes to follow in the footsteps of some of the greats.
 Infrared film photography still exists. Photo by: 'Adam Welch'.
Infrared film works by being formulated to record infrared light particles. The catch is that these films are also receptive to light from the visible spectrum as well. To solve this problem and in turn make photos using infrared film, you will need an infrared filter for your lens. An infrared filter works to filter out light which is not in the infrared spectrum. These are readily available from a variety of manufacturers and some are surprisingly inexpensive.
 An infrared filter. Photo by: 'Adam Welch'.
The great thing about shooting infrared photos on film is that it is convenient for those who want to try infrared photography for the first time. Furthermore, it’s perfect for those on a budget because all you need is a camera and lens, infrared film and an infrared filter. That’s it; no other specialised gear required.
Considerations for Shooting Black and White Infrared Film
If you’re shooting black and white infrared film, there are a few things to keep in mind. Here is a list of points to take into account when making photos with black and white infrared film.
1. Focusing Will be Affected
In most cases, you’ll be shooting black and white infrared film simply because this is the type of infrared film which is most widely available. An interesting aspect of this type of infrared film is that your focus points will not be accurate due to the properties of infrared versus visible light. This means that your image will be slightly out of focus, even if your scene is tack sharp in the viewfinder. A way to combat this issue is by using vintage lenses which you very well might be using anyway with your film camera.
Many of these older, manual focus lenses have an infrared focus adjustment indicator, usually a red line or red dot.
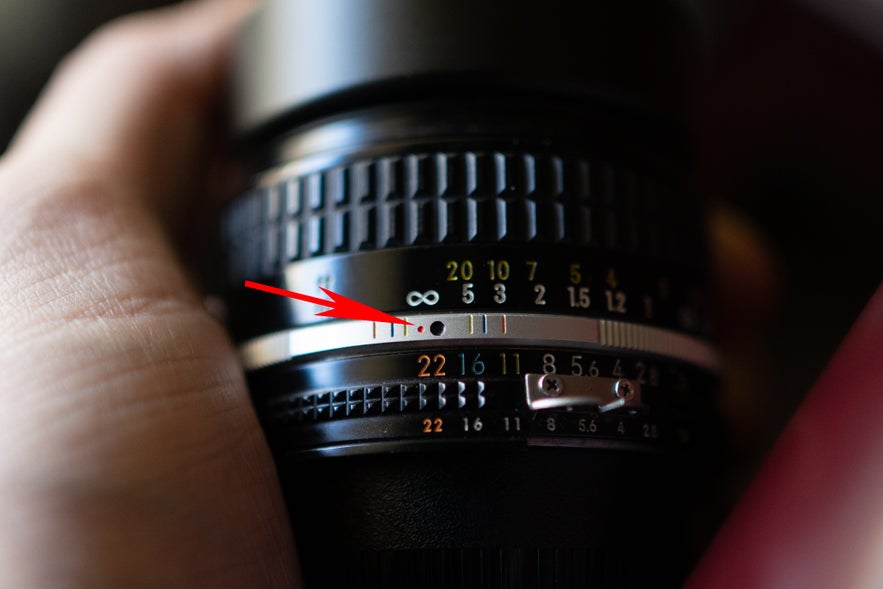 Infrared focus adjustment indicator. Photo by: 'Adam Welch'.
Once you have composed and focused your photo through the viewfinder, simply turn the lens focusing ring to the infrared focus indicator and boom, instantly corrected focus.
2. Your Infrared Filter is Also a Neutral Density Filter
An infrared filter works by constricting the type of light which makes it into the camera. This also means that it drastically reduces the total amount of usable light as well, thus becoming an ND filter. This darkening effect varies between infrared filters, so make sure to adjust your exposure accordingly.
Considerations When Shooting Colour Infrared Film
Colour infrared film is quite different from its black and white sibling. While not as readily available as black and white infrared film, expired colour infrared film stocks can still be sourced. Here are a few things to keep in mind should you venture into the world of colour infrared film photography.
1. Focusing Doesn’t Change
Colour infrared film, sometimes known as false-colour infrared film, or simply “EIR” or “CIR”, makes use of a dye-based emulsion. So unlike black and white infrared film, no focus adjustment is required. Just focus as you would normally with any other type of conventional film stock.
2. You Will Still Need a Filter
Shooting colour infrared film still demands that you use a filter. In fact, the final appearance of your photos will vary greatly depending on the type of colour filter used. In most cases, colour infrared film is used in tandem with an orange or yellow colour filter (the same used with conventional black and white photography).
3. A Special Note on Colour and Black and White Infrared Film Development
Since both of these infrared films are sensitive to infrared light, special care must be taken when developing your film. If you send your film to a lab, make certain the lab is experienced in developing infrared film. This is because many types of commercial film processing equipment feature infrared lights, which can ruin your precious photos.
Digital Camera Infrared
Whereas infrared film photography can be viewed as the cheaper, more traditional way to make infrared photos, modern digital cameras have made both colour and black and white infrared photography extremely simple. Albeit more expensive (generally) in the beginning, digital infrared photography can be more cost-effective in the long run if you plan on regularly pursuing this type of photo work.
 A simulated digital false-colour infrared photo. Photo by: 'Adam Welch'.
There are a couple of routes you can take towards making infrared photos with your digital camera. We’re going to explore both of these methods so that you can understand which one will fit your needs the best. Let’s go!
Digital Infrared Photography with Infrared Filters
Digital cameras are a convenient way to make any type of photo, even with infrared light. The problem is that virtually all modern DSLR and mirrorless digital camera manufacturers intentionally build “IR-pass” filters into their cameras. These small filters cover the digital sensor and prevent infrared light from impacting the image.
However, not ALL digital cameras feature this built-in IR-pass filter and some have relatively weak ones.
 Not all cameras have a built-in IR-pass filter. Photo by: 'Adam Welch'.
That’s right! Your regular DSLR could very well be an infrared photography DSLR. If your digital camera is sensitive to infrared light, then all you need is an infrared filter (just as with black and white infrared film) and you’re good to go.
 Your DSLR may be sensitive to infrared light. Photo by: 'Adam Welch'.
You might be asking, “but Adam, how can I tell if my camera is infrared sensitive? How?! TELL ME HOW?!?!”
Well, all you need is a television remote control. Yes, really.
Warning: Although relatively harmless, never intentionally expose your eyes to infrared light beams for extending periods of time.
While viewing your digital camera's LCD screen (never through an optical viewfinder), point your TV remote at the front of your lens and press any button on the remote. If you can see a light beam emitting from the remote, then this means your camera is infrared sensitive.
 If you can see a light beam emitting from the remote, then your camera is infrared sensitive. Photo by: 'Adam Welch'.
If you can’t see the light, then come along with me into the next section where we’ll talk about the amazing world of infrared camera conversions.
Digital Infrared Camera Conversions
If you’re looking to commit yourself more seriously to digital infrared photography or simply want a more convenient way to go about making infrared photos, then a digital infrared conversion might be right for you. Converting your digital camera to record infrared involves removing the camera's IR-pass sensor filter completely or depending on the conversion, switching it for an alternative filter.
 Converting your digital camera to record infrared involves removing the camera's IR-pass sensor filter. Photo by: 'Adam Welch'.
Converting your digital camera to image with infrared light is by far the most carefree method for making infrared photos. There are no filters needed (although you can use them) and the investment will eventually pay for itself if you plan on making lots of infrared photos. However, converting your digital camera to shoot infrared photos doesn’t come without a few caveats. Let’s take a look at some considerations to bear in mind if you’re considering a digital infrared conversion.
1. You’re Committed to Infrared
Once the infrared conversion is complete, your camera will only be able to shoot infrared photos. Since the infrared conversion involves removing or changing the IR-pass filter of your camera, there is no going back to conventional photography with that camera unless the IR-pass filter is re-installed. However, there are exceptions, such as with full-spectrum conversions... but we’ll save that for another day.
2. Post-Processing is More Involved
Even with an infrared converted digital camera, your images won’t have that “infrared look” directly out of the camera. Most RAW infrared images begin life looking something like this red and magenta monstrosity:
 Red and magenta RAW infrared image. Photo by: 'Adam Welch'.
Terrible, right? While processing images from an infrared converted digital camera is far from difficult, there will be a few things involved such as custom white balance settings and colour channel swaps in order to achieve the finished photo. This can all be conveniently accomplished by processing your infrared photography in Photoshop.
 After processing in Photoshop using the Channel Mixer and custom white balance. Photo by: 'Adam Welch'.
3. Focusing Problems
Just as with black and white infrared film photography, an infrared-converted digital camera suffers from the same focusing issues encountered when making photos using infrared light. However, many reputable infrared conversion companies will also compensate for this as part of the conversion package, so it becomes a non-issue in most cases. Alternatively, “Live View” focussing can also be used to by-pass this problem. In any event, make sure you inquire about this focusing issue should you choose to have your digital camera converted to shoot infrared.
- See also: Ultimate Guide to Focus Stacking
Infrared Photos Using a Smartphone
Yes, you read that correctly. It is possible to make real infrared digital photos using your smartphone. At the same time, this isn’t a very practical method but it bears mentioning. It all goes back to that IR-pass filter we talked about earlier.
 Infrared photos are possible with smartphones. Photo by: 'Adam Welch'.
Most smartphone camera sensors lack the IR-pass filter, so they are capable of recording images using infrared light. Of course, an infrared filter is still needed in order to filter out the visible light rays and herein lies the problem. It’s quite difficult to affix an infrared filter to a smartphone. It can be done, sure, but requires self-engineering some type of filter holder which can be... complicated.
Alternatively, it is possible to simply hold a the infrared filter in front of the camera lens but of course, this introduces potential problems as well; namely light leaks, motion blur and lens hotspots (more on this in a bit). All the points we’ve mentioned about post-processing infrared digital images will also still apply.
So, if you’re the adventurous type who likes to tinker around with photo projects, infrared smartphone photography can be an interesting endeavour.
 Impromptu (obviously) infrared self-portrait of the author using smartphone and 720nm infrared filter. Photo by: 'Adam Welch'.
Now that we’ve covered multiple ways to get started shooting infrared photos, let’s talk about some of the ideal conditions and subject matter that work best for this sort of photography.
Tips for Making Better Infrared Photos
I’m sure you’ve heard it said (probably by me) that there are few true “rules” in photography. The same goes for infrared photography. Since infrared light surrounds us, technically you can make infrared photography portraits, infrared landscapes, infrared street photography and even produce infrared photography at night. While yes, all of these are possible, they might not always be practical; especially if you are just getting started with shooting infrared.
 Simulated false-colour digital infrared photo. Photo by: 'Adam Welch'.
Just so you can hit the ground running, let’s talk about a few key points that will help you pick more suitable subjects and conditions for your infrared photography.
Go Green
There’s a reason that many infrared photos, both colour and black and white, feature scenes full of trees and lush foliage. Without making this a lesson in plant biology, the visibly green colour found in most tree leaves and plant life comes from a substance called chlorophyll. Not only does chlorophyll make photosynthesis possible but it also loves infrared photography, apparently.
 Leaves and plants are a common subject in infrared photography. Photo by: 'Adam Welch'.
Chlorophyll is highly reflectant of infrared light. This is why healthy plants and trees, rich in chlorophyll, present themselves with that otherworldly brightness present in so many infrared photos.
When you’re getting started with infrared photography, a safe bet is to look for lushly green plants and foliage. Of course, the more infrared light that is reflected, the brighter these elements appear. What lighting conditions are best you ask? Keep reading.
Best Conditions for Infrared Photography
Infrared photography loves highly luminous, sunny days, which might not otherwise be conducive to conventional photography. Those harsh shadows and that torturous midday sunlight aren’t ideal for regular photographs but are actually the perfect conditions for shooting in infrared.
 When it comes to infrared photography, the brighter the better. Photo by: 'Adam Welch'.
The benefits of shooting in bright conditions is two-fold. Firstly, since we are making use of infrared light, sunny conditions mean there is more of it available for imaging. This in turn means we can keep our shutter speeds in a more manageable range. Secondly, the more infrared light reflected from objects within the scene gives us much more intense infrared reflectance from those chlorophyll bearing trees and plants we mentioned earlier.
- See also: Bright Ideas for Shooting in Daylight
Lens Considerations for Infrared Photography
I wish that I could say that all lenses work well for infrared photography but this is simply not the case. Simply put, some lenses just don’t seem to like infrared photography, especially when using a digital camera.
 Some lenses are better suited to infrared photography than others. Photo by: 'Adam Welch'.
Some lenses are more prone to lens flare and “hot spots” when used for infrared photography. A hot spot is a bright area in the centre of the frame when compared to the rest of the image. Think of it as highly pronounced vignetting. It can be very noticeable depending on your lens and exposure settings; the latter of which we’ll discuss in the next section.
 The bright spot in the centre of this smartphone infrared photo is an example of an “infrared hotspot”. Photo by: 'Adam Welch'.
Unfortunately, there is no real way to determine if your lens is ideally suited for infrared photography without direct experimentation.
- See also: Best Lenses for Night Photography
Best Camera Settings for Infrared Photography
There is no magic formula for determining the ideal exposure for each and every infrared photo you make. However, there are some simple things that we can generally take into account when it comes to our camera settings for infrared photography.
Exposure Guidelines for Film and Non-Conversion Digital Infrared Photography
In most cases, you will be shooting long exposures in order to compensate for the immense darkening effects of the infrared filter (except for colour infrared film). This means larger apertures will be ideal in order to allow the maximum amount of light to enter the camera. Begin with the largest aperture (smallest f-number) available with your particular lens. This goes for both digital and non-digital applications.
Using a larger aperture also helps to avoid/reduce the appearance of lens hotspots and flare.
If you happen to be shooting a non-converted digital camera with an infrared filter, do your best to set a custom white balance based on the brightest portion of your scene with the filter attached (which can be difficult) if your camera has this feature available.
Exposure Guidelines for Converted Digital Infrared Photography
An infrared converted digital camera will allow you to shoot without an infrared filter, which will give you room to use much faster shutter speeds. This leads to a more straightforward and natural shooting experience while leaving more latitude for exposure settings. Even in this case, larger apertures are still advisable.
Furthermore, an accurate in-camera white balance is still ideal (as well as you can achieve), although reaching a desirable white balance will likely prove impossible without adequate post-processing. Also, be mindful that in most cases, infrared conversions slightly diminish the total resolution of the digital sensor. Because of this, always shoot using the lowest ISO setting possible to reduce the appearance of additional digital noise and pixelation should you intend on enlarging the resulting infrared photo.
Summing Up…
Infrared photography is an odd thing. It is a type of photography which makes the otherwise transparent become overtly visible. Think about that for a moment. How amazing is it that we have this many ways to use invisible light to make photographs which can be so strikingly beautiful? While infrared photography is far from a mainstream medium, it is slowly becoming more and more popular.
We’ve talked about quite a few ways to go about making infrared photographs but all the while, we have somehow managed to avoid what could be the biggest question when it comes to infrared photographs. That question is simply, “Why?”
 An infrared film image. Made with Rollei Infrared 400 film and processed at box speed. Photo by: 'Adam Welch'.
Much as with anything artistically self expressive, the fewer external evidences we introduce into our photographs, the more room is left to explore our own personal creativity. Black and white photography foregoes colour, reducing our expressions to tones of grey, shadows and light. Infrared photography takes this partial abstraction and turns it on its head. While still technically using light to craft our photographs, we are adding in a certain degree of uncertainty by making use of light that we can’t physically see with our own eyes.
In a way, we are reversing the common ideology upon which conventional photography so stringently relies.
If you are considering trying your hand at making your own infrared photographs, then I hope that the tips and explanations you've found here will help you along your way. As you can imagine, there is far too much information to cover in a single article.
If you would like to learn more about specific areas of infrared photography, then please don’t hesitate to post your questions and ideas for future content on this subject along with your own adventures into the world of infrared in the comments below.
As always, remember to have fun and happy shooting!
About the author: Adam Welch is an adventurer, photographer and author based in the USA. You can find more of his work on his website or by following him on Facebook and YouTube.
Have you ever tried infrared photography? Is this a genre of photography that interests you? Do you have any questions about infrared photography that you would like to have answered? Share your thoughts by leaving a comment below!

