Of all the editing tools at our disposal, across a wide range of software for post-processing, there’s likely not one that has bailed many a landscape photographer out of a jam than the graduated filter tool. It’s simple yet powerful, easy to use and can yield astonishing results.
- See the Complete Travel Photography Guide to Seljalandsfoss Waterfall
- Learn about Hard vs Soft Graduated Neutral Density Filters for Landscape Photography
But how well do you really understand this most glorious of post-processing tools that has become the best friend of landscape photographers everywhere? Today, we are going to take a close look at the graduated filter, where it originated from and why it is so incredibly useful.
We’ll be talking about the graduated filter as it appears in Lightroom and Photoshop but many of these tips and techniques will apply across many other photo editing programs that include a graduated filter tool.
For a quick reference walk-through of the graduated filter tool across all the platforms we discuss here, have a look at this video.
What is a GND Filter?
The digital iteration of the graduated filter tool is the latest evolution of a long established photography filter known as the ‘graduated neutral density filter’, or GND for short. The GND filter is a physical filter which is placed in front of the camera lens which, as the name suggests, provides a gradual darkening effect.
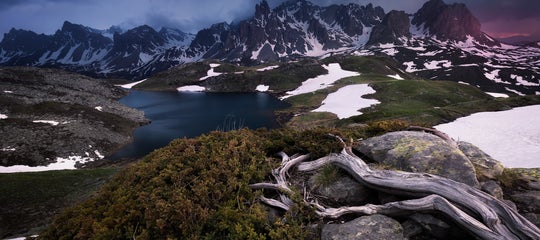
 GND filters provide a graduated neutral density effect. Photo by: 'Adam Welch'.
Born from Glass
GND filters have a history dating back to the early days of photography at the outset of the twentieth century, although they were somewhat different from the GND filters we might recognise today. These early GND filters were specifically made to be used with black and white photography, therefore they were essentially colour filters with a gradual gradation. Oftentimes yellow or red, these GND filters helped to selectively darken skies in order to add drama to a scene.
 GND filters were initially used in black and white photography. Photo by: 'Adam Welch'.
Physical GND filters work to balance highly contrasted scenes where one section of the composition is much more brightly illuminated than the remainder, such as a bright sky and a dark foreground. You can also use them when a longer exposure is required for a desired aesthetic effect in one part of a photo but not another, as was the case with the photo below.
 To obtain the sense of motion in the more shaded foreground the background portion of the composition was left over exposed. Photo by: 'Adam Welch'.
The GND filter will allow for the proper, more lengthy exposure for the darker areas while maintaining a balanced exposure in the highlights.
 A GND filter helped to balance the highlights in this scene. Photo by: 'Adam Welch'.
Physical GND filters are available in a wide variety of densities and in hard, soft or split (reverse) gradations.
The Digital Advantage
While real GND filters still have a place in the camera bag of serious landscape photographers, they are somewhat limited in their application. Aside from working to nail luminance values in camera (always a good idea), there isn’t much else that they accomplish. This is where the graduated filter comes into play inside our modern digital darkrooms.
 The graduated filter tool is very valuable in the editing process. Photo by: 'Adam Welch'.
Let’s take a look at why the graduated filter tool goes beyond simply balancing light and why it’s such a powerful tool for working with your landscape photos during post processing.
The Graduated Filter in Lightroom
From inside the Develop Module of Lightroom Classic, you can find the graduated filter tool at the top of the Development Panel. It’s the little icon shaped like a rectangle.
 Look for this rectangle-shaped icon. Photo by: 'Adam Welch'.
Clicking on the icon will bring up the graduated filter tool panel. It is here that we are met with a virtual cornucopia of adjustment options which can all be applied selectively using the graduated filter.
 All of these adjustments may be applied using the graduated filter tool. Photo by: 'Adam Welch'.
This is where the capabilities of the digital graduated filter tool far surpasses those of physical GND filters. We of course have the options to adjust our basic exposure values, highlights, shadows, white and black points and contrast. However, it’s the other little goodies that make the graduated filter tool in Lightroom truly shine. There is also the option to selectively apply any other global image adjustment that we have available in the Develop Panel.
 You can adjust a lot of values with the graduated filter tool. Photo by: 'Adam Welch'.
This includes colour temperature, sharpening, noise reduction, clarity, texture, dehaze and even saturation control. The only basic development features not currently available as a local adjustment with the graduated filter are the Tone Curve and Split Toning.
This is a really big deal if you’re a landscape photographer or any other type of photographer for that matter. The ability to selectively apply all of these edits using the graduated filter tool opens up an enormously wide world of creative possibilities for your photos.
Applying the Graduated Filter Tool in Lightroom
Using the graduated filter tool inside of Lightroom Classic couldn’t be more simple. After clicking on the graduated filter icon, simply click and drag from any direction on your image to apply the filter.
 Click and drag to apply the graduated filter tool to your image. Photo by: 'Adam Welch'.
From here, the graduated filter mask is completely adjustable. You’ll notice that the central point of the filter is represented by a small dot. You can click on this dot to select and move the entire graduated filter.
 Click on this dot to move the entire filter. Photo by: 'Adam Welch'.
You may also rotate the filter by hovering your cursor over the central line of the filter until it changes to a curved arrow and then click and drag up or down.
 Use the line to rotate your filter. Photo by: 'Adam Welch'.
Lastly, you can adjust the hardness or softness of the filter gradation by clicking and holding on the top or bottom of the filter while dragging. We’ll cover a few more tips on using the graduated filter in Lightroom a little bit later. Trust me, some of them are really cool!
Just in case you’re using Lightroom CC (not Classic), all of the points we’ve talked about here are available to you as well. You can find the graduated filter tool, referred to as the ‘Linear Gradient’ in Lightroom CC, by clicking on the icon in the toolbar at the right of the program window.
 The graduated filter tool is also in Lightroom CC. Photo by: 'Adam Welch'.
Also, should you prefer to use keyboard shortcuts like I do, you can access the graduated filter tool in Lightroom CC by simply hitting the ‘L’ key.
The Graduated Filter in Adobe Camera RAW
Way back in 2003, Adobe released Camera RAW... better known as Adobe Camera RAW or simply ‘ACR’. It features all of the image processing adjustments as Lightroom, including the graduated filter tool. Even though it appears slightly differently in ACR, the graduated filter tool is very much the same animal.
You can find the graduated filter at the very top of the ACR window.
 The graduated filter tool is located at the very top of the ACR window. Photo by: 'Adam Welch'.
From here, the procedure for making use of the graduated filter is essentially the same is in Lightroom Classic with all of the familiar image editing adjustments still available.
The only differences you will encounter when using the graduated filter tool in ACR as opposed to Lightroom Classic is that there are two points of adjustment which are represented by a green and red dot. The green dot signifies where the gradient begins and the red dot where it ends.
 The green dot is where the gradient begins and the red dot is where it ends. Photo by: 'Adam Welch'.
When more than one graduated filter is being used, these green and red dots revert to grey.
 The colourful dots are the gradient you are working on, while the greyed out dots are the ones that are not currently in use. Photo by: 'Adam Welch'.
Some users find the iteration of the graduated filter in ACR to be more intuitive in function. Of course, this is wholly subjective and your mileage may vary.
There is also a version of the graduated filter tool available inside Photoshop itself, known as the “Gradient”. This is a more involved method of applying a similar effect as the graduated filter tool. It requires a bit more explanation than I can include here, so we'll leave discuss it another time!
Advanced Tips and Tricks with the Graduated Filter
The graduated filter tool is a deceptively easy way to selectively adjust your landscape photos. For all it’s simplicity, there are a few hidden gems that will help you make the most of the graduated filter. Here is a list of handy tips for making your time using the graduated filter even easier and more efficient:
Range Masking
With the release of Lightroom v7.2 and ACR 10, Adobe introduced a new feature to their local adjustment tools (including the graduated filter) which allows the application of the filter to be dictated by luminance values, colour or pixel depth (should it be available with your image). Here’s the Range Mask in Lightroom Classic:
 Range mask in Lightroom Classic. Photo by: 'Adam Welch'.
...and now in ACR.
 Range mask in ACR. Photo by: 'Adam Welch'.
This means that we are now granted even more flexibility for how we apply our adjustments with the graduated filter tool.
Pin Visibility
Graduated filter tool not showing up? This is your fix. Oftentimes while processing your landscape images, you will be using multiple graduated filters so keeping track of the locations of each of your filters becomes a priority. In both Lightroom and ACR, we can control how and when our graduated filter location pins are visible to us.
In Lightroom: Use the ‘Show Edit Pins’ to toggle between modes for your graduated filter and other local adjustment tools pin visibility.
 This is how you toggle between your graduated filter in Lightroom and other adjustment tools. Photo by: 'Adam Welch'.
You can also use the keyboard shortcut ‘H’ to quickly switch between the ‘Never’ and ‘Always’ modes.
In ACR: Tick the ‘Overlay’ box or use keyboard shortcut ‘V’.
 Tick the 'overlay' box to control your graduated filter location pins. Photo by: 'Adam Welch'.
Overlay Mask Visibility
We have the option to decide whether or not the graduated filter mask overlay is visible while we work. The mask overlay is the colour used to indicate the areas where the graduated filter (or other local adjustments) has been applied.
In Lightroom: Tick the ‘Show Selected Mask Overlay’ or use keyboard shortcut ‘O’.
 Ticking this will mean your graduated filter mask overlay is visible while you work. Photo by: 'Adam Welch'.
In ACR: Tick the ‘Mask’ box or use keyboard shortcut ‘Y’.
 Ticking the 'mask' button in ACR will do the same thing. Photo by: 'Adam Welch'.
Toggle Overlay Mask Color
Just as we can control the visibility of the graduated filter’s mask, we can also dictate its colour.
In Lightroom: Cycle between available mask colours using keyboard shortcut ‘Shift+O’ or select from the colour list in the ‘Tools > Adjustment Mask Overlay’.
 This is how to change the colour of your graduated filter's mask. Photo by: 'Adam Welch'.
In ACR: Simply create your own custom mask colour by clicking the colour box next to the ‘Mask’ visibility option.
 You can choose your own colours in ACR. Photo by: 'Adam Welch'.
Automatically Straighten Filter
Hold down the ‘Shift’ key while applying your graduated filters in Lightroom or ACR to instantly keep the mask straight. In Lightroom, you will be limited to either horizontal or vertical orientations whereas ACR offers various degrees of “snapping” positions.
Duplicate Mask
Quickly make another mask with the same settings by right-clicking on the mask pin in Lightroom and selecting duplicate.
 This is how you duplicate a mask. Photo by: 'Adam Welch'.
In ACR, right-click anywhere inside the graduated filter and select duplicate to achieve the same result.
In Summary…
It’s difficult to overstate how valuable the graduated filter is during post-processing for landscape photography shooters. The graduated filter tool harnesses the power of true GND filters and kicks things up a notch. It provides us with a vehicle for applying other advanced digital adjustments which far exceed simple luminance control. Whether you’re a user of Lightroom Classic, ACR or Lightroom CC, I urge you to make use of the graduated filter tool if you haven’t already. If you use other programs to edit your photos, there is likely a version of the graduated filter tool lurking in whatever software you happen to be using. The graduated filter truly is the best friend of every photographer no matter what the subject matter happens to be.
About the author: Adam Welch is an adventurer, photographer and author based in the USA. You can find more of his work on his website or by following him on Facebook and YouTube.
Do you use Lightroom? How about Photoshop? Have you successfully used the graduated filter tool on your own images? Share your thoughts by leaving a comment below!