In just a few years, time-lapse photography has gone from a niche occupation of a selected few professionals to a default option on our phone cameras. To me, as a time-lapse professional, this change has been an interesting phenomenon to observe, as it has given rise to many new, talented creators.
- Check out The Beginner's Guide to Videography
- Learn about the The Exposure Triangle: Aperture, ISO & Shutter Speed Explained
- Discover The Best Time to Visit Iceland for Photography
However, it is not hard to notice the rising numbers of mediocre time-lapsers, whose work has the potential to be significantly better with just a few tweaks. So, let’s talk time-lapse photography and how you can make your work better! Are you interested in finding out how to start shooting quality time-lapse videos from scratch? Or do you want to improve your time-lapse game? Keep reading!
What is Time-Lapse Photography?
Time-lapse is a photographic technique that involves taking a series of photos of a certain subject, at a constant time interval; the photos are subsequently connected into a video clip, which conveys the time passing more rapidly.
While a camcorder records images at the speed of 25 or 30 frames per second (fps), when you use a photographic camera, it is possible to decrease this speed by taking photos at a slower pace (one each x seconds). Thanks to this ability, a longer interval of time is able to fit into a shorter video, which again runs at 25 or 30 fps. The final result is a shot in which time seems to fly, and otherwise slow and lengthy scenes develop right in front of our eyes.
This is what a time-lapse looks like:
Conversely, the first time-lapse creators shot their work with cinema cameras. Before the digital era, shooting and editing photos was much more difficult and restrictive than today; so naturally, this advanced technique was reserved almost exclusively for cinematographers. The process was additionally complicated by the modifications needed to slow down the shooting speed of the camera: its regular 24 fps tempo needed to be toned down to 1 fps or even less.
The first time-lapse shots can be traced back as far as 1872. However, the technique first gained considerable popularity through the revolutionary work of the grand master Ron Fricke, with his film Koyaanisqatsi, and later, Baraka. These classics pioneered the use of high-quality time-lapse shots for storytelling, documenting in a unique way events otherwise impossible to perceive with the naked human eye.
Fricke’s profound role in the development of the technique did not stop there. He recorded his masterpieces using enormous 70mm cinema cameras. He also designed and constructed customised, computer-controlled camera dollies, for carrying and moving his bulky equipment to make the shots more dynamic. It goes without saying that all this was unattainable to most and, with the exception of several super-productions made by BBC and Hollywood, time-lapse was hardly ever used on a professional level.
Everything changed some years later with the digital revolution and the democratisation of photography that it induced. Due to the more affordable and powerful DSLR cameras that were entering the market, as well as the rapid development of Motion Control (MOCO) technology, time-lapse was brought to the fingertips of small production companies and independent creators, who in turn popularised the technique and turned it into a mass phenomenon.
Time-lapse soon became a distinct genre: videos attracted millions of views, film festivals dedicated to it come about and camera manufacturers started including relevant options for it in their device menus. A whole new market dedicated to shooting accessories for time-lapse photography emerged, led by visionaries and small entrepreneurs, who boosted and advanced the possibilities of the technique to achievements unimaginable just a decade ago.
Now that you've got a quick rundown of the history of time-lapse photography, let's start looking at how you can make one.
- See also: Travel Photography Explained
Types of Time-Lapses
Cityscapes: Cities, Night, Motion Blur
When shooting time-lapse in urban settings, framing your shots so that they contain interesting, dynamic components is the key.
Elevated spots are usually attractive to shoot from, such as rooftops, terraces or bridges. However, the biggest problem with shooting in cities is being denied access to best viewpoints, or not being allowed to set up your camera there.
In these situations, I look for a hotel room or AirBnb overlooking the place I want to shoot: every single shot from my video PanamaX, from Panama City, was made that way.
In my view, cities are more interesting to shoot at night. Even a dull location gains a lively spark when illuminated by vibrant night lights.
It is important to note that, when shooting urban scenes at night, there is no need to use a filter to achieve motion blur (more on that later). During the daytime, a filter is certainly needed to make your video more fluid.
Landscapes: Nature, Travel, Destinations
Landscape videos are guilty for popularising time-lapse photography as a technique. These types of videos offer outputs which are hard to achieve through other methods: magnificent shots of nature with an impressive quality.
Shooting landscapes usually requires several sessions, as there is only one opportunity to capture that perfect, fleeting moment (unlike in cityscapes, where most scenes play out in a loop). Making these videos is not an easy or comfortable task, as shooting untouched, hidden nature is hardly possible without many hours of hiking with full equipment and spending countless nights under the stars.
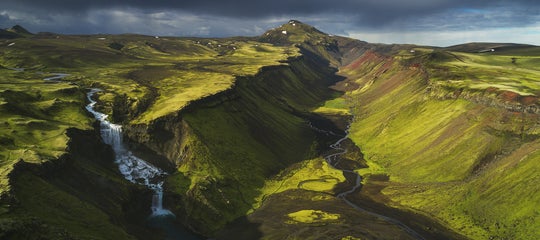
I first started shooting landscape time-lapse photography in the spectacular Icelandic wilderness. If you would like to explore nature through time-lapse photography and aren’t really sure where to start, then Iceland is a winning destination in any season, for beginners and experienced photographers, as well as hikers alike. It offers breathtaking Midnight Sun scenery in the summer months, as well as unparalleled Northern Lights experiences in the winter season.
If there is one clear winner in the process of digitalisation and democratisation of photography, as well as the expansion of time-lapse, it is astrophotography. For me, it is incredibly humbling to keep in mind that taking these photos was impossible and unimaginable before DSLRs. This is also the time-lapse style where the photographer can take the most impressive and unique shots. It is more challenging than daytime shooting: everything takes longer, and is much harder because you can’t see anything.
Night shooting requires more intuition, but you can't rely on that completely. You'll still need to make a lot of test shots with regards to focus, framing, and exposure.
Transitions: Day-To-Night, Night-To-Day
Well done, rounded time-lapses of sunrises and sunsets are the hardest to make, because of the constantly changing light. This is the only instance when the use of the Aperture Priority mode on your camera can be forgiven in time lapse photography, and moreover, welcomed (more on that in the section Shooting Modes).
In my opinion, transitions unfold wonderfully when shot in nature, but not so much in cityscapes, because of the fast movement of different elements.
In order to make your transition time-lapse fluid, it is important to give it more attention in post production.
Building your setup is usually fun and exciting, but with endless options and accessories, it can easily turn into an overwhelming task. To beginners, it might seem that they need to buy the latest camera, a dozen or so lenses, as well as every single add-on available on the market. So let's take a look at how to avoid motivational and financial burnout by identifying and investing in the essential equipment you'll need for time-lapse photography.
Camera
For night time-lapses such as the Northern Lights, or when you are making time-lapse photos in any other dimly-lit situations, it is highly recommended that you have a full frame camera. This is because they have bigger sensors, which enable you to take photos with a shorter exposure time and less noise. Aside from this specification, I recommend that you invest in a mirrorless camera for creating time-lapse images.
 A full-frame camera is important for time-lapse photography. Photo by: 'Enrique Pacheco'.
The camera market has undergone dramatic changes in the past few years. Only a little while ago, DSLR cameras were undisputedly ruling the world of professional photography. These days, more and more mirrorless cameras are making their way into the staple equipment of professional and expert photographers. When it comes to time-lapse photography, mirrorless cameras are, without a doubt, the most adequate choice for several reasons.
Reason #1:
The time-lapse technique does not require many of the options offered by the latest camera models, such as autofocus, face recognition, or image stabilisation. The most important components are a good resolution, considerable light sensitivity, a robust camera body, and compatibility with a wide variety of lenses.
Reason #2:
When using DSLR cameras, the moving parts within the camera – including the mirror – sometimes pose a problem when shooting with longer exposures, making the final image blurry. With mirrorless cameras, the absence of these additions makes way for night shots of greater quality.
Reason #3:
Mirrorless cameras usually have more compact bodies, which allows for more mobility and comfort, or for carrying several cameras at a time. This is a very useful possibility for time-lapsers, as the same scene may be shot from several angles at the same time to provide more versatility when compiling the images to make a video later on.
- See also: Camera & Gear Reviews
Lenses
Choosing lenses for your camera is a complicated task, in time-lapse as in all other specialised branches of photography. It poses probably the biggest challenge to beginners, who may find themselves overwhelmed by the infinite variety of lenses: prime, zooms, wide or telephoto.
The next thing you know, you may find your backpack overweight and your bank account empty.
There are, however, a few simple tricks known to more experienced photographers. When it comes to equipment, almost always, the less that you have is more.
Personally, I have been a victim of the immense consumerism that encircles the world of photography, having bought almost every lens underneath the sun. However, when I look at my body of work, I find that most of my videos have been shot using the same one or two lenses, and moreover, they're zoom lenses.
Even though prime lenses are usually faster and offer more quality than zooms, they make shooting in a wider range of focal lengths more complicated: carrying more lenses is inevitable. This can often have negative consequences on the quality of your work.
Needless to say, the more weight that you carry, the more compelled you will be to change lenses in-between the shots. Changing lenses increases the possibility of getting dust on the camera sensor, an issue that occurs very often, and brings about the nightmare of having to retouch thousands of photos when you're making a time-lapse.
A standard 24-70mm zoom lens is, in many cases, the ideal choice for those situations when you can only carry one lens. However, it falls short in both extremes: it is often not wide enough for shooting the landscape, nor long enough for close-ups. Therefore, my ideal choice when shooting time-lapses in-field is to carry two lenses – a 16-35mm and a 70-200mm.
Most main brands, as well as third parties, will produce lenses within these focal ranges (some vary by a few millimetres up or down) that can often compete with the equivalent prime lens in terms of quality.
If you want to make sure that the gaping hole between 35 and 70mm is taken care of, you could even add a 50mm prime lens to your kit. These lenses are usually relatively cheap and have large apertures.
With these three lenses in your bag, you will have the entire focal range covered, from ultra wide (16mm) to telephoto (200mm).
To sum up:
-
If you can only have one lens: go for a 24-70 mm zoom lens;
-
If you can have two: get a 16-35 mm and a 70-200 mm;
-
If you can have three: add a prime 50 mm lens to your kit.
Memory Cards
Memory cards are new and improved versions of old rolls of film. Not so long ago, photographers were limited to only 36 shots; today, thousands of photos can be stored on only one small piece of plastic that is reusable, reliable and almost always effective.
Why do I make this comparison? Because it is so common to see photography enthusiasts using only one memory card, on which they store several days' worth of work, for the sole reason that the memory card is not yet completely full. It is also common that they don’t own another substitute memory card. This is, to put it mildly, very foolish.
 You'll need more than one memory card for time-lapse photography. Photo by: 'Enrique Pacheco'.
With memory cards rapidly dropping in price, there is no excuse not to have at least two or three. Having extra space is always important in time-lapse photography: there is nothing worse than setting up for a shot, then realising that your card is almost full just as that perfect sunset unravels right in front of you.
In terms of brand names and memory card speed, there is not much to worry about, as most models can write even faster than our camera buffers. The writing speed is only noticeable when transferring the photos to the computer, so you should pay attention to it should you find yourself in situations where you need to copy a lot of data overnight before going to sleep.
As far as memory capacity is concerned, this is the way I see it: think about how many time-lapses you might do in a day – for example, let’s make this number 10. Next, multiply it by 300 photos in every shot (3000). With a bit of margin space added for extra safety (+1000), we come to a deduced value of 4000 photos per day. Therefore, you should have sufficient memory to hold 4000 photos taken with the maximum resolution that your camera can support.
Tripods
This dull, unexciting item often ends up being overlooked and neglected, as at first sight it doesn’t seem to affect the photo quality and therefore it is hard to justify investing a lot in it. However, it is usually a good idea to splash out on a quality tripod, and more so in time-lapse photography.
When creating a time-lapse, the tripod is an essential piece of equipment. It is used in every shot, with its role often determining the final output quality.
 A sturdy tripod will do wonders for your time-lapse photography. Photo by: 'Enrique Pacheco'.
Moreover, while technology advances at a head-spinning pace – forcing you to change cameras every two years at best – a good, solid tripod will follow you through a lifetime of projects. On the other hand, a bad or mediocre tripod will put you through torture for months before breaking at the exact moment when you need it the most.
So, how to choose the perfect, reliable tripod? Go to your favourite store, ask for the best tripod that your budget allows for and then buy the next best one. Certainly, good ones will share some useful traits you should keep an eye on. For example, carbon fibre tripods are more durable, reliable and weather resistant than their aluminium counterparts. I personally prefer twist locks to clip-on tripod legs, as they are easier and faster to set up.
As with all anatomy-related business, the tripod head is, by a long shot, the most important part to pay attention to on any tripod. A bad quality tripod head will make your adjustments imprecise: you'll have to count on the unfortunate slight tilt forward that happens after the bolts are tightened due to the weight of the camera (this is especially pronounced when using telephoto lenses).
Tripod heads with a rotating ball are always my best choice, once again, because of the speed and ease of manoeuvrability, as well as for their robustness.
Intervalometers
This trinket is a signature piece of equipment in time-lapse photography. It allows us to pre-determine how many photos the camera will take, and at what time interval.
 An intervalometer is faster to use than in-built camera functions. Photo by: 'Enrique Pacheco'.
Even though many new camera models come with this function built-in to their menus, I strongly recommend having an external intervalometer. It is – you guessed it – easier and faster to use. On top of that, your camera may not have the full range of options that an external device might offer, or it may be that these settings interfere with other important ones as you're taking a number of shots.
There are countless brands and models of intervalometers but in the end, almost all offer the same options and serve the same purpose. Unfortunately, the devices are usually not very damage-resistant, which is why I always carry an extra one, at least, especially when I travel to remote places where the possibility of buying a new one will be equal to zero.
When buying an intervalometer, it is important to make sure that it will allow you to take more than 300 photos. Apart from that, it is interesting (but by no means necessary) for the time passed and/or time remaining to be shown on the screen.
 Newer intervalometers allow for bulb ramping. Photo by: 'Enrique Pacheco'.
Recently, a new generation of intervalometers has hit the market. These advanced models allow for bulb ramping, which is the ability to change exposures during a time-lapse. This may be used when shooting under predictably changing light, such as sunrises and sunsets. While these devices are certainly interesting, they are usually quite complicated to use, and therefore would prove to be a worthy investment only for professionals and in very specific situations. In most cases, the automatic camera settings do the trick well enough, and, remember the rule: the simpler the equipment, the better.
Filters
Filters are a fundamental tool in time-lapse photography, and the most useful type of filter is a neutral density (ND). This accessory must form part of the basic equipment of a time-lapser. It provides the possibility to make the shutter speed longer, even on sunny days.
Long shutter speeds add a nice effect to photos and are essential to creating the motion blur effect needed to make the final video soft and flowing.
 Square filters are more versatile than round filters. Photo by: 'Enrique Pacheco'.
The need to buy a separate, round ND filter to fit every lens that you use is easily worked around by using an adaptable, 4-inch square filter holder. Square filters are much more versatile than round filters, particularly if you want to use them on a number of different lenses with varying threads.
ND filters work better if they are made of glass, as the plastic ones (made of resin) often produce unwanted colour casts.
My kit is comprised of three ND filters of different densities: 0.6 (2-stop), 0.9 (3-stop) and 1.8 (6 stop) respectively. These filters can always be combined, which would result in a higher density range of up to 11 stops if needed. Additionally, as I shoot mostly landscapes, I carry a graduated ND 3-stop filter, which helps to reduce the exposure only in one part of the frame (usually, the sky), to achieve a more balanced shot.
Motorised Sliders and Heads
How about adding something more dynamic element to your time-lapse? There are several ways that you can accomplish this. A basic option is a motorised head, such as the eMotimo, which is compact, affordable and popular. Motorised heads facilitate movement on two axes – pan and tilt.
 The eMotimo is a great gadget for time-lapse photography. Photo by: 'Enrique Pacheco'.
If you really want to impress the audience, then what you'll need is a motorised slider. This machinery moves the camera along a rail, which results in soft movement coordinated with the time-lapse in real time.
These systems have evolved a lot in recent times, and the market is overflowing with different models with a multitude of options. The main difference to pay attention to is the number of axes: the simplest sliders have one, which is horizontal, while more complicated models include the ability to pan, and the most advanced sliders come with three options – slide, pan and tilt. I don’t use the tilt option, as I don’t see a practical use for it in the specific shots I create. I believe that the landscape is best portrayed through pan and slide movements (this is, of course, a matter of my personal preference and taste).
 A slider allows your camera to move along a rail. Photo by: 'Enrique Pacheco'.
Ultimately, one axis less means having a slider that is more compact and easy to carry, which always scores extra points in my books. Keeping this in mind, it is useful to note that there are foldable models available too, which are made of carbon fibre. These are a lighter and easier option to carry.
Recommended Camera Settings for Making Time-Lapses
Before you set out to shoot your first time-lapse, make sure that your camera is set up correctly by following these simple steps.
Shooting Modes
The first thing to set up on your camera is the shooting mode. It is a good idea to use the manual mode, which will give you much more control over the shot. In automatic mode, the exposure may suddenly change if a cloud covers the sun or somebody passes in front of the camera; manual mode prevents this from happening, and allows us to set a constant exposure value.
Using manual mode is a good solution even when shooting a sunrise or sunset, if your plan is to end the time-lapse just when the sun has completely risen or gone below the horizon. However, if you would like to do a proper day-to-night or night-to-day) transition, then you should set your camera to Aperture Priority mode. When you do this, you can set the aperture to a fixed value, which will let your camera determine the shutter speed by itself. If your camera has an auto-ISO option, then this is the moment to use it.
How to Focus
Focusing well is the ingredient that makes or breaks a time-lapse: it is impossible to fix a photo that is out of focus, let alone an entire sequence of images. In time-lapse photography, Manual focus mode should always be used. You should approach focusing with a lot of care and patience, using the Live View option in the camera menu and the manual focus ring on the lens.
If you are shooting a landscape with a closed aperture, you can use the hyperfocal setting of your lens. In cases of night photography, where the depth of field may be very short, there is a simple trick that I use to focus: I simply set the focus in reference to the brightest star in the sky and I am able to get a sharp shot every time.
Other Camera Settings
A very important, often skipped step in any photo-shoot is to check the entire camera menu to clear all the weird, unwanted settings that may ruin your time-lapse. Many of these settings are usually activated by default, such as image stabiliser, AE lock and long exposure noise reduction. While you’re there, make sure your camera is set up to shoot in the highest resolution possible, as well as in RAW format.
How Many Photos Are Needed for a Time-Lapse?
It’s easy! You just need to follow this simple formula:
Number of photos / 30 = The duration of the final video clip.
In most situations, a clip lasting 10 to 15 seconds is more than enough for an effective time-lapse. To create one of this length, between 300 and 450 photos are necessary. Take this with a grain of salt: often, especially when shooting the landscape, you cannot predict the exact decisive point in the shot. For this reason, it is crucial to adapt the number of shots, and to keep shooting until this magical moment is recorded. Extra photos can always be removed later on when processing.
How to Calculate the Right Interval
Once you’re certain that everything is in order, you'll need to decide on the interval. The correct value can vary depending on the light conditions, as well as the subject. Making a time-lapse fluid and flowing is all about getting the interval right.
There is a simple formula for this step as well:
The faster the movement in the scene, the shorter the interval, and vice versa.
If the interval is longer, more real time is compressed into a shorter clip, and the scenes will appear to move faster in the final video.
When the Moon is full in a clear sky, it can provide enough light to make the night look like daytime with a long exposure; usually a 10 second interval with an ISO of 1600 is appropriate.
If you’re trying to capture the Milky Way, you should do it on a moonless night, with a much longer exposure: you will need to set your camera on a 20 to 30 second interval with an ISO of at least 3200 or 6400.
Hunting for the Aurora Borealis requires significantly more preparation, as the weather conditions need to be favourable for the dancing lights to appear. Auroras are very unpredictable! They sometimes move very fast, which is why it is better to make the exposure as short as possible. It is better to set the ISO higher, to 3200 or 6400, and reduce the exposure to 8 to 10 seconds.
Here is a rough guide as to the intervals that you will need in a number of common time-lapse scenarios:
-
Cityscape (cars, people walking): one photo every one or two seconds;
-
Landscape with fast moving clouds: one photo every three seconds;
-
Landscape with no clouds, or clouds moving slowly: one photo every 5 to 10 seconds;
-
Night shot with a full moon: one photo every 8 to 12 seconds;
-
Night shot with stars or the Milky Way: one photo every 20 to 30 seconds;
-
Northern lights: one photo every 5 to 15 seconds, depending on the brightness of the lights;
-
Day-to-night or night-to-day transition: one photo every 30 seconds.
Shutter Speed and Motion Blur
Motion blur is what gives the professional touch to the general feel of the final video.
Let’s talk about “dragging the shutter”, or how to achieve motion blur in your shots. There is a contradiction hidden here. When you look at an individual photo from a time-lapse, all the moving elements are usually out of focus and blurred. On the face of it, your images may seem to be very bad.
 Motion blur doesn't look very good in a single image though it makes more sense when compiled into a time-lapse video. Photo by: 'Enrique Pacheco'.
However, when the photos are combined to form the video clip, these motion blurs are precisely the thing that will produce fluidity of movement. Without motion blur, the photos will be too sharp and our brains won't be capable of processing them as a video clip, reproduced at 30 fps.
Motion blur is achieved with the help of low shutter speed, especially when shooting moving elements, such as cars, people, or water. In these situations, I shoot at speeds between 1/3 of a second, and one or two seconds. Needless to say, it is often not easy to shoot daytime, brightly-lit scenes using these settings, and that’s where ND filters may come in handy.
Expert Advice For Shooting Time-Lapse Images
Think as a Photographer, Shoot as a Videographer
It can be easy to forget that the final outcome is going to be a video consisting of many single images. Like in any other branch of photography, the most important elements to a good shot are the location, composition, light, and framing. So my ultimate advice is to think as a photographer but shoot as a videographer.
 Compose a time-lapse image as you would any other image. Photo by: 'Enrique Pacheco'.
When setting up your time-lapse, approach it as though you are taking only a single photo. Ensure that the light, framing, composition and other elements are ideal, before programming your intervalometer (taking care to choose the appropriate interval). Paying attention to these points will make your time-lapse more complete and visually interesting.
Always Shoot More and Faster Than You Think You Should
Think about how hard and expensive it was to take extra photos only some 20 or 30 years ago. Memory cards and hard drives are more than affordable today, and you need to buy them only once, so there is no excuse not to take more photos than you will end up using for the final clip.
A common beginner’s mistake: is to shoot exactly as much footage as you require, and at the exact speed you want in your video. So here is some counterintuitive advice: decide on your interval following the instructions that I've given you above and then make it slower
For example, if you think you should shoot at a 5 second interval, make it 3 seconds instead. Using this method, you may end up with a final shot running slower than you initially planned but it can always be sped up in the editing phase. A shot that is too fast is beyond repair, as you will be missing the frames required to slow it down.
The same rule applies for the length of the shot: if you end up having 500 photos instead of the 300 you need, the only thing for you to decide is what to do with the extra images. You can speed up the time-lapse or cut the video short. On the other hand, a short video may result in the loss of the most interesting moments of the scene.
I love living in this contemporary era where for every possible problem you might encounter, either professionally or personally, there is an app. Below, I've compiled a list of a few apps that I find fundamental to my creative process when making a time-lapse.
PhotoPills: Plan Your Time-Lapse
Some apps really make your life easier. PhotoPills is, without a doubt, the most important app on my phone. I find it incredibly hard to comprehend the trouble that photographers (including myself) had to endure before it existed. It offers information about sunrise and sunset times, as well as the exact locations where the Sun or the Moon will show up, which helps us to set up our equipment at the right place and time for that dream time-lapse sequence.
 PhotoPills is a great app for planning your time-lapses! Photo by: 'Enrique Pacheco'.
Other useful options of the app include interval and depth of field calculators, as well as my favourite tool: an augmented reality visualisation which offers a prediction of the exact positioning and paths of the Sun or the Milky Way at any determined moment.
Google Maps: Find the Right Place
Google Maps can be used for more than searching for restaurants or following the shortest route to your office. Thanks to its satellite view option, you can discover interesting spots from a bird’s eye view, which is a quite unique and otherwise unattainable opportunity.
It is also interesting to explore the area in which you are planning to shoot by using satellite view, in order to figure out how to better make use of the terrain. Often, the most fascinating landscapes are not that obvious, which is where Google Maps comes in. It offers a different point of view and brings you closer to unique, undiscovered, less popular sites that will make your work much more original.
Windy: Check the Weather Forecast
Choosing the right place for your shoot is as important as going there at the right moment. There’s no use being in an amazing spot with great equipment if the weather conditions are not appropriate.
It is important to note that, for shooting certain phenomena, you will have to pay attention not only to weather conditions but also to the season: for example, if you want to shoot the Aurora Borealis, then you'll have to plan your trip to the far north of the globe during the winter months, as the sky doesn’t get dark enough during the summer part of the year.
Another good example of a season-specific landscape are the Uyuni salt flats in Bolivia, which you have to visit during the rainy season if you wish to experience and capture that signature mirror effect.
Once your seasonal plans are set, it is super important to check weather conditions in real time. Bluntly put, some days leaving the house is not even worth it, wasting time and energy to no effect.
There are, of course, many apps and websites (and other methods) that allow you to stay on top of the latest weather info. My app of choice is Windy, because it offers a complete overview of all conditions. It can seem a bit overwhelming when you first start using it but I promise you that you will get used to the interface in no time.
- See also: 13-Day Photography Workshop in Bolivia
Post Processing Tips
Finally, you are back from your trip and are eager to transform your photos into a time-lapse video clip. There are two different procedures you can follow from here.
Making a Time-Lapse from JPG Photos
This is a basic, novice approach to time-lapse. If your photos have been shot in JPG format, they can be converted to video using any video-editing program you are familiar with or have a license for. The only thing to be done is importing the photos (a good practice is to have your sequences organised in separate folders, so that your program of choice can recognise and import them as a video sequence), and exporting them as a video. Voilà! Your time-lapse is ready to be reproduced.
Making a Time-Lapse from RAW Photos
What happens if your shots are in RAW format, as they should be? Well, the RAW files must first be developed in Lightroom and exported in TIFF or JPG format.
 Import your images to Lightroom. Photo by: 'Enrique Pacheco'.
Shooting in RAW doesn’t mean that the editing phase will be more complicated. It simply adds an important step to the process, which in turn gives you a much higher image quality with less compression, as well as more possibilities for colour correction.
To edit your RAW files, you'll just need to import the folder containing the RAW sequence to Adobe Lightroom, and follow the next steps:
Step 1. Retouch the first picture;
Step 2. Copy the settings (develop settings >> copy settings);
Step 3. Select all pictures;
Step 4. Paste settings (develop settings >> paste settings).
The photos are now ready to be exported in JPEG or TIFF format with the resolution that you choose. It is a good idea to export them to a separate folder, in order to avoid any possible confusion or mix-ups.
The next thing to do is to import the sequence of images to Adobe After Effects, where you'll be able to convert them into a video clip using ProRes for Mac. If you are using a PC, you can try PhotoJPG or a similar format). You can then give this new video file some finishing touches in your video editing software, such as Adobe Premiere, or Final Cut in my case.
Hopefully, you have acquired a more comprehensive understanding of the time-lapse photography technique, and the different ways it can be used to realise your creative vision. Ideally, you will feel inspired enough to grab your equipment bag and set out to create something amazing.
My last word of advice is to be patient, meticulous and above all, persistent, as repetition is the key to success with time-lapse photography.
About the author: Enrique Pacheco is a time-lapse specialist and landscape photographer based in Spain. You can find more of his work on his website or by following him on Vimeo, Facebook and Instagram.
Do you find time-lapse easier to understand and approach after reading this article? Did you find some of Enrique's tips useful? Will you take them with you to your next shoot? Tell us about it in the comments and share any time-lapse videos you have created!