The Ultimate Guide to Photographing the Aurora in Iceland

- What Causes the Aurora?
- Where to See the Northern Lights in Iceland?
- The Best Time to See the Northern Lights
- Optimal Conditions for Photographing the Aurora
- Is There a Way to Predict the Northern Lights?
- Best Locations to Photograph the Northern Lights in Iceland
- What to Bring
- Recommended Clothing
- Recommended Camera Gear
- Protecting Your Camera Gear in Arctic Conditions
- Prevent Condensation
- Strengthen your Tripod
- Keep your Batteries Charged
- Camera Settings for Photographing the Aurora
- Setting your Focus
- Aperture Setting
- ISO Setting
- White Balance
- Shutter Speed
- RAW or JPEG?
- Composing and Shooting the Aurora
- Creative Tips for Nothern Lights Photography
- Focus Stacking
- Shooting with a Person or Object in the Foreground
- Catching Reflections
- Staying Safe on the Aurora Chase
- Guided Photography Workshops to Capture the Aurora

There is nothing quite as enigmatic as the slow-dance of the Aurora Borealis (more commonly known as the ‘Northern Lights’), quietly undulating across the night sky. For many photographers, witnessing these ethereal colours in the atmosphere is quite literally a dream come true.
- Discover this 11 Day Northern Lights Photo Workshop around Iceland
- Check out this Guide to the Aurora Forecast in Iceland
- Join us on a Private Northern Lights Photo Tour
If you have travelled all the way to Iceland for the opportunity to photograph the Aurora, then the last thing you’ll want is to be awe-struck and completely unprepared when it emerges, fumbling needlessly in the dark as it dissipates and vanishes before your very eyes.
In this complete guide to photographing the Aurora in Iceland, we will help you to get equipped with everything you need to know about how to capture this elusive phenomenon before you even begin the chase, including the best time to see it, how to read the Aurora forecast, as well as what to wear, photographic equipment to bring and the best camera settings to use in order to produce your own breathtaking Aurora photographs.
What Causes the Aurora?
The Aurora may seem ethereal but there is actually a very scientific explanation behind its occurrence.
Basically, the Earth is surrounded by a magnetic field. When a ‘solar wind’ of particles emanates from the sun and penetrates this shield, it combines with atoms and molecules in the Earth’s atmosphere, creating colourful lights that can seemingly move across the sky.
The colours of these lights depend on what type of gases the discharged particles collide with. If the collision is with oxygen, then the result is green and yellow hues, whereas contact with nitrogen results in reds, violets and blues.

The Northern Lights are a complex atmospheric phenomenon. Photo by: 'Iurie Belegurschi'.
Although the Earth’s magnetic field deflects solar winds away from the atmosphere, the strength of the solar wind itself will affect the kind of Aurora that we see.
A weak solar wind means that the Aurora will be less prominent and not vary much in definition or colour. On the other hand, a strong solar wind will result in the Aurora swirling or dancing, even racing in columns fervently throughout the night sky.
Where to See the Northern Lights in Iceland?
Solar winds tend to be focused most intensely by the Earth’s magnetic field around the poles, therefore the best place to see the Northern Lights is within the Arctic Circle at a far-northern latitude between 60 to 74 degrees.
Iceland is situated at 66 degrees north, which makes it one of the few perfect places in the world where you can see and photograph this rather rare occurrence. Its unique environment, coupled with the Aurora, gives rise to a diverse range of options for photographers seeking to capture both original and extraordinary compositions.
 The Golden Circle in Iceland is one of the best places to see the Northern Lights. Photo by: 'Iurie Belegurschi'.
If you are able to get yourself to Iceland or another location within the Arctic Circle, then you will be in for a treat. The Aurora will appear to be directly overhead, even if it is only weak.
When the Aurora is overhead, it tends to be infinitely more stunning than when it is on the horizon. This is due to the low level of atmospheric interference, meaning that it will appear to be clearer and brighter, making it all the more photogenic.
Keep in mind though, that even if you are a few degrees outside of the Arctic Circle, you still still be able to see the Northern Lights - they will just appear to be further away, like a faint glow at the edge of the skyline.
The Best Time to See the Northern Lights
In Iceland, the Northern Lights are visible for approximately eight months a year. The best time to see them is during the dark autumn and winter period when the days are short, usually from early September to the end of April.
 You need dark skies and little light pollution to see the Northern Lights. Photo by: 'Iceland Photo Tours'.
Although the Aurora may be present during the daytime as well, it is only able to be seen and photographed when the sky is relatively dark. Therefore, it will not start to become visible until the sun sets.
The Aurora is typically at its most prominent near midnight, when the orientation of the Earth’s magnetic field is aligned with strong solar winds.
In the summertime, Iceland receives close to 24-hours of effective daylight. During this period, it is impossible to see the Northern Lights, as they are obscured by the brightness of the ‘Midnight Sun’.
Optimal Conditions for Photographing the Aurora
You will typically need a combination of luck, good weather and solar activity in order to photograph the Aurora at its finest. As a rule of thumb, avoid urban areas and man-made light sources, where light pollution will hamper your ability to see and capture the Northern Lights.
 Try to shoot the Northern Lights on a night when there is little moonlight. Photo by: 'Iceland Photo Tours'.
Coordinating your shoot to coincide with new moon cycles will help to reduce interference from moonlight. It is also best to head out on a somewhat clear night with little cloud coverage, to ensure maximum surface area in which to capture the Aurora in the sky.
Is There a Way to Predict the Northern Lights?
When planning your shoot, an excellent resource to refer to is the Aurora Forecast service on the Icelandic Met Office website, which includes a map of cloud coverage.
The forecast of auroral activity at midnight, on a ‘Kp-index’ scale of 0 to 9, is shown in the upper-right box. The Kp refers to a measure of global geomagnetic activity. The higher the Kp number, the more likely you will be able to see the Aurora.
 The Northern Lights are difficult to predict. Photo by: 'Iurie Belegurschi'.
Generally, a Kp of 4 or higher represents quite a lot of solar wind activity and means that you will be able to see the Northern Lights quite clearly with the naked eye.
Meanwhile on the map, shades of dark green refer to areas that are too cloudy, whereas white areas are clear. By combining data from the Aurora forecast and the cloud map, you will be able to plan ahead in order to ‘predict’ when and where you will most likely be able to see and photograph the Northern Lights.
Best Locations to Photograph the Northern Lights in Iceland
Just a little outside of Iceland’s biggest city, Reykjavík, the landscape becomes a photographer’s playground - rich with frozen Arctic tundra, sweeping waterfalls and impressive mountains - all of which are made more magical when illuminated by the captivating power of the Aurora.
One of the more interesting places to capture it is at Iceland’s iconic church-like mountain, Kirkjufell, on the north coast of the Snæfellsnes peninsula. There, you may be lucky enough to frame the Aurora seemingly exuding forth from its peak.
 Kirkjufell is one of the best places to photograph the Northern Lights. Photo by: 'Iceland Photo Tours'.
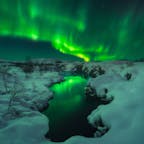
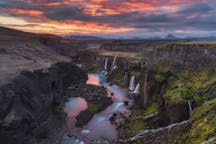
Another fascinating place to try your luck is at the majestic Skógafoss waterfall, which is easily-accessible in the dark. Be careful though, as you may find that the path leading to the waterfall can be frozen and quite slippery. At this location, you will have the opportunity to photograph the Aurora and stars lighting up the sky above, perhaps even swathing the waterfall below in brilliant green hues.
If you’re up for more of a challenge, then plan a visit to the famous Jökulsárlón glacier lagoon in the south - a large body of water that is usually resplendent with icebergs. There is the potential here for the glow of the Northern Lights to be mirrored in the water, making for an enthralling set of circumstances.
 The Jokulsarlon glacier lagoon is another great place to photograph the Northern Lights. Photo by: 'Iurie Belegurschi'.
Needless to say, the Northern Lights are a spectacle in themselves. So wherever you may be when they appear in the sky, whether you are in a famous location or not, be sure to have your camera ready to capture them in all their glory.
What to Bring
It will be winter during your visit to Iceland to shoot the Aurora and you will most likely be standing around for hours on end, outside, in the middle of the night. This means that it will be extremely cold and unless you are clothed appropriately, your body temperature will drop significantly.
In conditions such as these, it is absolutely essential that you wear the appropriate gear to ensure your safety and that you return home with spectacular photos to reminisce upon for years to come. Below, you will find a recommended packing list from clothing to photography equipment, which will assist you with planning your trip to shoot the Aurora.
Recommended Clothing
-
A thick thermal base layer.
-
A heavy fleece mid-layer.
-
A down coat top-layer.
-
Good quality warm gloves which will still enable you to operate your camera.
-
Water-resistant trousers (preferably thermal).
-
Thermal socks.
-
A neck-warmer or scarf.
-
An alpine mask to cover your face.
-
A good warm hat which covers your ears.
-
Water-proof, thermal, knee-high rubber boots.
-
Ice spikes or crampons to protect yourself from slipping on icy surfaces.
-
Headlamp.
Recommended Camera Gear
-
A digital camera, preferably a D-SLR with good low-light capabilities and clean high-ISO operation. Preferably weather-sealed.
-
A sturdy tripod that can hold your camera steady for long exposures, even in strong winds.
-
A fast ultra-wide angle lens such as a 14mm f/2.8. Faster lenses offer the advantage of letting in an extra 1-2 stops of light, meaning that you will be able to reduce your ISO and shutter speed for higher detail in your exposure. Prime wide lenses will allow you to capture as much of the sky as possible, though zoom lenses will give you more flexibility in framing. Take all filters off your lenses prior to shooting, including UV filters.
-
A remote trigger for your camera. This is necessary to prevent camera shake when pressing the shutter.
-
Two or more sets of extra batteries for all of your equipment.
-
Several large capacity, fast memory cards. You may find yourself shooting non-stop when the Aurora arrives, out of sheer excitement!
-
A reliable, waterproof camera bag.
Protecting Your Camera Gear in Arctic Conditions
 Make sure to protect your camera gear when photographing the Aurora Borealis. Photo by: 'Iurie Belegurschi'.
To ensure a long and trouble-free night of shooting the Aurora, it is essential that you protect your camera gear from the Arctic elements by treating it with proper care and storing it safely. Make sure that you maintain your camera gear in operational condition whilst you are in extremely cold weather by taking note of the following:
Prevent Condensation
If your camera gear is not weather-sealed, then it is essential that you transition from exceptionally cold environments to much warmer areas in a gradual fashion. Doing so will help prevent or reduce the amount of condensation that forms inside your equipment.
Condensation is usually harmless, though it can be annoying and problematic, particularly while you are trying to use your camera to capture images. You can reduce the risk of condensation forming within your camera body or lens by avoiding sudden changes in temperature. For example, if you are planning to move from the outdoors to the inside of your car, then first transfer your equipment to a camera bag that has also been outside. After you have closed the bag, move the bag and its contents into the warmer space. This will allow your camera to heat up, slowly and safely, inside the bag.
 You'll need to prevent condensation inside your camera when shooting in very cold temperatures. Photo by: 'Iceland Photo Tours'.
If you do accidentally end up with condensation inside your camera body or lens, then place the items near (not on) a heating source like a vent or heater inside your room. This will allow your equipment to defrost gently.
Strengthen your Tripod
The last thing you’ll want when you’re shooting the Aurora is for your entire rig to blow over while you are trying to capture that special shot. To make a lighter tripod sturdier, hang your camera bag from the tripod’s centre post. This will also help to reduce any camera movement as you take your exposure.
Keep your Batteries Charged
Arctic temperatures can take an enormous toll on battery life. To prevent them from draining too quickly, keep at least one or two sets of spare batteries warm inside an inner pocket of your outer or mid-layer.
If you see the power level of your batteries dropping, then replace them with fresh batteries before they go completely flat.
Make sure you have spare batteries for everything that you’ll be using, from your camera to your headlamp and remote trigger. Use Lithium-Ion batteries , as they tend to withstand Arctic temperatures better than others.
 Make sure to keep your batteries charged before you go out! Photo by: 'Edwin Martinez'.
Camera Settings for Photographing the Aurora
Photographing the Aurora, particularly if you have never even seen it before in real life, can be a daunting experience. You may find yourself struggling to compose in the dark and even have difficulty seeing or locating your camera settings.
Don’t let this be a deterrent because with the appropriate direction, you will be able to exercise your own creative vision to capture stunning photos of the Aurora during your visit to Iceland.
Turn your camera to Manual mode and follow these settings below to ensure sharp, properly exposed photographs of the Northern Lights. The rest of the creative process will be completely up to you.
Setting your Focus
It can be tricky to auto-focus on the environment when it is near pitch-black outside. The easiest way to do it is to switch your lens to manual focus and turn the focus ring to infinity.
If your lens is not able to be manually focused, then pre-focus to infinity during the daytime and mark out the point with a piece of tape so that you’ll be able to find it easily in the dark.
A better way to set your focus is to switch to Live View mode. Point your camera at a bright object in the distance, such as lights or stars, then magnify the object and carefully turn the focus ring on your lens until the object is as sharp as you can get it to be.
Aperture Setting
Aperture refers to the amount of light that is let into your camera by the lens. If there is not enough or even too much light, then you will not be able to properly expose your shot.
When shooting the Aurora in Iceland, adjust your aperture as wide as it will go. This will ensure that the maximum amount of light is able to enter your camera. Even if there seems to be only a slight tinge of colour in the sky, opening your aperture will result in your camera capturing a more vivid display of the Northern Lights than your eyes can see. You might be surprised with what you’ll be able to capture!
ISO Setting
Every camera has a different capabilities in low-light. When shooting the Aurora, selecting a low ISO such as 800 will reduce the risk of noise and ensure a crisp, smooth image. However, you may need to set your ISO as high as 6400, particularly if the Aurora is weak. A good starting point is at ISO 1600, from where you may adjust up or down, depending on the Aurora’s brightness.
Even a bright Aurora will still appear quite dark to the camera sensor, so make sure that you adjust your ISO accordingly.
White Balance
It is best to keep this in auto mode, as the white balance may be altered later in post-processing.
Shutter Speed
The Aurora can vary in its level of movement. Sometimes it can slow-dance across the sky. Other times, it will appear to move quite quickly.
To ensure the correct exposure, select a shutter speed below 20 seconds and use your histogram as a reference, making sure that none of the shadows or highlights are clipped. As long as there is no clipping, then you will have captured enough data within your photo to ensure an adequately exposed shot later on during post-processing.
Feel free to experiment and play around with the length of exposure time, depending on the strength of the Aurora. Keep in mind though that a shutter speed over 20 seconds will result in star movement.
RAW or JPEG?
For the best results when photographing the aurora, make sure to shoot in RAW. This will give you the cleanest images and record all of the data required for adjusting later in post-processing.
Composing and Shooting the Aurora
It’s as easy as setting up your tripod, composing your image and then clicking the button, right? You’ll actually be surprised by how difficult this can be to do in the dark.
A trick to ensuring a well-composed shot is to boost your camera’s ISO to the max and then take a brief 2-3 second exposure, which will allow you to understand what is in your frame. Once you have composed your shot, you can bring everything back down to the appropriate settings.
 Composition is important when you're photographing the Northern Lights. Photo by: 'Iurie Belegurschi'.
If you end up with a slightly overexposed or underexposed image, then experiment with a combination of the settings until you get the exposure that you want. Either shoot at a lower ISO to get cleaner files with greater dynamic range, or shoot a shorter exposure with faster shutter speed to capture more detail in the Aurora’s movement.
You can also try bracketing your exposures by shooting three shots at the widest aperture for 10, 20 and 30 seconds respectively. Doing this initially will allow you to capture different representations of the Aurora’s movement, so keep doing it until you see the effect that you like.
Creative Tips for Nothern Lights Photography
Now that you’ve learnt the basics, dare yourself to push the boundaries and get creative to ensure that you capture your own, unique experience when photographing the Aurora in Iceland.
Focus Stacking
When shooting at a wide aperture, you will find yourself exposing correctly for the Aurora but the landscape in the foreground may appear out-of-focus.
A trick to focusing is to take multiple exposures at varying focal distances, then to blend the photos later in post-processing. Start by focusing on the nearest object within the lower third of your camera grid, then slowly move your focus point to something further away until you have the entire frame in focus. Don’t forget to make sure that all four corners of your photograph are in focus.
- See also: Ultimate Guide to Focus Stacking
Shooting with a Person or Object in the Foreground
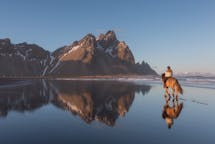
Placing a person within your frame can give the viewer a sense of scale and provide some perspective as to how it may feel to stand beneath the Northern Lights. You can also create certain moods, depending on what your person is doing within the shot and how bright the Northern Lights might be. For example, the person might have their back to the camera with their arms in the air, embracing the sheer intensity of a strong Aurora bearing down upon them.
On the other hand, you might like to frame the Aurora behind snow-covered spruce trees, giving the sense of nature on Earth reaching up towards its heavenly counterpart. There is no end to your creative vision, so make your composition as unique and exciting as you want it to be.
 Look for an interesting foreground when photographing the Aurora in Iceland. Photo by: 'Albert Dros'.
Catching Reflections
What’s better than capturing the Aurora dancing across the sky? Capturing it reflected symmetrically in a perfectly still body of water or ice below!
There are a number of locations in Iceland where you’ll be able to compose this kind of shot, so don’t be afraid to explore during the day, ensuring that you’ll be ready to capture the shot in the same location at night.
 Reflections give the Northern Lights another dimension. Photo by: 'Iceland Photo Tours'.
Staying Safe on the Aurora Chase
When travelling around Iceland during the winter, conditions can be quite treacherous. You will need to ensure that you bring along enough fuel for your car, chemical additives to prevent the fuel from freezing, jumper cables in case your engine doesn’t start and a tow rope in case your car happens to slide off an icy road and requires rescuing. It is also important to bring an appropriate supply of food, sleeping gear rated for Arctic temperatures, as well as medical supplies, on the off-chance that you do end up stuck somewhere, injured and far away from help.
- See also: Guide to the Aurora Forecast in Iceland
Guided Photography Workshops to Capture the Aurora
It’s easy to get caught up in planning to capture the moment but you really won’t want to miss your once-in-a-lifetime opportunity to see the Northern Lights with your own eyes. To reduce the risk of an Aurora chase going wrong, consider joining a guided photography workshop in Iceland.
By joining a guided Aurora photography workshop with Iceland Photo Tours, you will receive expert instruction on how to photograph the Aurora. You can also rest-assured in knowing that your safety is being placed first and foremost while you are being taken to the right place at the right time to capture some of the most intriguing photos of your life. Get ready for it by following the information contained in this Guide. Then, when you finally catch a glimpse of the elusive Aurora, you’ll be able to enjoy the sight as you photograph it, rather than letting it slip away from you.
About the author: Serena Dzenis is a landscape photographer based in Iceland. You can find more of her work on her website or by following her on Facebook and Instagram.
Are you ready to photograph the Northern Lights? Check out our 4-day Northern Lights and Ice Caves Photo Tour in the enchanting surrounds of Vatnajökull National Park in Iceland!