Ultimate Guide to Photographing the Moon

- Moon Phases
- New Moon
- Waxing Crescent
- First Quarter
- Waxing Gibbous
- Full Moon
- Waning Gibbous
- Last Quarter
- Waning Crescent
- Other Significant Moon Events
- What is the Supermoon?
- What is the Blood Moon?
- How to Plan and Capture a Picture of the Moon
- Moon Photography with a Foreground
- Distance
- Websites and Apps for Planning
- MoonCalc
- PhotoPills
- Camera Gear & Equipment
- Camera Settings
- Aperture
- ISO
- Shutter Speed
- Where to Set the Focus?
- Taking the Shot

I love photographing the moon. There’s something really exciting about just looking at it in the sky and imagining that you’re somewhere else. Although you might think it always looks the same, the moon is actually a very dynamic subject that can make for extraordinary astrophotography. When you combine it with elements or objects within the landscape, you can end up with a really artistic shot that will certainly draw attention.
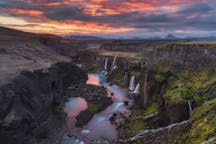
- Join us on this 11 Day Iceland in Autumn Photography Workshop
In this ultimate guide to photographing the moon, I’ll go through the different moon phases and explain what kind of camera gear is best for moon photography. I’ll also give you some pro tips for planning your shoot, including helpful apps you can use, the best settings to capture a picture of the full moon as well as how to photograph the moon with a foreground.
 A lot is involved in photographing the moon, so follow this guide for the best results. Photo by: 'Albert Dros'.
Moon Phases
You’re probably already aware that the moon goes through different phases. The way it appears to us on Earth depends upon which part of the moon is lit by the sun, where the moon is in relation to the position of the sun, as well as the Earth’s orbital position in relation to the sun.
There are eight moon phases in total, all of which will affect your photography differently. The first step to creating an image of the moon is to decide upon which phase you want to shoot.
New Moon
This is when the moon is completely shadowed by the sun. During the New Moon phase, you won’t be able to see the moon, meaning that there’s no point in heading out for moon photography.
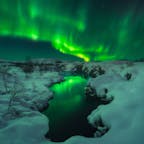
However, it is a great time for other types of photography, such as shooting the Northern Lights, photographing the Milky Way and making astrophotography time-lapses. Without the interference of moonlight, you’ll be able to see the stars and the Aurora Borealis much more clearly in the sky.
Waxing Crescent
This is when the moon appears to be partially lit from the bottom right side if you’re in the Northern Hemisphere, and from the left if you’re in the Southern Hemisphere. Basically, it’s the type of crescent-shaped moon that you probably drew or painted as a kid.
During the waxing crescent phase, the moon is visible from late in the morning until just after dusk. This is a great time for making otherworldly shots with a bit of daylight.
First Quarter
During the first quarter moon phase, 50% of the moon is lit, so it’s a good time to practice half moon photography. You’ll generally be able to see it from the afternoon into the early evening.
There will be just the right amount of light to illuminate the foreground while the sky will still be dark enough to bring out the stars.
Waxing Gibbous
This is when the moon looks like it’s almost full but it’s not quite there yet. During the waxing gibbous phase, the moon is visible from the late afternoon and throughout the rest of the night.
You can make quite ethereal shots of the moon when it is in this phase as it can appear to be quite mysterious, with just a hint of shadow yet to be revealed.
Full Moon
This is the phase that is most important for full moon landscape photography. When the moon is full, it means that it is 100% illuminated by light. You’ll be able to see it from sunset all the way through until sunrise.
This phase is great for photography as the glow of the moon will illuminate your foreground nicely. However, it can make capturing the stars a little difficult, as the amount of ambient light will mean that they’ll seem to fade into the sky.
Waning Gibbous
This is the opposite of the waxing gibbous phase. Again, the moon will appear to be almost full. It will be visible for most of the night until the early hours of the morning.
The side-lighting during this phase can produce shadows which make the craters of the moon much more interesting.
Last Quarter
This is the opposite of the first quarter moon phase. The moon will be 50% illuminated and be visible from late in the night until the morning. It’s a bit more difficult to shoot as there isn’t much of it, so you’ll need to align it with an element in the foreground to help it stand out in the sky.
Waning Crescent
This is the final moon phase before the cycle begins once more. The moon will be partially lit and be visible just before dawn into the early afternoon. It is much more challenging to try to photograph the moon during this phase as you’ll have less light to work with, though the resulting images can be enchanting.
Other Significant Moon Events
What is the Supermoon?
You’ve probably heard of some of the hype about the ‘super moon’. This is when a full moon comes as close to Earth as it can possibly get during its orbit. The result is that it seems to be larger than it usually appears.
Photographers love the supermoon because it happens a few times a year and it’s extremely fun to shoot, especially when you think of the endless compositions that you can use to demonstrate how big it looks!
What is the Blood Moon?
The blood moon is actually a total lunar eclipse. This is when the moon takes on a reddish hue and can be quite a spectacular thing to witness, let alone photograph! It only occurs once every few years, so if you get a chance to shoot this rare event, then you’d better be ready for it!
How to Plan and Capture a Picture of the Moon
 Plan how you'll capture the shot for the best results. Photo by: 'Albert Dros'.
Once you’ve decided upon which moon phase you want to shoot, it’s time to start planning out how you’ll capture the shot. For the purpose of this guide, I’ll be focusing on full moon photography because I really like how the moon looks when it’s big, glowing and rising in the sky.
Moon Photography with a Foreground
Whenever you take a picture of something in the sky, it’s a good idea to compose it properly so that you can give it some form of context. If you simply point your camera into the sky and photograph the moon, it’s impossible for your viewers to know how big the moon actually is or where the photo was taken.
This is where pre-visualisation comes into play.
The secret to taking a successful photo of the moon is to include some kind of foreground interest. You can do this easily by aligning the moon with a building or something else in the landscape, so think carefully about where you would like to take your shot and what kinds of objects are around that you might be able to use in the foreground.
 A foreground makes moon photography much more interesting. Photo by: 'Albert Dros'.
I’ve spent a lot of time exploring my neighbourhood, looking for possible compositions that I might be able to take advantage of in the future. One of the subjects that I found was the Amersfoort church tower, which I really wanted to use as a foreground to help demonstrate the size of a full moon. Eventually, I came up with two different compositions that I wanted to try to capture – one shot where the moon would be rising next to the tower and another shot where it would be aligned with the top of the tower.
 The St Nicholas church in Amsterdam is a great foreground for shooting the supermoon. Photo by: 'Albert Dros'.
I’ve also done a bit of exploring in Amsterdam, where I found the St Nicholas church. I decided that this church would be a great foreground for shooting something special, such as a supermoon, which I would photograph between the church towers as well as behind the steeple of the church for a more magical effect.
If you don’t have a building or another object that you can use as a foreground, then you can even use a silhouette of a person in front of the moon to give it that extra ‘wow’ factor.
Distance
Once you’ve got an idea of how you want to compose your shot, the next step is to think about the distance that you’ll need to stand away from your foreground subject in order to align it with the moon. The further away that you stand, the bigger the moon will appear to be.
You can achieve quite extreme effects by standing really far away and using a telephoto zoom lens! Somewhere between 700 metres to 2 kilometres away is a good distance, depending on your focal length. However, for more sharpness of detail, it’s better to stand a little bit closer.
 Knowing where to stand and at what distance is an important factor in moon photography. Photo by: 'Albert Dros'.
In my case, I wanted the moon to look big, but not so big that it would dominate the pictures. Rather, I wanted to balance the composition in my first shot of the moon with the Amersfoort church tower so that it would be situated in half of the frame, whereas in the second shot, I wanted it to appear to be sitting on top of the church tower without appearing to be too large or heavy.
 The supermoon at St Nicholas church. Photo by: 'Albert Dros'.
For the supermoon, I wanted an even more exaggerated effect, to make the moon appear to be even bigger when situated near the St Nicholas church.
In order to figure out where to stand to take your shot, you’ll need to do a few calculations. Don’t worry though, because there are websites and apps that make this step quite easy!
Websites and Apps for Planning
MoonCalc
One of the best websites out there for planning your moon photography is MoonCalc. This app detects the path of the moon, moonrise, moon culmination and moonset, while displaying azimuth and altitude information for a particular time. It’s really helpful for working out where the moon is going to be during the seconds, minutes and hours so that you can be fully-prepared and ready to take the shot when the moment happens.
The website is fast to use and accurate, which is exactly what you want when you are planning your shot.
To give you an idea of how this website works, here is a screenshot of the location of the Amersfoort church tower in relation to the position of the moonrise:
 MoonCalc is great for planning moonrises. Photo by: 'Albert Dros'.
Using this website, I was able to determine the following details which I’ve marked with numbers on the above diagram:
-
Moonrise would occur at this position at 21:09 PM.
-
This would be the position of the moon at 1 hour after the moonrise time, 22:09.
-
This would be where I’d stand to take the shot.
The pin that you can see is actually sitting on top of where the Amersfoort church tower is located. When you place a pin on the map, you have the benefit of being able to see where the moon will rise and what angle it will be at in relation to the subject that you are planning to shoot, so that you can work out exactly where you need to stand.
In my case, I had actually done some previous scouting, so I already knew that the moon would be at the right height for my shot close to 1 hour after the beginning of moonrise. I also knew that on this day, the 19th of July 2016, that the full moon would be rising close to the sunset time at 22:00, which would give me enough light to work with to illuminate the church tower itself. Basically, too much darkness would not allow me to capture any of the details of the church, therefore timing was of the essence!
Given that some locations closer to town meant that my view of the moon and the Amersfoort church tower would be blocked, I had to find a place to stand that was a little further out than I wanted to be. I actually figured out that I could stand on a roundabout near the city centre, which would provide an unobstructed view.
PhotoPills
If you prefer to use your smartphone, then I highly recommend that you download the PhotoPills app. The reason that I like to use it is because it has an amazing augmented reality (AR) function, which allows you to see in real time where the moon will rise from and where it will be during the moment that you’ll be taking your shot. There is even a great YouTube channel for this app where the team behind PhotoPills will teach you how to use it.
Here is a screenshot of the plan that I had for the supermoon:
 PhotoPills has a great AR function which allows you to see the path the moon will take around your subject. Photo by: 'Albert Dros'.
In addition to using PhotoPills, I also went to the location that I had in mind for taking this shot in order to ensure that I would have an unobstructed view of the church. Once I got there, I used the AR function of the app to see the path that the supermoon would take around the St Nicholas church.
The AR function is super easy to use and worth its weight in gold. All you have to do is to hold the phone out in front of you, select the date that you want to view information for, and voila! You’ll be able to view the path that the moon will take through the sky on that day.
Camera Gear & Equipment
When photographing the moon, you’ll need a telephoto lens that will give you enough focal length to compress the scene. I recommend using a lens within the 150mm-600mm+ range on a full frame camera.
You’ll also need a DSLR camera and a tripod to help keep everything sturdy, to ensure that you’ll end up with sharp, usable shots.
To further minimise camera shake, I suggest using a remote cable to release the shutter. That way, you won’t need to press the button and risk moving your camera.
For the Amersfoort church tower images, I used a Sony A7RII with a Sigma 150-600mm lens and a Sigma MC-11 adapter. In my opinion, this is one of the best lenses for moon photography.
When I photographed the supermoon at the St Nicholas church in Amsterdam, I used a 100-400mm with 3x extender, which gave me a range of 200-800mm on my camera.
It’s also a good idea to invest in a gear head for your tripod, which will allow you to make small, accurate adjustments in terms of tilting and panning with separate controls. These are much easier to use in-field for moon photography than ballheads, which can get a bit fidgety.
Camera Settings
Set your camera to manual mode before you shoot. This way, you’ll have full control over the camera settings. Keep in mind that the moon will rise and move through the sky very quickly, so you’ll need to be ready to change your settings if necessary at a moment’s notice.
Aperture
When photographing the moon, you want to aim for an aperture around f/8. This should give you a sharp image while letting enough light.
ISO
Once you’ve set your aperture, take a test shot. If you find that your image appears to be a little bit dark, then try increasing the ISO. Somewhere within the 200-400 range is good. The aim is to keep your ISO as low as possible to reduce the risk of noise.
Shutter Speed
When shooting the moon, you’ll want to keep your shutter speed shorter than 0.5 seconds. Keep in mind that the moon will be moving through the sky as you shoot, so it will be blurred with longer exposures.
Where to Set the Focus?
It’s not likely that you’ll be able to get both the moon and your foreground sharp and in focus. However, the difference should be negligible given the distance that you’re shooting from. In my shots, you can see that the foreground is in focus but the moon is slightly blurry.
 Choose the part of the image that will be the most important. This is where you should set the focus. Photo by: 'Albert Dros'.
When deciding where to set the focus, you need to choose the part of the image that will be the most important for your viewer to look at. While the moon will take up a big part of your shot, it’s actually the foreground which is giving it context, so make sure that you set the focus on your foreground subject.
Taking the Shot
Make sure that you get to your location and set up your camera gear at least an hour in advance, so that you’ll have time to prepare for your different compositions.
Once you’ve gotten your camera focused and ready, it’s time to capture the shot.
 The moon moves pretty quickly so be ready to take the shot! Photo by: 'Albert Dros'.
As I mentioned earlier, the moon will be moving through the sky pretty quickly, so you’ll need to concentrate in order to capture the images that you’ve pre-visualised. Basically, you’ll only have a few seconds to shoot before you’ll notice that the moon has moved.
A good trick that I use to combat the movement of the moon is to quickly lower my tripod, which changes the angle at which my camera and lens ‘see’ the moon. This gives me another chance at attempting to capture the shot, as the moon will appear to be lower in the frame before rising into its position again.
Now that you’ve got the lowdown from my ultimate guide to photographing the moon, it’s time to get out there and experiment! Practice makes perfect, so if you don’t get right the first time, then try again.
The great thing about this moon photography technique is that you don’t just have to be limited to moonrises. You can also use this technique to shoot moonsets, sunrises and sunsets with an interesting foreground subject. With a little planning and pre-visualisation, the possibilities are endless!
About the author: Albert Dros is a landscape photographer based in the Netherlands. You can find more of his work on his website or by following him on Facebook and Instagram.
Have you ever tried to photograph the moon? What kind of planning was involved and how did it turn out? Leave a comment below!