
The Exposure Triangle: Aperture, ISO & Shutter Speed Explained

- What is a Stop of Exposure?
- What Does ISO Stand for in Photography?
- Aperture and F Stops
- What is Shutter Speed and How Does it Work?
- The Exposure Triangle - How Aperture, Shutter Speed and ISO Interact
- Effects of Adjusting Each Element of the Exposure Triangle
- Slow Shutter Speed vs. Fast Shutter Speed Photography
- How Does the ISO Affect Exposure?
- What Does Aperture Do?

What is exposure in photography? Exposure is defined as the amount of light reaching the electronic sensor, or film. In more simple terms, it is how bright or dark the scene you are capturing is and how light or dark the resulting photograph will be. Exposure is determined by three elements: ISO, aperture, and shutter speed. These three elements directly interact with each other, creating what is known as the “Exposure Triangle”.
- Check out these 11 Tips to Help You Capture Stunning Landscape Photographs
- Join us on this Golden Myanmar | 12 Day Travel Photography Workshop
Learning how the Exposure Triangle works is important for any photographer who wants to improve their photography by using proper photographic techniques. In mastering the art of exposure, you can even reach new heights with your visual artistry. So stay tuned as we discuss ISO, aperture, and shutter speed in depth, so that you can fully understand how to use the Exposure Triangle, as well as how each variable can affect an image.
What is a Stop of Exposure?
Before we get into the three variables of exposure, you will hear and read about “stops” in photography, so let’s explain what a stop is.
A “stop” is the unit of measurement for the amount of light that makes up the exposure determined by the shutter speed, ISO, and aperture. For example, you can increase your exposure by one stop by increasing your ISO from 100 to 200, your shutter speed from 1/60th to 1/30th, or aperture from 11 to 8. These will all be an increase of one stop to the exposure, which would brighten your image by letting in more light.
Below is an example of a correct exposure, an underexposed image by two stops, and an overexposed image by two stops. I know this may seem overwhelming, but keep reading and we will get in depth to what each piece of the triangle means.
 A properly exposed image. Photo by: 'Sean Ensch'.
 The same image, 2 stops underexposed. Photo by: 'Sean Ensch'.
 The same image, 2 stops overexposed. Photo by: 'Sean Ensch'.
What Does ISO Stand for in Photography?
ISO (International Standards Organisation) is the standardised industry scale for measuring sensitivity to light. Originally, it referred to how sensitive film was to light, but now it refers to the camera’s digital sensor’s sensitivity to light.
Now what does sensitivity to light mean in the context of photography?
Put simply, the lower the ISO number, the less sensitive to light that your camera sensor will be. The higher the number, the more sensitive it is. An easier way to say this would be that a lower number ISO will not absorb as much light as a higher number, thus keeping an image darker.
In terms of stops, it is very easy to remember with ISO, as one full stop comes from doubling the number. For example, going from ISO 50 to ISO 100 is one full stop. When you increase from 50 to 100, you are doubling the amount of light being absorbed by the sensor which will increase the brightness of your exposure by one stop.
In contrast, if you decrease your ISO from 800 to ISO 400, you wlll be decreasing light sensitivity. This means that you'll be letting in less light, to your camera sensor which will make your image darker.
Aperture and F Stops
The definition of aperture in photography is the diameter of the opening of the optics that lets light travel through the lens to the sensor. The larger the opening, the more light that will be able to enter, thus increasing the brightness of your image.
Aperture is measured in f-stops such as 1.4, 2, 2.8, 4, 5.6, 8, 11, 16, 22, 32, and so on.
You may think that the larger the number, the more light that will enter your lens to brighten the image. However, with aperture, the opposite is the case. Your camera sensor will actually receive less light if you shoot at a larger f-number, such as f/16.
The lower the f-number, the greater the opening will be, meaning that more light will enter your lens. For example, an aperture of f/4 will allow much more light to enter than an aperture of f/5.6. This may seem strange compared to the simpler way of measuring the ISO, but it’s because these numbers are an approximate geometric sequence generated from the powers of the square root of 2. While you may find this confusing for now, it’s easy to remember once you spend some time working with it.
An example of how you might increase the exposure by using the aperture would be by switching f-stops from f/2 to f1.4, or f/22 to f/16. In these two cases, you would open the aperture up a little, thereby letting in more light to the camera sensor and brightening the exposure.
In contrast, if you were to switch your f-stop from f/8 to f/11, you would be decreasing the exposure by reducing the amount of light that is able to reach the sensor of your camera.
What is Shutter Speed and How Does it Work?
Lastly, we have shutter speed. Shutter speed refers to how long the shutter is left open to let light into the sensor and therefore is measured in seconds.
A good way to understand how a camera’s shutter works is to think of it as an eye opening and closing. When your eye is closed, it is letting in no light, then when you open it, it lets light in.
Shutter speed is similar to how long the eye stays open. The longer it is open, the longer that your camera sensor will be exposed to light, which will in turn brighten your image. Once the shutter opens, the light goes into the sensor, brightening the image more and more the longer it is open.
Now, increasing the shutter speed is somewhat akin to opening and closing your eyes at a faster speed also. When you use a faster speed, there is less time for light to enter through the shutter, which means that less light will ultimately reach your camera's sensor.
With that said, in order to increase one stop of exposure by using the shutter speed, you will have to decrease the shutter speed number value. For example, if your shutter speed is 1/60th of a second and you want to increase one stop of exposure, you will set your shutter speed to 1/30th, thereby doubling the amount of time that the shutter stays open. This will give you more time to let the light reach your camera's sensor.
Other examples include going from a shutter speed of 4 seconds to 2 seconds, 1/500th to 1/250th, 1/4000th to 1/2000th, and so on.
The Exposure Triangle - How Aperture, Shutter Speed and ISO Interact
Now that we have covered what each of the elements of the Exposure Triangle are, we can talk about how they interact with one another.
The aperture, shutter speed and ISO all directly affect one other when you are trying to achieve the right exposure. If your exposure is correct but you decrease one of the variables, then you must also increase one of the other variables in order to make up for it or your exposure will be off. This is because each of the three elements has a different effect on the final image. Here are a few example settings which may help you to understand this theory a little better.
You have a proper exposure at: Shutter: 1/500th, Aperture: f/11, ISO: 200
Now let’s increase the aperture by two stops from f/11 to f/5.6, thereby letting in more light with the larger (more open) aperture. When you do this, the image will be two stops overexposed, as you'll be letting in two more stops of light.
To compensate for adding the two stops to the aperture, you will need to subtract two stops of light from the shutter speed and/or from the ISO. To do this, you can either increase your shutter speed by two stops from 1/500th to 1/2000th (so that it is faster, thereby letting in less light), or you can decrease your ISO by two stops from 200 to 50 (this will decrease the light sensitivity of your camera's sensor, thereby letting in less light).
Each setting works together in unison, so if you take away from one setting, then you must add to another. The new values for the same properly exposed image may now either be: Shutter: 1/2000th, Aperture f/5.6, ISO 200, or Shutter: 1/500th, Aperture: f/5.6, ISO: 50 (depending on which variables you decide to change).
In this example, you can also subtract the added two stops of light from the aperture by removing one stop from shutter speed and one stop from ISO. This will give you the following values for a properly exposed image: Shutter: 1/1000th, Aperture f/5.6, ISO 100.
Effects of Adjusting Each Element of the Exposure Triangle
Now that you understand how the ISO, aperture, and shutter speed function together, let’s discuss how different values of each can affect the look of a photo. This is where the Exposure Triangle comes in handy when you want to achieve a certain artistic goal.
We now know that the shutter speed is the length of time that the sensor will be exposed to light, so how does shutter speed affect the way an image looks?
Slow Shutter Speed vs. Fast Shutter Speed Photography
When the shutter opens and exposes the sensor to the light, it is like the light is burning in the image onto the sensor. It is capturing that light to make an image for as long as the shutter remains open.
When you use a very fast shutter speed, you will freeze any movement in that image because the shutter stays open for such a short period of time.
On the other hand, whenever you use a slow shutter speed, movement will be dragged through the photo, creating blurs, sweeps and shakiness.
So what is the purpose of slow shutter speed photography?
Sometimes, in low light situations such as night photography, you will need really long shutter speeds to capture the ambient light. This is because there are limitations as to how high your ISO can go and how wide your aperture can open. Oftentimes with night photography, you may have to use shutter speeds of up to 15 seconds or longer, sometimes even several minutes long!
Aside from shooting at night, using slower shutter speeds instead of fast shutter speeds can also create completely different moods in your photos.
Look at the two images below of the waterfall: the first was shot at a fast shutter speed and the second was shot at a slow shutter speed.
 Faster vs. slower shutter speed. Which do you prefer? Photo by: 'Sean Ensch'.
This shift in only one of the settings of the Exposure Triangle completely changes the look and mood of the image. The first image with a faster shutter speed freezes the motion of the waterfall, so that every detail is captured. This gives the waterfall a sense of rawness, making it seem more real. The faster shutter speed emphasises the power of the water.
On the other hand, using a slower shutter speed in the second photo causes the movement of the water to blur. This creates a surreal and almost dreamy atmosphere. These are two very different moods which are the result of using different shutter speeds with the same, exact scene.
How Does the ISO Affect Exposure?
What is the difference between going from ISO 100 to ISO 1600? We know this would increase exposure by four stops of light, but how will that change the photo?
Whenever you increase the ISO, there comes a price. Shooting at lower ISO values will result in cleaner images. With film photography, a lower ISO stock will have less grain than a high ISO film and in the digital world, it is very similar.
When you use a lower ISO setting on your digital camera, your pictures will contain less “noise” than if you were to shoot with a higher ISO. Noise is essentially the digital version of grain, which is why shooting with a low ISO is desired in photography.
So why would anyone in their right mind shoot at a high ISO? Well, you might not want to but sometimes you have to.
An example of when you might use a higher ISO is when you are shooting in a dimly lit room or during dusk outdoors. In these situations, there is very little ambient light available to enter the camera's sensor. While you may open your aperture as wide as it can go and slow your shutter speed all the way down, sometimes these values may not be enough to obtain the correct exposure.
That’s where increasing the ISO comes in. Let’s say you are shooting a portrait of someone indoors at night with only a small lamp for light. Your aperture is wide open at f/1.8 (it’s the lowest f-stop available on your lens), while your shutter speed is set at 1/60th of a second (as slow as you can go before your photos get shaky while handholding your camera). At this point in time, you have your ISO set to 200, but you are three stops underexposed. What can you do?
In this case, you can increase your ISO by three stops to ISO 1600, in order to obtain the proper exposure. The change in ISO may result in a little more noise but you'll end up with a well exposed shot.
In the image below, you can see what noise looks like when shooting at ISO 10000 during the night.
 The Northern Lights over the Black Church of Budir in Iceland. Shot at ISO 10000 at night. Photo by: 'Sean Ensch'.
What Does Aperture Do?
Aperture controls the depth of field of a photo – that is, which objects will be in focus in an image. It creates a sense of distance between the nearest and furthest objects, depending on how much is in focus and how much is blurred.
The depth of field that you will be able to achieve depends largely upon the focal length of your lens, distance to subject that you're focusing on, as well as the almighty aperture setting. The more open the aperture (lower f-number), the shallower your depth of field will be and vice versa.
 A shallow depth of field is great for highlighting your subject from the foreground and background. Photo by: 'Sean Ensch'.
Changing the aperture setting is useful when you want your subject to really be in focus. For example, let’s say you are taking a photo of a person standing in a park and you really want them to pop out in the photo from the busy foreground and background. If you were to use a small aperture in this circumstance (high f-number), you would have almost everything around them in sharp focus. This can make your shot seem chaotic, with nothing to attract the viewer's eye from the mess.
By dropping your aperture down to f/1.8, you will be able to ensure that only your subject is in focus, while the foreground and background will be blurred, melting all of the distractions away.
Don't forget though that if you lower the aperture in the Exposure Triangle, then you will need to compensate by using either a faster shutter speed and/or lower ISO in order to achieve the correct exposure.
Another example of when you may want to change your aperture setting is when you are shooting a beautiful landscape out in nature. This time, rather than having blurriness in the shot, your aim is to have the entire foreground and background sharp. In this case, you will have to use a higher aperture, such as f/16, to ensure that everything is in focus.
 Shallow depth of field at f/2.8. You can see that the background is blurred, as well as some elements of the foreground. Photo by: 'Sean Ensch'.
 The same image shot at f/4. The background is less blurry, making it more of a distraction. Photo by: 'Sean Ensch'.
 The same image shot at f/22. Now the background and the foreground are in focus. It's much more difficult for the viewer's eye to fall on the subject. Photo by: 'Sean Ensch'.
Now that you've got the basics of the Exposure Triangle under your belt, you'll hopefully have a better understanding of the technical settings of your camera, as well as how to use them to improve your photography. The best way to fully grasp the concept of exposure is to go out and start taking some photos. Shift your settings around so that you can see how different values can give your photos different looks and moods. That’s where the artistry and fun comes in to photography. Happy shooting!
About the author: Sean Ensch is a landscape photographer based in the USA. You can find more of his work on his website or by following him on Facebook and Instagram.
Get outside into the great outdoors and practice your photography in-field! Join one of our photography tours and workshops in Iceland. It's the best place to improve your photography skills.


Other interesting articles

What is Aperture? An Introduction to Aperture in Photography
When you’re just starting out with photography it’s important to know how your camera works. Aperture is an important part of the exposure triangle (shutter speed, ISO and aperture). It partly deter...Read more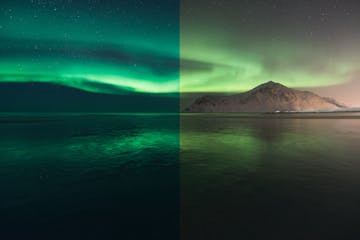
Understanding White Balance in Photography
White balance is one of the most important yet less-considered settings of a camera when it comes to producing compelling images. A slight change towards a warmer or a cooler colour temperature can...Read more
Ultimate Guide to Blue Hour Photography
The sun hasn't risen yet but you are starting to clearly see the details of the landscape; the shapes and lines that were swathed in shadows are finally becoming familiar again, while the night has...Read more


