
Depth of Field in Photography


As you start out in photography, you may begin to wonder about some of those beautiful smooth portraits that you sometimes see online. The background is beautifully blurred and sometimes the foreground objects are very smooth as well. These photos have been taken using a shallow depth of field with a lens that has a fast aperture.
- Find out What is Aperture? An Introduction to Aperture in Photography
- Discover this Culture & Landscape Photography Tour in China's Fujian Province
Knowing this, how can you apply it to improve your own photography? In this article, we’ll teach everything you need to know about depth of field, including what it is, the different effects that you can achieve and how to know what depth of field to use in real life situations.
What is Depth of Field?
Depth of field (DoF) is the area that appears sharp in your photo. It’s usually measured as a focus plane that doesn’t simply cut off on both ends but has a smooth transition from sharp to unsharp (or 'in-focus' to ‘out-of-focus’). This field is different for every photo and depends on the properties of your lens, sensor and camera settings (mainly the aperture).
When you use the focus on your camera (you’ll probably mostly use autofocus), the camera locks its focus on a single point. From this point, the field of focus starts and fades out into out-of-focus on both the front and back, depending on the factors mentioned above. When you see portrait photos with a very blurry background, they have mostly been taken by using a ‘shallow’ DoF. A shallow DoF means that the field that is in focus is very narrow.
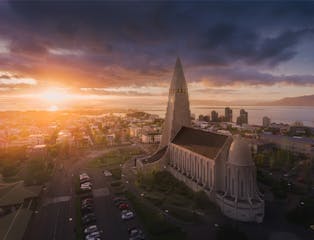
 An example of depth of field. Photo by: 'Albert Dros'.
The Effect of Aperture on Depth of Field
So how do you get those blurry backgrounds or foregrounds? There are a couple of ways to achieve this look. The most important setting on your camera to keep in mind is the aperture. By using a wide open aperture (low f-stop number), you can create a shallow DoF. However, it really depends on your lens how far you can go.
If you’re just starting out and only have the kit lens of your camera, then it isn't likely that you'll be able to achieve super blurry backgrounds because your lens may not be ‘fast’ enough. What we mean by this is that your lens may not be able to shoot at very big apertures (think of f/2, f/1.8 or f/1.4 for example) because kit lenses are usually relatively cheap and slow.
If you’re interested in making portraits with a blurry background, then I recommend that you buy a lens with a faster aperture. You’ll benefit from a prime lens, as they’re generally cheaper and can offer much faster apertures than zooms. Look for a 50mm prime lens with f/1.8 or f/2 apertures. They’re relatively low in price and can give you that look you want.
To achieve the blurry background, put your lens on the lowest f-stop number that is possible (meaning your lens will be wide open and receive a lot of light). Now you’ll get the most shallow DoF you can get with your lens. Simply by changing the aperture, you can change the blurriness of the foreground. The preference is up to you.
Of course, when you’re changing your aperture, you’ll have to change your shutter speed with it to make up for a correctly-lit exposure. If you don’t want to bother too much with that, simply put your camera on Aperture Priority mode and the camera will change the shutter speed by itself, so your picture will still have the same brightness.
 A portrait with a blurry background. Photo by: 'Albert Dros'.
In this image above, we have a recognisable background of the skyline of Dubai with the Burj Khalifa. The model is separated by using an aperture of f/2.8. But because we want people to still recognise the background, it’s not blurred out too much (with an aperture of f/1.4 for example). Sometimes, you don’t need that much blur!
Subject Distance
Another way to change the DoF of your image is to change the distance at which you photograph your subject. By doing that, you can change your focus point. The shorter the distance, the shallower the DoF.
Try getting very close to a subject, up to a point that your camera can barely focus. You’ll see that your background gets very blurry. This is, of course, difficult with portraits because you don’t want to be a few centimetres away from your subject. But for other cases, like photographing a flower for example, getting very close can be great to get that dreamy effect. It also really depends on the focal length of your lens.
 Dreamy effect with a flower. Photo by: 'Albert Dros'.
In this image above, I went super close to the tulip with a fast wide angle lens. Shooting wide open at f/1.4 with minimum focus distance, I created this very dreamy image with both the front and background completely blurred out. Even the tulip itself is not completely in focus (the back is out of focus). This is how you can create very dreamy images.
Focal Length
So how does the focal length of your lens affect DoF? The longer the lens you use, the shallower the DoF. This is because you magnify the object from a distance.
So when you are using a rather ‘slow’ zoom lens that does not allow you to set a very fast aperture, you can zoom in as much as possible (think of zooming in to 200mm with a 70-200mm lens at f/4 or slower) and then move away from your subject until you get the framing you need. By using the long lens from a long distance, you can get a shallow DoF behind your subject. Try it out!
 Shallow depth of field using a telephoto lens. Photo by: 'Albert Dros'.
This image above was shot at f/5.6 – an aperture that is not that fast. But it was shot at 300mm. So even at f/5.6, if the focal length is long enough, you can still get beautiful separation. You can separate objects by standing far away and using a long lens. In this case, you don’t need a super fast aperture.
Sensor Size
The sensor size of a camera also has an effect on DoF. Full frame sensors have a shallower DoF than smaller sensors (think of micro four thirds or APS-C cameras). This is why it’s easier to achieve a shallow DoF by using cameras with a full frame sensor.
If you’ve ever used a medium format camera, it’s even easier, but sometimes also difficult! Think of shooting a landscape photo at f/8 where you focus on something in front and the background is out of focus. This is something we don’t normally get, but when using medium format you’ll have to be very careful with your DoF and focusing.
Another interesting thing to note here is that smartphones take super tiny photos but these days, they are able to produce images with great background blur. This background blur is actually not ‘real’. It's being generated with algorithms that detect the main subject (often a face) and then artificially blur out the rest of the frame. You’ll see this when sometimes the phone doesn’t do a 100% good job and there will be some artefacts on the edges. This is because optically, the tiny sensor of your phone is not able to produce such a small DoF. It does it artificially but often does an amazing job these days. Technology is very impressive.
But back to using full frame vs APS-C and micro four thirds sensors. If we’re looking at the same effective focal length, there is a difference in DoF. Full frame will be much shallower than crop sensors and that's why most portrait photographers prefer using full frame cameras.
Live View DOF with Mirrorless vs DSLR
These days, a lot of cameras are mirrorless and use Live View. The great advantage of using Live View mode is that you can see your DoF in real time. If you’re using a traditional DSLR camera and look through your viewfinder, you won’t see the effect your current set aperture has on your photo until after you took the shot.
Seeing the DoF change in real time in Live View is a nice advantage, as you can quickly compare apertures to see which one looks the best for your shot. Some DSLR cameras have Live View function where this is possible as well, but definitely not all of them do.
Knowing What Depth of Field to Use
DoF can be very important in photographs and can really make or break them. It is important to be aware of different techniques that are used to either smooth out the DoF or make things completely sharp. It’s very tempting to completely blur out everything when you start out with photography, especially portraits, but this is not always the ‘best’ way to take a photo.
Sometimes, you want to see more from the background in order to have some context. Also, portrait lenses these days often have a maximum f/1.2 or f/1.4 aperture. By working with these fast apertures, you can get the eyes of your model in focus, but by shooting at such a fast aperture you’ll already get the nose out of focus. The DoF is just THAT shallow. If you want to go for that look then it's perfectly fine, but sometimes you’ll want to stop down your lens a little bit to f/2 or f/2.8 to get a bit of a more ‘natural’ look instead of very dreamy. It’s of course up to your own preference.
In landscapes, DoF can be used in great ways to focus on the main subject. By using not only background blur, but also a lot of tricks regarding foreground blur, you can really bring focus to the main subject. Front blur in DoF is a great technique to use in landscape photography.
 Blurry stones near an iceberg in the distance. Photo by: 'Albert Dros'.
In the above image, DoF is creatively used to get beautiful front blur bokeh of the sun reflecting on the stones. By focusing on the ice in the back and using a large aperture of f/2.8, the focus plane gets very narrow, creating an interesting foreground effect.
Knowing how to use DoF is crucial in photography. However, don’t be afraid to experiment and try out different things. Getting creative with DoF can be a lot of fun!
Examples of Depth of Field
Moon in Amsterdam
 Moon in Amsterdam. Photo by: 'Albert Dros'.
In this example, a narrow aperture of f/14 was used to get everything ‘in focus’. If you look closely, the moon is actually slightly out of focus. This was almost impossible to prevent as I was shooting from a distance of around 1km with a 450mm lens. The distance from the church and the moon is infinite. By focusing on the church, the moon would always be slightly out of focus. However, by narrowing the aperture, the sharpness of the moon is still very acceptable. This is a good example of why you don’t always want to use a large aperture.
- See also: Ultimate Guide to Photographing the Moon
Curved Lane
 Dreamy lane. Photo by: 'Albert Dros'.
In this image I used multiple techniques to get a creative result. It was shot at 330mm very close to the ground. The aperture was quite fast resulting in a very blurry foreground and even the background is slightly out of focus. By using the zoom to emphasise on the curve in the road, and using a faster aperture, I could put the focus on the light rays and trees in the middle. Playing with aperture and long focal lengths is a lot of fun!
- See also: Ultimate Guide to Forest Photography
Different
 Tulip shot at 400mm. Photo by: 'Albert Dros'.
In flower fields, you’ll often find flowers that are just a bit different than the others. This was shot at 400mm! The background and foreground blur still look very soft and dreamy, even though the aperture was only f/5.6. This technique is a great way to pull out subjects if you don’t have a fast wider lens.
Peeking Through

Getting creative with compositions can be fun. For this image, a very narrow aperture of f/22 was used to get both the surrounding tree branches in focus combined with the backdrop of the mountains. On top of that, the f/22 aperture also created a bit of a sunstar.
- See also: Patagonia Photo Workshops
 Changing your depth of field can really change the atmosphere of your images. Photo by: 'Albert Dros'.
The same technique was used here, but instead of using a very narrow aperture, a wide open aperture was used to put immediate focus on the subject. By using the wide open aperture, it really brings you in the photo and really intensifies the focus point. Try out both narrow and wide if you’re not sure what to use!
About the author: Albert Dros is a landscape photographer based in the Netherlands. You can find more of his work on his website or by following him on Facebook and Instagram.
Learn all about depth of field and aperture with our expert photography guides in Iceland. Join one of our autumn photography tours!


Other interesting articles

A Beginner’s Guide to Exposure for Landscape Photography in Iceland
Let’s talk about exposure. It’s a concept that can be difficult to get your head around, particularly if you’ve already been confused by the numbers and jargon associated with photography! Basically...Read more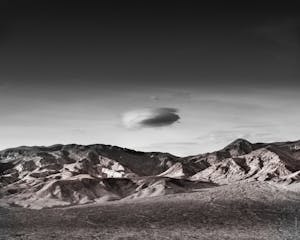
How to Use the Graduated Filter Tool for Landscape Photography
Of all the editing tools at our disposal, across a wide range of software for post-processing, there’s likely not one that has bailed many a landscape photographer out of a jam than the graduated fi...Read more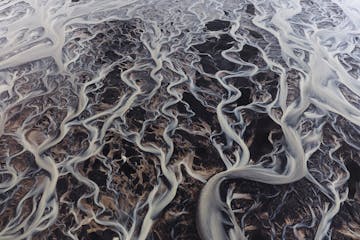
How to Use Leading Lines for Better Compositions in Landscape Photography
Leading lines are one of the simplest and most powerful tools for creating high impact landscape photos. They can mean the difference between what is a mundane snapshot versus a truly engaging photo...Read more


